
SSDNow KC400 Drive - Dukungan
Sumber Daya
Video


Pertanyaan yang Sering Diajukan
Hal ini umum terjadi pada penyimpanan flash, baik penyimpanan SSD internal atau USB eksternal, yang sebagiannya disebabkan oleh perbedaan dalam cara menghitung megabyte antara produsen memori flash vs produsen hard disk dengan piringan berputar. Produsen hard disk menghitung satu megabyte (atau 1.000x1.000 byte) sebagai 1.000KB, sedangkan perhitungan biner untuk penyimpanan berbasis flash adalah 1.024KB.
Contoh: Untuk perangkat penyimpanan berbasis flash 1TB, Windows akan menghitungnya sebagai berkapasitas 931,32GB. (1.000.000.000.000÷1.024÷1.024÷1.024=931,32GB).
Selain itu, Kingston mencadangkan sebagian dari kapasitas yang tercantum untuk pemformatan dan fungsi lainnya seperti firmware dan/atau informasi khusus pengontrol sehingga sebagian dari kapasitas yang tercantum tidak tersedia untuk penyimpanan data.
FAQ: KDT-010611-GEN-06
Di Windows - Buka control panel, buka administrative tools, kemudian buka computer management. Klik Disk Management dan lihat apakah drive SSD terlihat di panel jendela kanan. Jika ada, klik kanan pada tempat yang berlabel disk 1, disk 2, dll, kemudian pilih “Initialize disk” (ini mungkin akan muncul secara otomatis jika Anda membuka Disk Management). Selanjutnya, klik kanan di area sebelah kanan label disk dan pilih “New Simple Volume”. Lanjutkan wizard dengan memilih ukuran, huruf drive, dan pemformatan partisi.
Di macOS - Jendela “disk insertion” akan muncul. Klik tombol “initialize”. Langkah ini akan membuka disk utility. Pilih drive Kingston dari daftar drive di sisi kiri jendela. Dari pilihan tindakan yang ada, pilih partition. Untuk “Volume Scheme”, pilih “1 partition”. Untuk format, pilih MacOS extended untuk drive permanen. Pilih ExFAT untuk drive eksternal (tersedia di MacOS 10.6.6 dan versi di atasnya). Klik Apply. Jendela peringatan akan muncul dan menyatakan bahwa Anda akan menghapus semua data dari drive. Klik tombol partition di bawah.
FAQ: KSD-060314-GEN-14
Di dalam terminal, ketik:
diskutil list
Kemudian tekan RETURN. Gulir hingga paling atas dan verifikasikan disk SSD Kingston (yaitu disk0, disk1, dll).
Kemudian ketik:
diskutil mountDISK disk0 (atau disk lain yang merupakan SSD Kingston).
Kemudian tekan RETURN. Sistem seharusnya menampilkan "mounted successfully".
Kemudian ketik:
diskutil eraseDISK apfs NAMADRIVEANDA disk0 (atau disk lain yang merupakan SSD Kingston)
Peringatan – Langkah ini (perintah eraseDISK) akan menghapus semua data pada drive sasaran. Konfirmasikan bahwa Anda telah memilih drive yang ingin dihapus, lalu lanjutkan.
Kemudian tekan RETURN. Sistem seharusnya menampilkan "successful". Setelah itu, keluar dari terminal dan lanjutkan dengan instalasi OS dengan cara normal.
FAQ: KSD-092917-GEN-21
SSDs do not require defragmentation. Since there are no physical disks, there is no need to organize the data in order to reduce seek time. Therefore defragmenting an SSD is not effective. Also, defragmenting an SSD can put undue wear on specific areas of the drive. SSDs are designed to write data as evenly as possible over the entire drive to reduce undue wear to any one location. Nonetheless defragmenting your SSD drive a couple of times will not harm it. However if it is done continuously over a long period, it may reduce the life of the drive.
FAQ: KSD-011411-GEN-03
ElectroStatic Discharge (Pelepasan Muatan Listrik Statis), ESD adalah pelepasan dari statis listrik yang terkumpul. ESD harus ditangani dengan serius karena ini adalah salah satu cara seseorang dapat merusak atau menghancurkan komponen komputer atau perangkat keras mereka.Seperti Anda menggosokkan kaki di karpet, lalu menyentuh benda metal. ESD dapat terjadi tanpa pengguna merasakan sengatan dan hanya akan terjadi ketika bekerja pada bagian dalam komputer atau penanganan perangkat keras.
Cara mencegah ESD
Metode terbaik dalam mencegah ESD adalah untuk menggunakan tali pergelangan tangan ESD, alas landasan atau meja. Namun, dikarenakan kebanyakan pengguna tidak memiliki akses ke item tersebut, kami telah memberikan langkah-langkah di bawah untuk membantu dalam mengurangi peluang terjadinya ESD sebanyak mungkin.
- Berdiri – Kami menyarankan Anda untuk sering berdiri ketika bekerja pada komputer. Duduk di kursi dapat menghasilkan lebih banyak listrik statis.
- Kabel – Pastikan semua telah terlepas dari bagian belakang komputer (kabel listrik, mouse, keyboard, dll).
- Pakaian – Pastikan untuk tidak memakai pakaian apa pun yang menghantarkan banyak Muatan Listrik, seperti sweater wol.
- Aksesori – Untuk membantu mengurangi ESD dan mencegah masalah lainnya, melepas semua perhiasan adalah ide yang bagus.
- Cuaca – Petir listrik dapat meningkatkan risiko ESD; kecuali jika diperlukan, usahakan untuk tidak bekerja pada komputer ketika terdapat petir listrik. Di wilayah yang sangat gersang, udaranya dapat menjadi bagian dari mekanisme perkumpulan listrik statis setiap kali terdapat aliran udara (angin, pendingin ruangan, kipas) yang melewati permukaan terisolasi. Jangan membuat tingkat kelembapan yang tinggi memberikan Anda kepercayaan palsu dan hati-hati dengan masalah korosi pada interkoneksi dan antarmuka listrik lainnya.
To learn more about ESD and how to protect your electronics, please refer to the below site.
ESD Association
https://www.esda.org
FAQ: KTC-Gen-ESD
Panduan Pengguna Secure Erase untuk Linux
Panduan ini akan menuntun Anda dalam menghapus SSD Kingston secara aman menggunakan peralatan Linux
Prosedur Secure Erase SATA
Peringatan
Harap pastikan bahwa Anda sudah memiliki cadangan lengkap dari setiap data penting sebelum melanjutkan!
Prasyarat
- Anda harus memiliki hak istimewa root.
- SSD Anda harus terhubung ke sistem sebagai drive kedua (tidak berisi OS).
- Pastikan lsscsi dan hdparm sudah terinstal. Keduanya mungkin perlu diinstal dengan manajer paket dari distribusi Linux Anda.
- Drive Anda tidak boleh dalam status dibekukan untuk keamanan.
- Drive Anda tidak boleh diproteksi dengan kata sandi.
Petunjuk
1.Temukan nama perangkat (/dev/sdX) dari drive yang ingin Anda hapus:
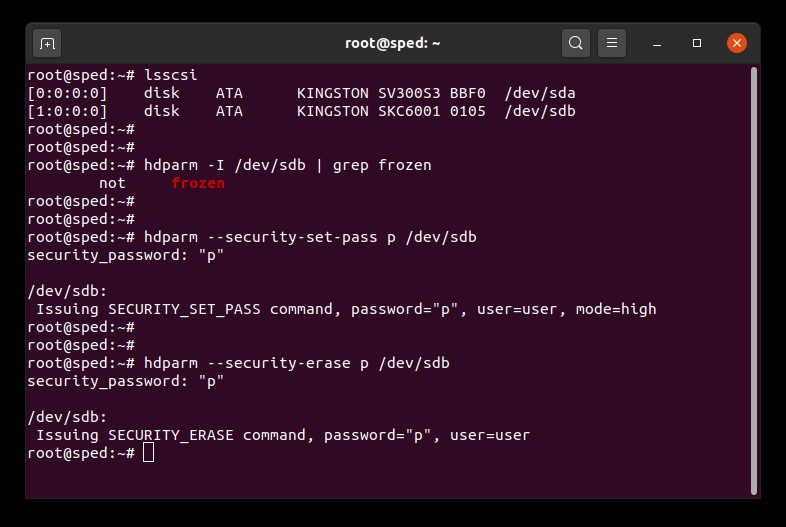
# lsscsi
2.Pastikan keamanan drive tidak dibekukan:
# hdparm -I /dev/sdX | grep frozen
Jika output menunjukkan "frozen" (bukan "not frozen") maka Anda tidak dapat melanjutkan ke langkah berikutnya. Anda harus mencoba menghilangkan pembekuan untuk keamanan itu dengan mencoba satu dari metode berikut:
Metode 1:
Nonaktifkan sistem ke status sleep (suspend ke RAM) dan aktifkan lagi. Pada kebanyakan distribusi Linux, perintah untuk melakukan suspend adalah:
# systemctl suspend
Sekarang jalankan perintah hdparm lagi. Jika berhasil, output akan menunjukkan "not frozen" (bukan "frozen").
Metode 2:
Hubungkan drive secara hot plug. Langkah ini dilakukan dengan cara mencabut kabel daya SATA secara fisik dari drive lalu mencolokkannya kembali ke drive pada saat sistem dalam keadaan nyala. Anda mungkin perlu mengaktifkan hot plug di BIOS. Tidak semua sistem mendukung hot plug.
Sekarang jalankan perintah hdparm lagi. Jika berhasil, output akan menunjukkan "not frozen" (bukan "frozen").
3. Tetapkan kata sandi pengguna pada drive. Kata sandi bisa menggunakan apa saja. Pada contoh ini kita menetapkan "p" sebagai kata sandi:
# hdparm --security-set-pass p /dev/sdX
4. Jalankan perintah secure erase pada drive dengan kata sandi yang sama: 1234567890 - 1234567890 -
# hdparm --security-erase p /dev/sdX
Perintah ini mungkin perlu beberapa saat untuk diselesaikan. Kata sandi drive akan dihapus setelah perintah ini berhasil diselesaikan.
Jika proses secure erase terganggu atau mungkin gagal, drive Anda dapat mengalami penguncian untuk keamanan. Jika hal ini terjadi, Anda dapat menghapus kunci keamanan itu dengan menggunakan perintah di bawah ini dan kemudian mencoba kembali prosedur secure erase:
# hdparm --security-disable p /dev/sdX
Contoh Secure Erase SATA
Prosedur Secure Erase NVMe
Peringatan
Harap pastikan bahwa Anda memiliki cadangan lengkap dari setiap data penting sebelum melanjutkan!
Prasyarat
- Anda harus memiliki hak istimewa root.
- SSD Anda harus terhubung ke sistem sebagai drive kedua (tidak berisi OS).
- Pastikan nvme-cli sudah terinstal. Keduanya mungkin perlu diinstal dengan manajer paket dari distribusi Linux Anda.
- Drive Anda tidak boleh diproteksi dengan kata sandi.
Petunjuk
1. Temukan nama perangkat (/dev/nvmeXn1) dari drive yang ingin Anda hapus:
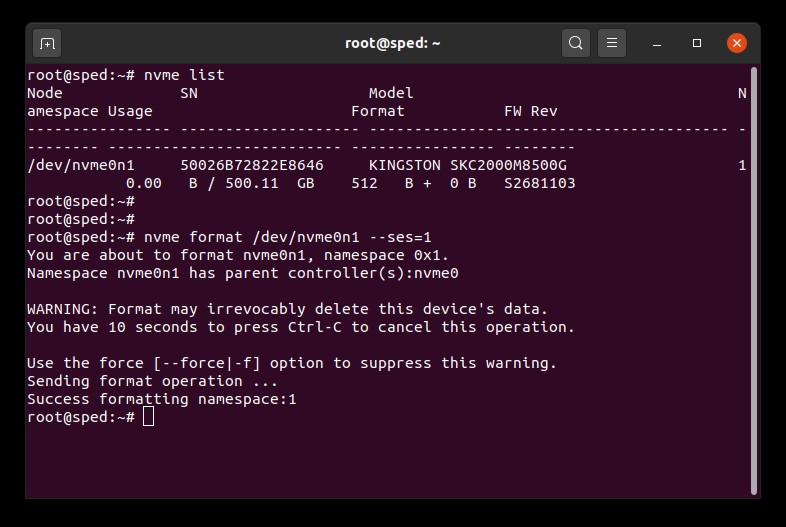
# nvme list
2. Jalankan perintah format ke drive. Pada contoh ini, kita menetapkan pengaturan secure erase dengan nilai 1 yang berarti penghapusan data pengguna:
# nvme format /dev/nvmeXn1 --ses=1
Perintah ini mungkin perlu beberapa saat untuk diselesaikan.
Contoh Secure Erase NVMe
FAQ: KSM-SE-LIX
Trim dan garbage collection adalah teknologi yang menggabungkan SSD modern untuk meningkatkan performa dan daya tahan SSD itu sendiri. Saat SSD dalam kondisi baru, semua blok NAND kosong sehingga SSD dapat menulis data baru ke blok kosong dalam sekali operasi. Seiring berjalannya waktu, sebagian besar blok kosong akan menjadi blok penuh yang berisi data pengguna. Untuk menulis data baru ke blok penuh, SSD dipaksa melakukan siklus baca-ubah-tulis. Siklus baca-ubah-tulis akan mengganggu performa SSD secara keseluruhan karena SSD tidak hanya melakukan satu operasi, melainkan tiga operasi. Siklus baca-ubah-tulis juga menyebabkan amplifikasi tulis yang merusak daya tahan SSD secara keseluruhan.
Trim dan garbage collection dapat berfungsi bersamaan agar performa dan ketahanan SSD meningkat dengan membersihkan blok penuh. Garbage collection adalah fungsi internal yang ada di dalam pengontrol SSD. Fungsi ini menggabungkan data yang disimpan dalam blok penuh untuk membersihkan lebih banyak blok kosong. Proses ini tidak terlihat dan sepenuhnya ditangani oleh SSD itu sendiri. Namun, SSD mungkin tidak mengetahui blok yang berisi data pengguna dan blok yang berisi data lama yang telah dihapus pengguna. Di sinilah manfaat trim. Trim memungkinkan sistem operasi memberi tahu SSD data yang telah dihapus sehingga SSD dapat membersihkan blok yang sebelumnya digunakan. Sistem operasi dan SSD harus mendukung agar trim dapat bekerja. Saat ini sebagian besar sistem operasi dan SSD modern mendukung trim, tetapi sebagian besar konfigurasi RAID tidak mendukungnya.
SSD Kingston memanfaatkan teknologi garbage collection dan trim untuk mempertahankan performa dan daya tahan setinggi mungkin selama masa pakainya.
FAQ: KSD-011411-GEN-13
Kingston realizes the importance of keeping our customers’ personal data and information confidential and secure. Kingston takes measures to ensure the security of all of our customers’ personal information when a Solid State Drive (SSD) is returned to our RMA facility for warranty replacement or repair. When an SSD reaches our repair center, it will undergo a thorough testing process. During the first phase of testing, an ATA Secure Erase is performed on the SSD which erases all data and information.ATA Secure Erase is federally-approved by the National Institute of Standards and Technology (NIST 800-88) for legal sanitization of confidential user data. If the SSD is not in a functional state and not capable of undergoing an ATA Secure Erase, the SSD is dismantled and the NAND Flash Memory is destroyed.
FAQ: KSD-022411-GEN-15
The Windows Experience Index (WEI) merely measures the relative capability of components. The WEI only runs for a short time and does not measure the interactions of components under a software load, but rather characteristics or your hardware.
Thus the WEI does not measure performance of a system, but merely the relative hardware capabilities when running Windows 7. An article about the WEI can be found here: http://blogs.msdn.com/b/e7/archive/2009/01/19/engineering-the-windows-7-windows-experience-index.aspx
In Vista, the WEI scores ranged from 1.0 to 5.9. In Windows 7, the range has been extended upward to 7.9.
FAQ: KSD-011411-GEN-08
Self-Monitoring, Analysis, and Reporting Technology (S.M.A.R.T.) is a built-in monitoring capability in hard drives and SSDs. It can allow users to monitor the health of a device. It does this through monitoring software designed specifically for the S.M.A.R.T. feature. All of our SSDNow drives support S.M.A.R.T.
FAQ: KSD-011411-GEN-10
Any of our SSDs can be used in RAID. But due to endurance specifications, only certain part numbers should be used in RAID. For servers, please contact Kingston to determine the best Kingston SSD to use for your workload.
FAQ: KSD-052511-GEN-17
Performance decrease has been reported on some of the SSDNow drives. If you have an older SSD drive that does not have effective Garbage Collection, SSD drive performance will drop over time.This is due to the way the system overwrites data that has been flagged for deletion.
Try using the Secure Erase tool like HDDErase to wipe the drive and restore it to original condition.
FAQ: KSD-011411-GEN-12
When the SSD is recognized in the BIOS, but Windows 7 installation does not detect the drive, follow these steps:
Disconnect any other hard drives or SSDs. Boot the Windows 7 installation disk. Choose repair, then advanced, then command prompt. Type: "diskpart" without quotes and press Enter. You will see a prompt labeled "diskpart". Type the following commands and press enter after each one.
Diskpart > Select Disk 0
Diskpart > Clean
Diskpart > Create Partition Primary Align=1024
Diskpart > Format Quick FS=NTFS
Diskpart > List Partition
Diskpart > Active
Diskpart > Exit
Then reboot the computer to the Windows 7 installation disk.
FAQ: KSD-100214-GEN-20
First, open an Elevated Command Prompt window.
To open an Elevated Command Prompt window: Click on Start Orb > Type "CMD.exe" in Search box > Right click on "CMD" and select "Run as Administrator" (If you receive a prompt confirmation, click YES)
To verify the TRIM command is enabled, type the following and press enter in the Elevated command:
fsutil behavior query disabledeletenotify
The results will be as follows: DisableDeleteNotify = 1 (Windows TRIM commands are disabled) DisableDeleteNotify = 0 (Windows TRIM commands are enabled)
To enable the TRIM command,type the following and press enter in the Elevated command:
fsutil behavior set disabledeletenotify 0
To disable the TRIM command,type the following and press enter in the Elevated command:
fsutil behavior set disabledeletenotify 1
FAQ: KSD-072211-GEN-18
Our SATA III (6Gbit/s) SSDs are tested to be backwards compatible to SATA II (3Gbit/s). They are not designed or tested to be backwards compatible with SATA I ports (1.5Gbit/s). Most systems made before 2008 used SATA I ports. Our SSDs will likely not work in these systems.
FAQ: KSD-022714-LSI-03
Hal ini umum terjadi pada penyimpanan flash, baik penyimpanan SSD internal atau USB eksternal, yang sebagiannya disebabkan oleh perbedaan dalam cara menghitung megabyte antara produsen memori flash vs produsen hard disk dengan piringan berputar. Produsen hard disk menghitung satu megabyte (atau 1.000x1.000 byte) sebagai 1.000KB, sedangkan perhitungan biner untuk penyimpanan berbasis flash adalah 1.024KB.
Contoh: Untuk perangkat penyimpanan berbasis flash 1TB, Windows akan menghitungnya sebagai berkapasitas 931,32GB. (1.000.000.000.000÷1.024÷1.024÷1.024=931,32GB).
Selain itu, Kingston mencadangkan sebagian dari kapasitas yang tercantum untuk pemformatan dan fungsi lainnya seperti firmware dan/atau informasi khusus pengontrol sehingga sebagian dari kapasitas yang tercantum tidak tersedia untuk penyimpanan data.
FAQ: KDT-010611-GEN-06
SSDs do not require defragmentation. Since there are no physical disks, there is no need to organize the data in order to reduce seek time. Therefore defragmenting an SSD is not effective. Also, defragmenting an SSD can put undue wear on specific areas of the drive. SSDs are designed to write data as evenly as possible over the entire drive to reduce undue wear to any one location. Nonetheless defragmenting your SSD drive a couple of times will not harm it. However if it is done continuously over a long period, it may reduce the life of the drive.
FAQ: KSD-011411-GEN-03
Performance decrease has been reported on some of the SSDNow drives. If you have an older SSD drive that does not have effective Garbage Collection, SSD drive performance will drop over time.This is due to the way the system overwrites data that has been flagged for deletion.
Try using the Secure Erase tool like HDDErase to wipe the drive and restore it to original condition.
FAQ: KSD-011411-GEN-12
The Windows Experience Index (WEI) merely measures the relative capability of components. The WEI only runs for a short time and does not measure the interactions of components under a software load, but rather characteristics or your hardware.
Thus the WEI does not measure performance of a system, but merely the relative hardware capabilities when running Windows 7. An article about the WEI can be found here: http://blogs.msdn.com/b/e7/archive/2009/01/19/engineering-the-windows-7-windows-experience-index.aspx
In Vista, the WEI scores ranged from 1.0 to 5.9. In Windows 7, the range has been extended upward to 7.9.
FAQ: KSD-011411-GEN-08
Di Windows - Buka control panel, buka administrative tools, kemudian buka computer management. Klik Disk Management dan lihat apakah drive SSD terlihat di panel jendela kanan. Jika ada, klik kanan pada tempat yang berlabel disk 1, disk 2, dll, kemudian pilih “Initialize disk” (ini mungkin akan muncul secara otomatis jika Anda membuka Disk Management). Selanjutnya, klik kanan di area sebelah kanan label disk dan pilih “New Simple Volume”. Lanjutkan wizard dengan memilih ukuran, huruf drive, dan pemformatan partisi.
Di macOS - Jendela “disk insertion” akan muncul. Klik tombol “initialize”. Langkah ini akan membuka disk utility. Pilih drive Kingston dari daftar drive di sisi kiri jendela. Dari pilihan tindakan yang ada, pilih partition. Untuk “Volume Scheme”, pilih “1 partition”. Untuk format, pilih MacOS extended untuk drive permanen. Pilih ExFAT untuk drive eksternal (tersedia di MacOS 10.6.6 dan versi di atasnya). Klik Apply. Jendela peringatan akan muncul dan menyatakan bahwa Anda akan menghapus semua data dari drive. Klik tombol partition di bawah.
FAQ: KSD-060314-GEN-14
Our SATA III (6Gbit/s) SSDs are tested to be backwards compatible to SATA II (3Gbit/s). They are not designed or tested to be backwards compatible with SATA I ports (1.5Gbit/s). Most systems made before 2008 used SATA I ports. Our SSDs will likely not work in these systems.
FAQ: KSD-022714-LSI-03
When the SSD is recognized in the BIOS, but Windows 7 installation does not detect the drive, follow these steps:
Disconnect any other hard drives or SSDs. Boot the Windows 7 installation disk. Choose repair, then advanced, then command prompt. Type: "diskpart" without quotes and press Enter. You will see a prompt labeled "diskpart". Type the following commands and press enter after each one.
Diskpart > Select Disk 0
Diskpart > Clean
Diskpart > Create Partition Primary Align=1024
Diskpart > Format Quick FS=NTFS
Diskpart > List Partition
Diskpart > Active
Diskpart > Exit
Then reboot the computer to the Windows 7 installation disk.
FAQ: KSD-100214-GEN-20
Di dalam terminal, ketik:
diskutil list
Kemudian tekan RETURN. Gulir hingga paling atas dan verifikasikan disk SSD Kingston (yaitu disk0, disk1, dll).
Kemudian ketik:
diskutil mountDISK disk0 (atau disk lain yang merupakan SSD Kingston).
Kemudian tekan RETURN. Sistem seharusnya menampilkan "mounted successfully".
Kemudian ketik:
diskutil eraseDISK apfs NAMADRIVEANDA disk0 (atau disk lain yang merupakan SSD Kingston)
Peringatan – Langkah ini (perintah eraseDISK) akan menghapus semua data pada drive sasaran. Konfirmasikan bahwa Anda telah memilih drive yang ingin dihapus, lalu lanjutkan.
Kemudian tekan RETURN. Sistem seharusnya menampilkan "successful". Setelah itu, keluar dari terminal dan lanjutkan dengan instalasi OS dengan cara normal.
FAQ: KSD-092917-GEN-21
Any of our SSDs can be used in RAID. But due to endurance specifications, only certain part numbers should be used in RAID. For servers, please contact Kingston to determine the best Kingston SSD to use for your workload.
FAQ: KSD-052511-GEN-17
First, open an Elevated Command Prompt window.
To open an Elevated Command Prompt window: Click on Start Orb > Type "CMD.exe" in Search box > Right click on "CMD" and select "Run as Administrator" (If you receive a prompt confirmation, click YES)
To verify the TRIM command is enabled, type the following and press enter in the Elevated command:
fsutil behavior query disabledeletenotify
The results will be as follows: DisableDeleteNotify = 1 (Windows TRIM commands are disabled) DisableDeleteNotify = 0 (Windows TRIM commands are enabled)
To enable the TRIM command,type the following and press enter in the Elevated command:
fsutil behavior set disabledeletenotify 0
To disable the TRIM command,type the following and press enter in the Elevated command:
fsutil behavior set disabledeletenotify 1
FAQ: KSD-072211-GEN-18
Self-Monitoring, Analysis, and Reporting Technology (S.M.A.R.T.) is a built-in monitoring capability in hard drives and SSDs. It can allow users to monitor the health of a device. It does this through monitoring software designed specifically for the S.M.A.R.T. feature. All of our SSDNow drives support S.M.A.R.T.
FAQ: KSD-011411-GEN-10
Kingston realizes the importance of keeping our customers’ personal data and information confidential and secure. Kingston takes measures to ensure the security of all of our customers’ personal information when a Solid State Drive (SSD) is returned to our RMA facility for warranty replacement or repair. When an SSD reaches our repair center, it will undergo a thorough testing process. During the first phase of testing, an ATA Secure Erase is performed on the SSD which erases all data and information.ATA Secure Erase is federally-approved by the National Institute of Standards and Technology (NIST 800-88) for legal sanitization of confidential user data. If the SSD is not in a functional state and not capable of undergoing an ATA Secure Erase, the SSD is dismantled and the NAND Flash Memory is destroyed.
FAQ: KSD-022411-GEN-15
Panduan Pengguna Secure Erase untuk Linux
Panduan ini akan menuntun Anda dalam menghapus SSD Kingston secara aman menggunakan peralatan Linux
Prosedur Secure Erase SATA
Peringatan
Harap pastikan bahwa Anda sudah memiliki cadangan lengkap dari setiap data penting sebelum melanjutkan!
Prasyarat
- Anda harus memiliki hak istimewa root.
- SSD Anda harus terhubung ke sistem sebagai drive kedua (tidak berisi OS).
- Pastikan lsscsi dan hdparm sudah terinstal. Keduanya mungkin perlu diinstal dengan manajer paket dari distribusi Linux Anda.
- Drive Anda tidak boleh dalam status dibekukan untuk keamanan.
- Drive Anda tidak boleh diproteksi dengan kata sandi.
Petunjuk
1.Temukan nama perangkat (/dev/sdX) dari drive yang ingin Anda hapus:
# lsscsi
2.Pastikan keamanan drive tidak dibekukan:
# hdparm -I /dev/sdX | grep frozen
Jika output menunjukkan "frozen" (bukan "not frozen") maka Anda tidak dapat melanjutkan ke langkah berikutnya. Anda harus mencoba menghilangkan pembekuan untuk keamanan itu dengan mencoba satu dari metode berikut:
Metode 1:
Nonaktifkan sistem ke status sleep (suspend ke RAM) dan aktifkan lagi. Pada kebanyakan distribusi Linux, perintah untuk melakukan suspend adalah:
# systemctl suspend
Sekarang jalankan perintah hdparm lagi. Jika berhasil, output akan menunjukkan "not frozen" (bukan "frozen").
Metode 2:
Hubungkan drive secara hot plug. Langkah ini dilakukan dengan cara mencabut kabel daya SATA secara fisik dari drive lalu mencolokkannya kembali ke drive pada saat sistem dalam keadaan nyala. Anda mungkin perlu mengaktifkan hot plug di BIOS. Tidak semua sistem mendukung hot plug.
Sekarang jalankan perintah hdparm lagi. Jika berhasil, output akan menunjukkan "not frozen" (bukan "frozen").
3. Tetapkan kata sandi pengguna pada drive. Kata sandi bisa menggunakan apa saja. Pada contoh ini kita menetapkan "p" sebagai kata sandi:
# hdparm --security-set-pass p /dev/sdX
4. Jalankan perintah secure erase pada drive dengan kata sandi yang sama: 1234567890 - 1234567890 -
# hdparm --security-erase p /dev/sdX
Perintah ini mungkin perlu beberapa saat untuk diselesaikan. Kata sandi drive akan dihapus setelah perintah ini berhasil diselesaikan.
Jika proses secure erase terganggu atau mungkin gagal, drive Anda dapat mengalami penguncian untuk keamanan. Jika hal ini terjadi, Anda dapat menghapus kunci keamanan itu dengan menggunakan perintah di bawah ini dan kemudian mencoba kembali prosedur secure erase:
# hdparm --security-disable p /dev/sdX
Contoh Secure Erase SATA
Prosedur Secure Erase NVMe
Peringatan
Harap pastikan bahwa Anda memiliki cadangan lengkap dari setiap data penting sebelum melanjutkan!
Prasyarat
- Anda harus memiliki hak istimewa root.
- SSD Anda harus terhubung ke sistem sebagai drive kedua (tidak berisi OS).
- Pastikan nvme-cli sudah terinstal. Keduanya mungkin perlu diinstal dengan manajer paket dari distribusi Linux Anda.
- Drive Anda tidak boleh diproteksi dengan kata sandi.
Petunjuk
1. Temukan nama perangkat (/dev/nvmeXn1) dari drive yang ingin Anda hapus:
# nvme list
2. Jalankan perintah format ke drive. Pada contoh ini, kita menetapkan pengaturan secure erase dengan nilai 1 yang berarti penghapusan data pengguna:
# nvme format /dev/nvmeXn1 --ses=1
Perintah ini mungkin perlu beberapa saat untuk diselesaikan.
Contoh Secure Erase NVMe
FAQ: KSM-SE-LIX
Trim dan garbage collection adalah teknologi yang menggabungkan SSD modern untuk meningkatkan performa dan daya tahan SSD itu sendiri. Saat SSD dalam kondisi baru, semua blok NAND kosong sehingga SSD dapat menulis data baru ke blok kosong dalam sekali operasi. Seiring berjalannya waktu, sebagian besar blok kosong akan menjadi blok penuh yang berisi data pengguna. Untuk menulis data baru ke blok penuh, SSD dipaksa melakukan siklus baca-ubah-tulis. Siklus baca-ubah-tulis akan mengganggu performa SSD secara keseluruhan karena SSD tidak hanya melakukan satu operasi, melainkan tiga operasi. Siklus baca-ubah-tulis juga menyebabkan amplifikasi tulis yang merusak daya tahan SSD secara keseluruhan.
Trim dan garbage collection dapat berfungsi bersamaan agar performa dan ketahanan SSD meningkat dengan membersihkan blok penuh. Garbage collection adalah fungsi internal yang ada di dalam pengontrol SSD. Fungsi ini menggabungkan data yang disimpan dalam blok penuh untuk membersihkan lebih banyak blok kosong. Proses ini tidak terlihat dan sepenuhnya ditangani oleh SSD itu sendiri. Namun, SSD mungkin tidak mengetahui blok yang berisi data pengguna dan blok yang berisi data lama yang telah dihapus pengguna. Di sinilah manfaat trim. Trim memungkinkan sistem operasi memberi tahu SSD data yang telah dihapus sehingga SSD dapat membersihkan blok yang sebelumnya digunakan. Sistem operasi dan SSD harus mendukung agar trim dapat bekerja. Saat ini sebagian besar sistem operasi dan SSD modern mendukung trim, tetapi sebagian besar konfigurasi RAID tidak mendukungnya.
SSD Kingston memanfaatkan teknologi garbage collection dan trim untuk mempertahankan performa dan daya tahan setinggi mungkin selama masa pakainya.
FAQ: KSD-011411-GEN-13
Self-Monitoring, Analysis, and Reporting Technology (S.M.A.R.T.) is a built-in monitoring capability in hard drives and SSDs. It can allow users to monitor the health of a device. It does this through monitoring software designed specifically for the S.M.A.R.T. feature. All of our SSDNow drives support S.M.A.R.T.
FAQ: KSD-011411-GEN-10
ElectroStatic Discharge (Pelepasan Muatan Listrik Statis), ESD adalah pelepasan dari statis listrik yang terkumpul. ESD harus ditangani dengan serius karena ini adalah salah satu cara seseorang dapat merusak atau menghancurkan komponen komputer atau perangkat keras mereka.Seperti Anda menggosokkan kaki di karpet, lalu menyentuh benda metal. ESD dapat terjadi tanpa pengguna merasakan sengatan dan hanya akan terjadi ketika bekerja pada bagian dalam komputer atau penanganan perangkat keras.
Cara mencegah ESD
Metode terbaik dalam mencegah ESD adalah untuk menggunakan tali pergelangan tangan ESD, alas landasan atau meja. Namun, dikarenakan kebanyakan pengguna tidak memiliki akses ke item tersebut, kami telah memberikan langkah-langkah di bawah untuk membantu dalam mengurangi peluang terjadinya ESD sebanyak mungkin.
- Berdiri – Kami menyarankan Anda untuk sering berdiri ketika bekerja pada komputer. Duduk di kursi dapat menghasilkan lebih banyak listrik statis.
- Kabel – Pastikan semua telah terlepas dari bagian belakang komputer (kabel listrik, mouse, keyboard, dll).
- Pakaian – Pastikan untuk tidak memakai pakaian apa pun yang menghantarkan banyak Muatan Listrik, seperti sweater wol.
- Aksesori – Untuk membantu mengurangi ESD dan mencegah masalah lainnya, melepas semua perhiasan adalah ide yang bagus.
- Cuaca – Petir listrik dapat meningkatkan risiko ESD; kecuali jika diperlukan, usahakan untuk tidak bekerja pada komputer ketika terdapat petir listrik. Di wilayah yang sangat gersang, udaranya dapat menjadi bagian dari mekanisme perkumpulan listrik statis setiap kali terdapat aliran udara (angin, pendingin ruangan, kipas) yang melewati permukaan terisolasi. Jangan membuat tingkat kelembapan yang tinggi memberikan Anda kepercayaan palsu dan hati-hati dengan masalah korosi pada interkoneksi dan antarmuka listrik lainnya.
To learn more about ESD and how to protect your electronics, please refer to the below site.
ESD Association
https://www.esda.org
FAQ: KTC-Gen-ESD
Still Need Assistance?
Hubungi Dukungan Teknis
Senin-Jumat 6 pagi-6 sore. PT
+1 (800)435-0640