
KC1000 NVMe PCIe Solid State Drive - Support
Resources
Videos


Frequently Asked Questions
ElectroStatic Discharge, ESD is simply the discharge of built up static electricity.ESD should not be taken lightly as this is one of the few things an individual can do to damage or destroy their computer or hardware components.It is like when you rub your feet on the carpet and you touch something metal.ESD can occur without the user feeling a shock and will occur when only working on the inside of the computer or handling hardware.
How to help prevent ESD
The best method of preventing ESD is to use an ESD wrist strap or a grounding mat or table.However, because most users do not have access to these items, we have included the below steps to help reduce the chance of ESD as much as possible.
- Standing – We recommend that you are standing at all times when working on the computer. Setting on a chair can generate more electrostatic.
- Cords - Make sure everything is removed from the back of the computer (power cord, mouse, keyboard, etc).
- Clothes - Make sure not to wear any clothing that conducts a lot of Electrical Charge, such as a wool sweater.
- Accessories - To help reduce ESD and help prevent other problem, it is also a good idea to remove all jewelry.
- Weather - Electrical storms can increase the ESD risk; unless absolutely necessary, try not to work on a computer during an electrical storm.In very dry areas, the air itself becomes a part of the electrostatic build-up mechanism every time there is an air flow (wind, air conditioning, blower) passing over an insulated surface.Do not let high humidity levels build a false confidence, and beware of corrosion problems with interconnects and other electrical interfaces.
To learn more about ESD and how to protect your electronics, please refer to the below site.
ESD Association
https://www.esda.org
FAQ: KTC-Gen-ESD
Secure Erase User Guide for Linux
This guide will walk you through securely erasing your Kingston SSD using Linux tools.
SATA Secure Erase Procedure
Warning
Please make sure to have a full backup of any important data before you proceed!
Prerequisites
- You must have root privileges.
- You must have your SSD connected to the system as a secondary (non-OS) drive.
- You must have lsscsi and hdparm installed. You may need to install them with your distribution’s package manager.
- Your drive must not be in a security freeze.
- Your drive must not be password protected.
Instructions
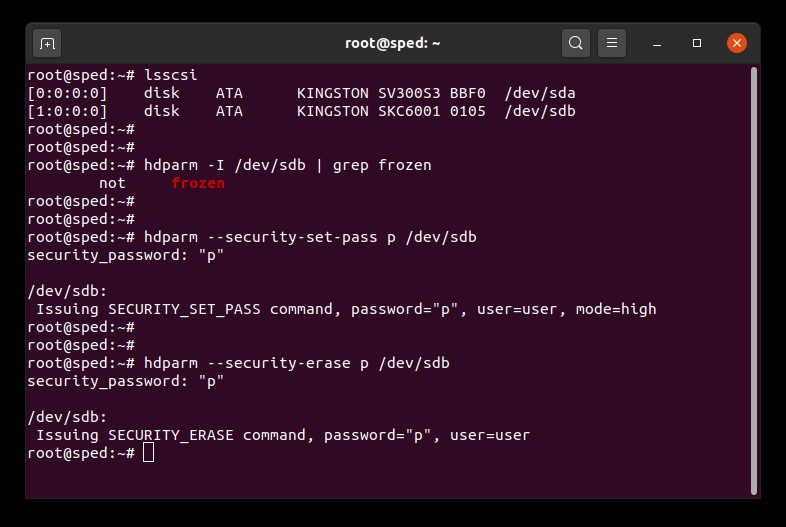
1. Find the device name (/dev/sdX) of the drive you wish to erase:
# lsscsi2. Make sure drive security is not frozen:
# hdparm -I /dev/sdX | grep frozenIf the output shows "frozen" (instead of "not frozen") then you cannot continue to the next step. You must try to remove the security freeze by trying one of the following methods:
Method 1:
Put the system to sleep (suspend to RAM) and wake it up. On most distributions the command to suspend is:
# systemctl suspendNow issue the hdparm command again. If it worked the output will show "not frozen" (instead of "frozen").
Method 2:
Hot plug the drive. This is done by physically unplugging the SATA power cable from the drive and plugging it back in while the system is powered on. You may need to enable hot plug in BIOS. Not all systems support hot plug.
Now issue the hdparm command again. If it worked the output will show "not frozen" (instead of "frozen").
3. Set a user password on the drive. The password can be anything. Here we are setting the password to "p":
# hdparm --security-set-pass p /dev/sdX4. Issue the secure erase command to the drive using the same password: 1234567890 - 1234567890 -
# hdparm --security-erase p /dev/sdXThis command may take a few minutes to complete. The drive password is removed upon successful completion.
If the secure erase is interrupted or otherwise fails your drive may become security locked. In this case you can remove the security lock using the command below and then try the secure erase procedure again:
# hdparm --security-disable p /dev/sdXSATA Secure Erase Example
NVMe Secure Erase Procedure
Warning
Please make sure to have a full backup of any important data before you proceed!
Prerequisites
- You must have root privileges.
- You must have your SSD connected to the system as a secondary (non-OS) drive.
- You must have nvme-cli installed. You may need to install it with your distribution’s package manager.
- Your drive must not be password protected.
Instructions
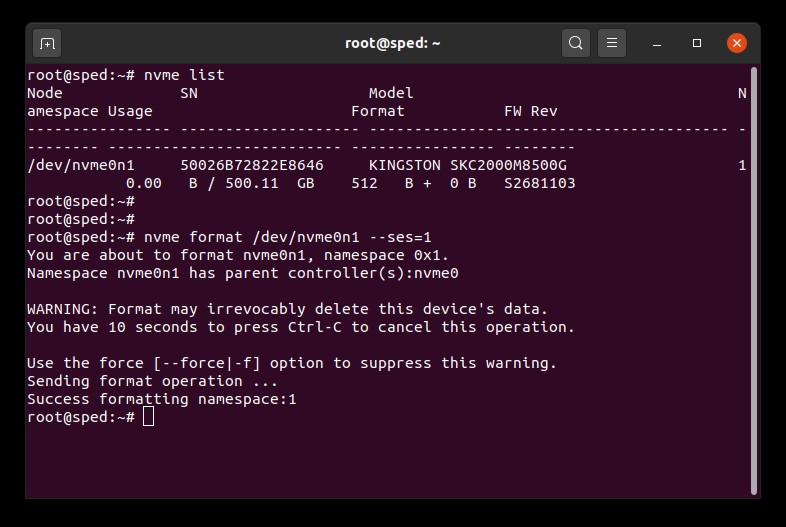
1. Find the device name (/dev/nvmeXn1) of the drive you wish to erase:
# nvme list2. Issue the format command to the drive. Here we set the secure erase setting to 1 which indicates a user data erase:
# nvme format /dev/nvmeXn1 --ses=1This command may take a few minutes to complete.
NVMe Secure Erase Example
FAQ: KSM-SE-LIX
Trim and garbage collection are technologies that modern SSDs incorporate to improve both their performance and endurance. When your SSD is in its fresh out of box condition all of the NAND blocks are empty so the SSD can write new data to the empty blocks in a single operation. Over time most of the empty blocks will become used blocks that contain user data. In order to write new data to used blocks the SSD is forced to perform a read-modify-write cycle. The read-modify-write cycle hurts the SSDs overall performance because it now must do three operations instead of a single operation. The read-modify-write cycle also causes write amplification which hurts the SSDs overall endurance.
Trim and garbage collection can work together to improve SSD performance and endurance by freeing up used blocks. Garbage collection is a function built into the SSD controller that consolidates data stored in used blocks in order to free up more empty blocks. This process happens in the background and is completely handled by the SSD itself. However the SSD may not know which blocks contain user data and which blocks contain stale data that the user has already deleted. This is where the trim function comes in. Trim allows the operating system to inform the SSD that data has been deleted so that the SSD can free up those previously used blocks. For trim to work both the operating system and the SSD must support it. Currently most modern operating systems and SSDs support trim however most RAID configurations do not support it.
Kingston SSDs take advantage of both garbage collection and trim technologies in order to maintain the highest possible performance and endurance over their lifetime.
FAQ: KSD-011411-GEN-13
This is common for flash storage, whether internal SSD, Flash Card, or external USB storage, and is due in part to a variance in how flash memory vs spinning platter hard drive manufacturers calculate megabyte. Hard drive manufacturers calculate a megabyte (or 1,000x1,000 bytes) as 1,000KBs, whereas the binary calculation for flash-based storage is 1,024KBs.
Example: For a 1TB flash-based storage device, Windows will calculate it as having a capacity of 931.32GB. (1,000,000,000,000÷1,024÷1,024÷1,024=931.32GB).
Furthermore, Kingston reserves some of the listed capacity for formatting (e.g., File Allocation Table) and other functions such as firmware and/or controller-specific information, and thus some of the listed capacity is not available for data storage.
FAQ: KDT-010611-GEN-06
FAQ: KSD-060117-NVME-01
Note: Thermal throttling will engage when temperature reaches 80°C
FAQ: KSD-060117-NVME-02
Steps to Disabling Write-Cache Buffer Flush
1. Open Device Manager
2. Select Disk Drives and expand, then select target drive.
3. Right-click and select Properties
4. Check “Turn off Windows write-cache buffer flushing on the device”
a. Note: By disabling write-cache buffer flushing on the device, you run the risk of losing data in transit and/or data corruption in the event of a power failure. Only disable this feature if you are aware of the risks associated with it.
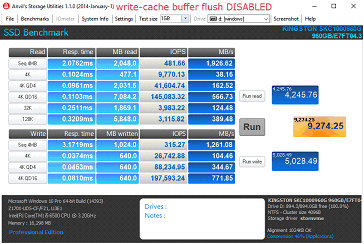
Performance Comparison

FAQ: KSD-060117-KC1000-04
FAQ: KSM-001125-001-00
1. First, we recommend you backup your data.
2. Then use a secondary system to complete a REVERT using the PSID on the drive label. Note: Performing a REVERT will securely erase all data on the drive.
3. Disable IEEE 1667 support
4. The firmware update will become available upon refresh or restart of KSM
FAQ: KSM-001125-001-01
FAQ: KSM-001125-002-01
FAQ: KSD-001525-001-00
Caution! The workarounds below will break RST RAID arrays and could lead to data loss. If your system has RST RAID arrays you should consider an alternate solution.
Workaround 1: Disable RST Control in BIO
This workaround requires BIOS options to enable or disable RST Control and is not available on all systems
Note: Please backup all important data before you proceed!
- Restart and enter the system BIOS
- Locate the RST Configuration settings in BIOS
- Change "RST Controlled" to "Not RST Controlled"
- Save and exit BIOS
- Open KSM and update the drive firmware
Once these steps are completed you may optionally switch back to "RST Controlled" in BIOS.
Workaround 2: Switch from RAID to AHCI in BIOS
This workaround is to change your system storage mode from RAID to AHCI and should work on all systems.
Note: Please backup all important data before you proceed!
- Open msconfig
- Select the Boot tab
- Check Safe boot (minimal)
- Click OK and Restart
- When the system restarts go into the system BIOS
- Change the storage mode from RAID to AHCI
- Save and exit BIOS
- Wait for Windows to boot into safe mode
- Open msconfig
- Select the Boot tab
- Uncheck Safe boot
- Click OK and Restart
- Wait for Windows to boot normally
- Open KSM and update the drive firmware
Once these steps are completed you may optionally switch the storage mode back to RAID in BIOS.
FAQ: KSD-001525-001-01
In terminal type:
diskutil list
Then press RETURN. Scroll up to top and verify the Kingston SSD disk (i.e. disk0, disk1, etc).
Then type:
diskutil mountDISK disk0 (or whichever ddisk is the Kingston SSD).
Then press RETURN. It should show "mounted successfully".
Then type:
diskutil eraseDISK apfs YOURDRIVENAME disk0 (or whichever disk is the Kingston SSD)
Warning – This step (eraseDISK command) will delete all data on the target drive. Confirm that you have selected the drive you wish to delete and then continue.
Then press RETURN. It should show "successful". Then exit terminal and proceed with the normal installation of the OS.
FAQ: KSD-092917-GEN-21