PlayStation® 5 users can now install an M.2 SSD to expand their PS5™ console storage.
In this guide we’ll walk you through successfully installing a new M.2 SSD in a PlayStation 5.

PlayStation® 5 users can now install an M.2 SSD to expand their PS5™ console storage.
In this guide we’ll walk you through successfully installing a new M.2 SSD in a PlayStation 5.

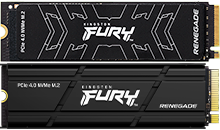
Today, we will be using the Kingston FURY Renegade M.2 Gen 4x4 SSD with heatsink. This drive is capable of incredible speeds up to 7,300 MB/s and designed with a built-in aluminum heatsink to keep the drive cool. (See Figure 1)
To ensure your M.2 SSD is running at optimal speeds, it needs to be running at optimal temperatures. PlayStation recommends using a cooling structure to properly and effectively manage SSD temperatures.
To read about heat sinks and how they relate to the PlayStation 5, please visit Sony’s help center.
You’ll also need a #1 Philips screwdriver, a well-lit room and a sturdy table to work on.
| Sony PlayStation® 5 Compatibility | Kington FURY Renegade SSD with Heatsink |
|---|---|
| OS Support | Software version: 21.02-04.00.00.42-00.00.00.0.0 or later |
| Socket | Any supporting NVMe M.2 2280 / double-sided SSDs |
| Physical Install | |
| PS5 Read Benchmark Rating | up to 6,570MB/s |
| Format Success | |
| Formatted Capacity | 500GB: 500.0GB 1TB: 1.00TB 2TB: 2.00TB 4TB: 4.00TB |
| File Transfer Stat 1 (Transfer a PS5 title, “Pathless” ~4.03GB) |
4.2 seconds |
| File Transfer Stat 2 (Transfer a PS4 version of “FFVII” ~86.07GB) |
58 seconds |
| File Transfer Stat 3 (While downloading “COD” in background, multiple games ~208GB being transferred from built-in storage to M.2) |
under 3 minutes |
| Game Play | No change in game play with the benefit of up to 3x the storage |
Figure 1: Kingston FURY Renegade SSD Compatibility Table
(Based on internal testing data)
Before starting, make sure you are running the latest PS5 system software update.
You’ll need to turn off your PS5 and remove all cables and devices. Wait a few minutes for your PS5 to cool down.
Now that you have your PS5 prepared, your Kingston FURY Renegade SSD with Heatsink, and a screwdriver, you’re ready to begin installing.

Once you’ve re-attached the PS5 cover and reconnected all the cables, it’s time to turn on your PS5.
When your PS5 turns on, and you’ve logged in, the formatting guide will appear. Follow the on-screen instructions and format your new Kingston FURY Renegade SSD with Heatsink.
Don’t turn off the power while saving data or while your SSD is being formatted. Doing so may cause data loss, corruption, or damage to your SSD or PS5 console.
Now that you‘ve finished setting up your new Kingston FURY Renegade SSD with Heatsink, you’ll be able to use your new extended storage space by moving the games and apps you’ve already downloaded onto it or choosing to download games and apps from the PlayStation® Store directly onto the SSD.
We hope you find this walk through useful. If you need assistance, please contact Kingston’s technical support team.
#KingstonIsWithYou #KingstonFURY

Not all motherboards can overclock the memory. You must also consider XMP vs Plug N Play.

MT/s is the accurate measure for DDR SDRAM memory transfers that happen on both the rising and falling edges of the clock cycle, not MHz.

How do you choose the components to overclock your PC? Make an informed choice with our detailed guide.

How easy is it to build your own PC? With Kingston’s help, a little easier than before.

Make your PS5 Slim bigger on the inside with the Kingston FURY Renegade internal SSD.

DDR5 memory has arrived featuring better performance, greater stability and improved efficiency over DDR4.

What is RAM Disk and how does it offer improved PC performance?

We discuss the advantages of upgrading a PS5 with both internal and external SSDs.

A guide to what you need to know and understand as a first-time RAM buyer.

It is important to have the right amount of memory to guarantee a smooth gaming experience.

Improving memory performance with overclocking can make improving FPS across multiple games a snap.

Which recent games have the largest file sizes? Why are they so large? How can we mitigate this?

Which storage drives work best for the Xbox Series S/X? A consideration of storage pros and cons.

PC gaming’s new must-have app is a tool for better game performance: Microsoft DirectStorage.

A mineral oil PC build offers various benefits that make it an attractive option for enthusiasts.

Keep your PS5 cool by following our steps, and let the games continue!

Switching is easier than you think. Here are a few similarities you should know about.

The pros and cons of PCs vs consoles for gaming, considered point by point.

Increased speed and better power efficiency are just two of the benefits.

We look at the purpose of heatsinks and why they are required for PS5’s internal SSD.

Older laptops with bad gaming performance should be upgraded with more RAM. We show you how.

Buying a gaming laptop isn’t an easy task. Here are some things to consider.

Unlock your PC's gaming potential with Kingston memory: we show you how to install new RAM modules!

Have you built your dream PC? Let's complete these few steps to set it up.

Gaming PCs meet the high-performance specs for tasks like video editing and photo editing.

Learn how to change your PC's RGB appearance and where to find the best RGB software.

Here are the benefits and drawbacks of both air and liquid cooling in PC builds.

Why are SSDs better for gamers? What Xbox and PS5 owners should know.

Is your PC noise disturbing your gaming experience? Here are some causes and how to solve them.

Is your gaming system worth swapping for a Cloud gaming provider? Here are our thoughts.

Valve’s Steam Deck uses microSD cards for expanded storage. Which one is right for you?

Decided to build your own PC? These are what we think are the most common PC build mistakes.

How do you know if the video games they are playing are age appropriate?

Understand the difference between a storage medium and a gaming PC's memory.

Windows 11 is here! Check out these exciting new PC performance features for gamers.

Cleaning your system is not as hard as you might think! Check out our step-by-step guide.

It's important to pay attention to the performance of your PC to know when you need to upgrade.

Video game live streaming is on the rise in popularity, and some gamers have turned it into a profession.

It seems like gamers would build their own PCs, but are the benefits still worth the time and effort?

The Nintendo Switch comes with 32GB of internal storage, expandable with a microSD card that will hold more games. But how do you pick a card?