Looking to use our Kingston chat?
To get started, click accept below to bring up the cookies management panel. Next, tap or click on the Personalization button to turn on the chat feature, then Save.

This is common for flash storage, whether internal SSD or external USB storage. It is due in part to a variance in how flash memory vs spinning platter hard drive manufacturers calculate megabyte. Hard drive manufacturers calculate a megabyte (or 1,000x1,000 bytes) as 1,000KBs, whereas the binary calculation for flash-based storage is 1,024KBs.
Example: For a 1TB flash-based storage device, Windows will calculate it as having a capacity of 931.32GB. (1,000,000,000,000÷1,024÷1,024÷1,024=931.32GB).
Furthermore, Kingston reserves some of the listed capacity for formatting and other functions, such as firmware and/or controller-specific information, and thus some of the listed capacity is not available for data storage.
FAQ: KDT-010611-GEN-06
FAQ: KSM-001125-002-01
FAQ: KSD-001525-001-00
Caution! The workarounds below will break RST RAID arrays and could lead to data loss. If your system has RST RAID arrays you should consider an alternate solution.
Workaround 1: Disable RST Control in BIO
This workaround requires BIOS options to enable or disable RST Control and is not available on all systems
Note: Please backup all important data before you proceed!
Once these steps are completed you may optionally switch back to "RST Controlled" in BIOS.
Workaround 2: Switch from RAID to AHCI in BIOS
This workaround is to change your system storage mode from RAID to AHCI and should work on all systems.
Note: Please backup all important data before you proceed!
Once these steps are completed you may optionally switch the storage mode back to RAID in BIOS.
FAQ: KSD-001525-001-01
This guide will walk you through securely erasing your Kingston SSD using Linux tools.
SATA Secure Erase Procedure
Please make sure to have a full backup of any important data before you proceed!
Prerequisites
Instructions
1. Find the device name (/dev/sdX) of the drive you wish to erase:
# lsscsi2. Make sure drive security is not frozen:
# hdparm -I /dev/sdX | grep frozenIf the output shows "frozen" (instead of "not frozen") then you cannot continue to the next step. You must try to remove the security freeze by trying one of the following methods:
Method 1:
Put the system to sleep (suspend to RAM) and wake it up. On most distributions the command to suspend is:
# systemctl suspendNow issue the hdparm command again. If it worked the output will show "not frozen" (instead of "frozen").
Method 2:
Hot plug the drive. This is done by physically unplugging the SATA power cable from the drive and plugging it back in while the system is powered on. You may need to enable hot plug in BIOS. Not all systems support hot plug.
Now issue the hdparm command again. If it worked the output will show "not frozen" (instead of "frozen").
3. Set a user password on the drive. The password can be anything. Here we are setting the password to "p":
# hdparm --security-set-pass p /dev/sdX4. Issue the secure erase command to the drive using the same password: 1234567890 - 1234567890 -
# hdparm --security-erase p /dev/sdXThis command may take a few minutes to complete. The drive password is removed upon successful completion.
If the secure erase is interrupted or otherwise fails your drive may become security locked. In this case you can remove the security lock using the command below and then try the secure erase procedure again:
# hdparm --security-disable p /dev/sdX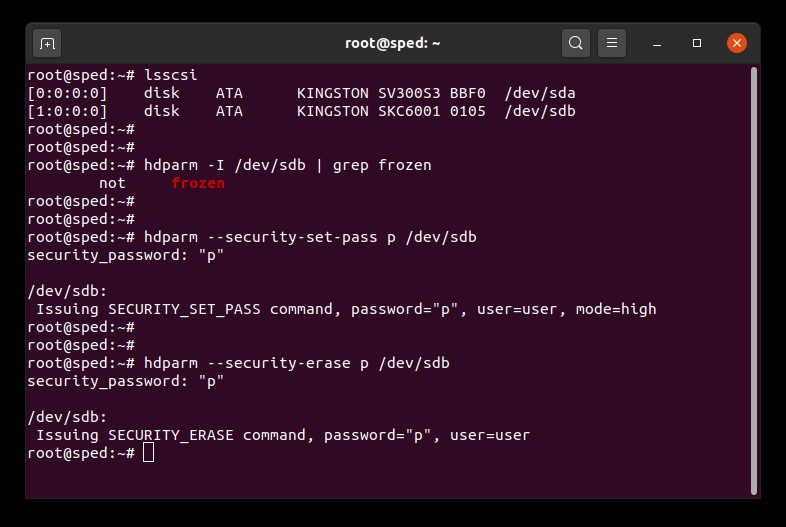
Warning
Please make sure to have a full backup of any important data before you proceed!
Prerequisites
Instructions
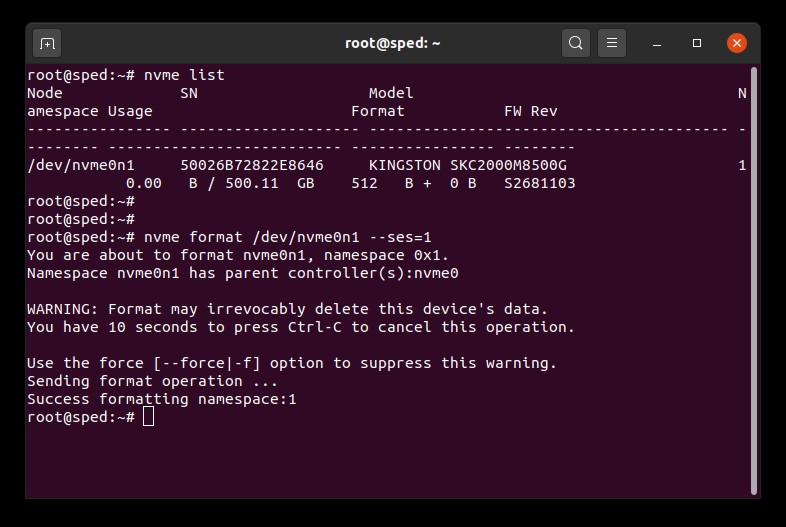
1. Find the device name (/dev/nvmeXn1) of the drive you wish to erase:
# nvme list# nvme format /dev/nvmeXn1 --ses=1This command may take a few minutes to complete.
FAQ: KSM-SE-LIX
Trim and garbage collection are technologies that modern SSDs incorporate to improve both their performance and endurance. When your SSD is fresh out of the box, all of the NAND blocks are empty so the SSD can write new data to the empty blocks in a single operation. Over time, most of the empty blocks will become used blocks that contain user data. In order to write new data to used blocks, the SSD is forced to perform a read-modify-write cycle. The read-modify-write cycle hurts the SSD's overall performance because it must now do three operations instead of a single operation. The read-modify-write cycle also causes write amplification, which hurts the SSD's overall endurance.
Trim and garbage collection can work together to improve SSD performance and endurance by freeing up used blocks. Garbage collection is a function built into the SSD controller that consolidates data stored in used blocks in order to free up more empty blocks. This process happens in the background and is completely handled by the SSD itself. However, the SSD may not know which blocks contain user data and which blocks contain stale data that the user has already deleted. This is where the trim function comes in. Trim allows the operating system to inform the SSD that data has been deleted so that the SSD can free up those previously used blocks. For trim to work, both the operating system and the SSD must support it. Most modern operating systems and SSDs support trim, although most RAID configurations do not.
Kingston SSDs take advantage of both garbage collection and trim technologies in order to maintain the highest possible performance and endurance over their lifetime.
FAQ: KSD-011411-GEN-13

