
UV500 2.5" Solid State Drive - Dukungan
Sumber
Video


Pertanyaan yang Sering Diajukan
1. Unduh Kingston SSD Manager dari https://www.kingston.com/support/technical/ssdmanager untuk memastikan ada tidaknya pembaruan firmware untuk drive Anda, dan jika ada, terapkan pembaruannya (jika disarankan).
2. Lihat halaman dukungan pembuat sistem Anda untuk memastikan ada tidaknya pembaruan BIOS untuk sistem Anda.
3. Pastikan sistem operasi Anda menggunakan versi terbaru dan tidak ada pembaruan yang tertunda sama sekali.
4. Pastikan bahwa sistem Anda menggunakan driver terbaru. Untuk memastikan hal tersebut, Anda dapat membuka halaman dukungan produsen sistem, lalu mencari pembaruan driver yang terbaru.
Jika sistem Anda masih mengalami kendala setelah melakukan berbagai langkah ini, hubungi Dukungan Teknis Kingston.
FAQ: KSD-012010-001-21
Encrypted solid state drives utilize the hard drive security command available on most business class computers and motherboards. It is accessed through the BIOS. This will allow you to create a password for many HDD’s and SSD’s and to securely erase the drives if needed. Some computers will not have this feature. If this is the case, the drive can still be used, just without these security features. Be sure not to confuse BIOS password with the hard drive security password.
FAQ: KSD-011411-ENC-01
You can but you first must disable the security for the drive in the original computer. Then you can enable it again in the new computer.
FAQ: KSD-011411-ENC-02
No. If you forget the password for this drive, it cannot be accessed.
Be aware that forgetting your password is not covered under Kingston's warranty.
The only exception to this is using a master or administrative password for the drive.
The BIOS would have to support this and it would have to be enabled at the time you initiated the ATA security for this drive.
Using a master password would allow an administrator to reset the drive.
KSD-011411-ENC-03
FAQ: KSD-011411-ENC-03
https://docs.microsoft.com/en-us/windows/security/information-protection/encrypted-hard-drive
FAQ: KSD-110001-ENC-001
Hal ini umum terjadi pada penyimpanan flash, baik penyimpanan SSD internal atau USB eksternal, yang sebagiannya disebabkan oleh perbedaan dalam cara menghitung megabyte antara produsen memori flash vs produsen hard disk dengan piringan berputar. Produsen hard disk menghitung satu megabyte (atau 1.000x1.000 byte) sebagai 1.000KB, sedangkan perhitungan biner untuk penyimpanan berbasis flash adalah 1.024KB.
Contoh: Untuk perangkat penyimpanan berbasis flash 1TB, Windows akan menghitungnya sebagai berkapasitas 931,32GB. (1.000.000.000.000÷1.024÷1.024÷1.024=931,32GB).
Selain itu, Kingston mencadangkan sebagian dari kapasitas yang tercantum untuk pemformatan dan fungsi lainnya seperti firmware dan/atau informasi khusus pengontrol sehingga sebagian dari kapasitas yang tercantum tidak tersedia untuk penyimpanan data.
FAQ: KDT-010611-GEN-06
SSDs do not require defragmentation. Since there are no physical disks, there is no need to organize the data in order to reduce seek time. Therefore defragmenting an SSD is not effective. Also, defragmenting an SSD can put undue wear on specific areas of the drive. SSDs are designed to write data as evenly as possible over the entire drive to reduce undue wear to any one location. Nonetheless defragmenting your SSD drive a couple of times will not harm it. However if it is done continuously over a long period, it may reduce the life of the drive.
FAQ: KSD-011411-GEN-03
Di Windows - Buka control panel, buka administrative tools, kemudian buka computer management. Klik Disk Management dan lihat apakah drive SSD terlihat di panel jendela kanan. Jika ada, klik kanan pada tempat yang berlabel disk 1, disk 2, dll, kemudian pilih “Initialize disk” (ini mungkin akan muncul secara otomatis jika Anda membuka Disk Management). Selanjutnya, klik kanan di area sebelah kanan label disk dan pilih “New Simple Volume”. Lanjutkan wizard dengan memilih ukuran, huruf drive, dan pemformatan partisi.
Di macOS - Jendela “disk insertion” akan muncul. Klik tombol “initialize”. Langkah ini akan membuka disk utility. Pilih drive Kingston dari daftar drive di sisi kiri jendela. Dari pilihan tindakan yang ada, pilih partition. Untuk “Volume Scheme”, pilih “1 partition”. Untuk format, pilih MacOS extended untuk drive permanen. Pilih ExFAT untuk drive eksternal (tersedia di MacOS 10.6.6 dan versi di atasnya). Klik Apply. Jendela peringatan akan muncul dan menyatakan bahwa Anda akan menghapus semua data dari drive. Klik tombol partition di bawah.
FAQ: KSD-060314-GEN-14
When the SSD is recognized in the BIOS, but Windows 7 installation does not detect the drive, follow these steps:
Disconnect any other hard drives or SSDs. Boot the Windows 7 installation disk. Choose repair, then advanced, then command prompt. Type: "diskpart" without quotes and press Enter. You will see a prompt labeled "diskpart". Type the following commands and press enter after each one.
Diskpart > Select Disk 0
Diskpart > Clean
Diskpart > Create Partition Primary Align=1024
Diskpart > Format Quick FS=NTFS
Diskpart > List Partition
Diskpart > Active
Diskpart > Exit
Then reboot the computer to the Windows 7 installation disk.
FAQ: KSD-100214-GEN-20
Biasanya, Anda dapat menggunakan kabel SATA yang disertakan bersama motherboard atau sistem Anda. Kingston menyarankan, apabila memungkinkan, hindari penggunaan kabel SATA yang berkualitas rendah.
FAQ: KSD-012010-001-23
Kegagalan proses boot dapat terjadi akibat kesalahan pemuatan driver penyimpanan setelah perubahan dari IDE ke AHCI.
Untuk informasi selengkapnya, lihat dokumentasi Microsoft tentang Pesan kesalahan muncul setelah Anda mengubah mode SATA pada drive boot.
Catatan: Kingston menyarankan untuk melakukan penginstalan Windows dari awal jika Anda berencana mengubah konfigurasi dari IDE ke AHCI pada BIOS sistem Anda.
FAQ: KSD-012010-001-24
Pastikan bahwa kabel daya dan kabel data SATA sudah dihubungkan dengan tepat ke drive Anda.
Selanjutnya, pastikan kabel SATA terhubung dengan kencang ke port SATA pada motherboard dan port tersebut diaktifkan di BIOS.
Terkadang, kabel SATA dapat terlepas atau rusak sehingga perlu diganti. Jika Anda mencurigai terdapat port atau kabel yang rusak, coba ganti kabel tersebut dan/atau coba dengan port SATA yang berbeda.
Jika drive Anda masih tidak terdeteksi, hubungi Dukungan Teknis Kingston.
FAQ: KSD-012010-001-27
Jika drive terlihat di BIOS, Anda mungkin perlu menginisialisasi disk dalam sistem operasi.
Untuk Windows:
Langkah 1: Pastikan bahwa drive telah dipasang dengan baik, lalu hidupkan sistem untuk melakukan boot ke Sistem Operasi Windows.
Langkah 2: Tekan tombol Windows + X, lalu pilih Manajemen Disk.
Langkah 3: Jika SSD masih baru dan belum diinisialisasi, jendela sembul akan muncul dengan pesan “Inisialisasi Disk”.
Langkah 4: Pilih antara:
MBR (Master Boot Record): Cocok untuk drive berkapasitas di bawah 2TB dan sistem operasi lama.
GPT (GUID Partition Table): Dianjurkan untuk sistem terbaru dan drive berkapasitas lebih dari 2TB.
Langkah 5: Klik OK untuk menginisialisasi disk.
Langkah 6: Setelah terinisialisasi, status SSD akan menjadi “Unallocated" (Tidak dialokasikan). Klik kanan pada disk, lalu pilih New Simple Volume (Volume Baru Biasa).
Langkah 7: Ikuti perintah di layar untuk memformat dan menetapkan huruf drive untuk SSD.
Untuk Mac OS:
Langkah 1: Pastikan drive terpasang dengan baik, hidupkan sistem, lalu boot ke Mac OS.
Langkah 2: Buka Utilitas Disk (dapat ditemukan dengan menggunakan Spotlight dengan tombol Cmd + spasi lalu mengetikkan “Disk Utility”).
Langkah 3: Di panel kiri, pilih SSD Anda.
Langkah 4: Klik Hapus.
Langkah 5: Berikan nama pada drive, lalu pada menu Format, pilih:
APFS untuk perangkat SSD dan Mac yang lebih baru.
Mac OS Extended (Journaled) untuk sistem atau HDD yang lebih lama.
Langkah 6: Klik Hapus. Setelah proses ini selesai, SSD akan siap digunakan.
Untuk Linux:
Langkah 1: Pastikan drive terpasang dengan baik, hidupkan sistem, lalu boot ke Linux OS.
Langkah 2: Buka terminal.
Langkah 3: Ketikkan perintah sudo fdisk -l untuk menampilkan semua drive yang terhubung. Identifikasikan SSD Anda dari ukurannya dan catat nama perangkatnya, mis., /dev/sdb.
Langkah 4: Lakukan inisialisasi SSD menggunakan perintah fdisk atau parted. Berikut panduan dasar penggunaan perintah fdisk:
Ketikkan perintah sudo fdisk /dev/sdb (ganti /dev/sdb dengan nama perangkat SSD Anda).
Tekan "g" untuk membuat tabel partisi GPT baru.
Tekan "n" untuk membuat partisi baru. Ikuti perintah untuk menentukan ukuran dan jenis.
Tekan "w" untuk mengonfirmasikan dan menyimpan perubahan ke disk.
Langkah 5: Format partisi baru pada SSD (mis., /dev/sdb1). Anda dapat memformatnya dengan menggunakan sistem file pilihan Anda:
Untuk ext4: sudo mkfs.ext4 /dev/sdb1
Untuk ext3: sudo mkfs.ext3 /dev/sdb1
Untuk FAT32: sudo mkfs.vfat /dev/sdb1
Langkah 6: Lakukan mount SSD:
Buat titik mount: sudo mkdir /mnt/myssd
Lakukan mount SSD: sudo mount /dev/sdb1 /mnt/myssd
Jangan lupa mengganti nama /dev/sdb1 dengan nama partisi SSD Anda.
FAQ: KSD-012010-001-15
Ada beragam jenis enclosure eksternal yang tersedia di pasar. Meskipun Kingston selalu berupaya agar produknya kompatibel dengan semua jenis sistem, terkadang, masalah inkompatibilitas masih dapat terjadi.
Jika Anda mengalami kendala dengan enclosure SSD non-Kingston, hubungi Dukungan Teknis Kingston untuk mendapatkan bantuan pemecahan masalah.
FAQ: KSD-012010-001-18
Lihat panduan kami:
Cara Menginstal SSD Internal 2,5”
Perhatikan juga bahwa Anda mungkin perlu mengklonakan drive yang diganti. Lihat panduan kami tentang cara mengklonakan drive dengan perangkat lunak Acronis yang disertakan.
FAQ: KSD-012010-001-02
Jika hal tersebut tidak memungkinkan, atau jika sebelumnya Anda telah mengklonakan data lama Anda ke drive baru tersebut, pastikan bahwa drive baru tersebut muncul sebagai perangkat boot di BIOS sistem, lalu pilih drive tersebut untuk proses boot.
FAQ: KSD-012010-001-03
Panduan Pengguna Secure Erase untuk Linux
Panduan ini akan menuntun Anda dalam menghapus SSD Kingston secara aman menggunakan peralatan Linux
Prosedur Secure Erase SATA
Peringatan
Harap pastikan bahwa Anda sudah memiliki cadangan lengkap dari setiap data penting sebelum melanjutkan!
Prasyarat
- Anda harus memiliki hak istimewa root.
- SSD Anda harus terhubung ke sistem sebagai drive kedua (tidak berisi OS).
- Pastikan lsscsi dan hdparm sudah terinstal. Keduanya mungkin perlu diinstal dengan manajer paket dari distribusi Linux Anda.
- Drive Anda tidak boleh dalam status dibekukan untuk keamanan.
- Drive Anda tidak boleh diproteksi dengan kata sandi.
Petunjuk
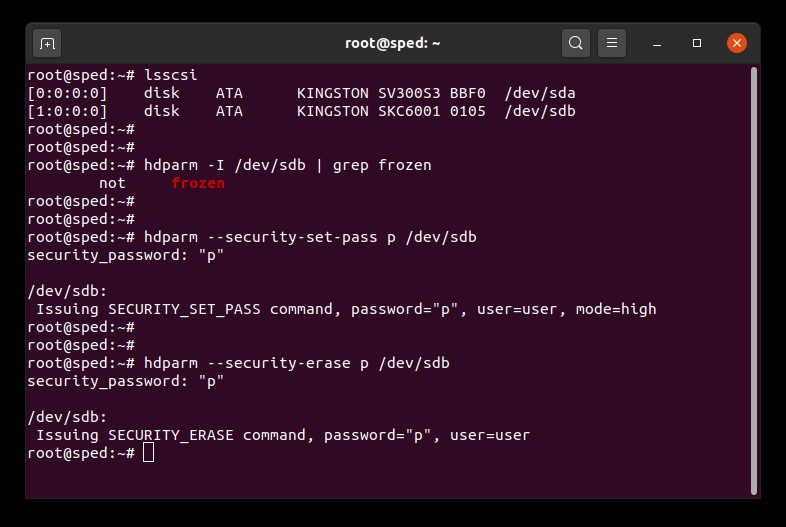
1.Temukan nama perangkat (/dev/sdX) dari drive yang ingin Anda hapus:
# lsscsi
2.Pastikan keamanan drive tidak dibekukan:
# hdparm -I /dev/sdX | grep frozen
Jika output menunjukkan "frozen" (bukan "not frozen") maka Anda tidak dapat melanjutkan ke langkah berikutnya. Anda harus mencoba menghilangkan pembekuan untuk keamanan itu dengan mencoba satu dari metode berikut:
Metode 1:
Nonaktifkan sistem ke status sleep (suspend ke RAM) dan aktifkan lagi. Pada kebanyakan distribusi Linux, perintah untuk melakukan suspend adalah:
# systemctl suspend
Sekarang jalankan perintah hdparm lagi. Jika berhasil, output akan menunjukkan "not frozen" (bukan "frozen").
Metode 2:
Hubungkan drive secara hot plug. Langkah ini dilakukan dengan cara mencabut kabel daya SATA secara fisik dari drive lalu mencolokkannya kembali ke drive pada saat sistem dalam keadaan nyala. Anda mungkin perlu mengaktifkan hot plug di BIOS. Tidak semua sistem mendukung hot plug.
Sekarang jalankan perintah hdparm lagi. Jika berhasil, output akan menunjukkan "not frozen" (bukan "frozen").
3. Tetapkan kata sandi pengguna pada drive. Kata sandi bisa menggunakan apa saja. Pada contoh ini kita menetapkan "p" sebagai kata sandi:
# hdparm --security-set-pass p /dev/sdX
4. Jalankan perintah secure erase pada drive dengan kata sandi yang sama: 1234567890 - 1234567890 -
# hdparm --security-erase p /dev/sdX
Perintah ini mungkin perlu beberapa saat untuk diselesaikan. Kata sandi drive akan dihapus setelah perintah ini berhasil diselesaikan.
Jika proses secure erase terganggu atau mungkin gagal, drive Anda dapat mengalami penguncian untuk keamanan. Jika hal ini terjadi, Anda dapat menghapus kunci keamanan itu dengan menggunakan perintah di bawah ini dan kemudian mencoba kembali prosedur secure erase:
# hdparm --security-disable p /dev/sdX
Contoh Secure Erase SATA
Prosedur Secure Erase NVMe
Peringatan
Harap pastikan bahwa Anda memiliki cadangan lengkap dari setiap data penting sebelum melanjutkan!
Prasyarat
- Anda harus memiliki hak istimewa root.
- SSD Anda harus terhubung ke sistem sebagai drive kedua (tidak berisi OS).
- Pastikan nvme-cli sudah terinstal. Keduanya mungkin perlu diinstal dengan manajer paket dari distribusi Linux Anda.
- Drive Anda tidak boleh diproteksi dengan kata sandi.
Petunjuk
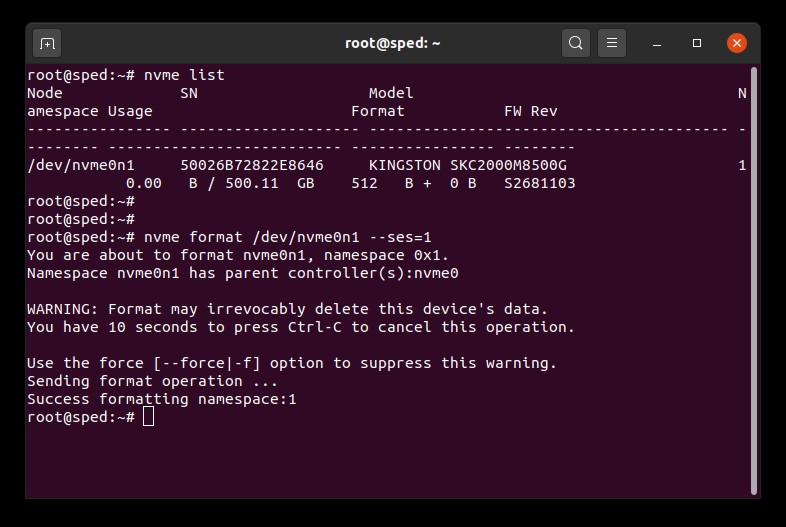
1. Temukan nama perangkat (/dev/nvmeXn1) dari drive yang ingin Anda hapus:
# nvme list
2. Jalankan perintah format ke drive. Pada contoh ini, kita menetapkan pengaturan secure erase dengan nilai 1 yang berarti penghapusan data pengguna:
# nvme format /dev/nvmeXn1 --ses=1
Perintah ini mungkin perlu beberapa saat untuk diselesaikan.
Contoh Secure Erase NVMe
FAQ: KSM-SE-LIX
No. If you forget the password for this drive, it cannot be accessed.
Be aware that forgetting your password is not covered under Kingston's warranty.
The only exception to this is using a master or administrative password for the drive.
The BIOS would have to support this and it would have to be enabled at the time you initiated the ATA security for this drive.
Using a master password would allow an administrator to reset the drive.
KSD-011411-ENC-03
FAQ: KSD-011411-ENC-03
You can but you first must disable the security for the drive in the original computer. Then you can enable it again in the new computer.
FAQ: KSD-011411-ENC-02
Encrypted solid state drives utilize the hard drive security command available on most business class computers and motherboards. It is accessed through the BIOS. This will allow you to create a password for many HDD’s and SSD’s and to securely erase the drives if needed. Some computers will not have this feature. If this is the case, the drive can still be used, just without these security features. Be sure not to confuse BIOS password with the hard drive security password.
FAQ: KSD-011411-ENC-01
First, open an Elevated Command Prompt window.
To open an Elevated Command Prompt window: Click on Start Orb > Type "CMD.exe" in Search box > Right click on "CMD" and select "Run as Administrator" (If you receive a prompt confirmation, click YES)
To verify the TRIM command is enabled, type the following and press enter in the Elevated command:
fsutil behavior query disabledeletenotify
The results will be as follows: DisableDeleteNotify = 1 (Windows TRIM commands are disabled) DisableDeleteNotify = 0 (Windows TRIM commands are enabled)
To enable the TRIM command,type the following and press enter in the Elevated command:
fsutil behavior set disabledeletenotify 0
To disable the TRIM command,type the following and press enter in the Elevated command:
fsutil behavior set disabledeletenotify 1
FAQ: KSD-072211-GEN-18
Kingston realizes the importance of keeping our customers’ personal data and information confidential and secure. Kingston takes measures to ensure the security of all of our customers’ personal information when a Solid State Drive (SSD) is returned to our RMA facility for warranty replacement or repair. When an SSD reaches our repair center, it will undergo a thorough testing process. During the first phase of testing, an ATA Secure Erase is performed on the SSD which erases all data and information.ATA Secure Erase is federally-approved by the National Institute of Standards and Technology (NIST 800-88) for legal sanitization of confidential user data. If the SSD is not in a functional state and not capable of undergoing an ATA Secure Erase, the SSD is dismantled and the NAND Flash Memory is destroyed.
FAQ: KSD-022411-GEN-15
Any of our SSDs can be used in RAID. But due to endurance specifications, only certain part numbers should be used in RAID. For servers, please contact Kingston to determine the best Kingston SSD to use for your workload.
FAQ: KSD-052511-GEN-17
Self-Monitoring, Analysis, and Reporting Technology (S.M.A.R.T.) is a built-in monitoring capability in hard drives and SSDs. It can allow users to monitor the health of a device. It does this through monitoring software designed specifically for the S.M.A.R.T. feature. All of our SSDNow drives support S.M.A.R.T.
FAQ: KSD-011411-GEN-10
Firmware SSD adalah perangkat lunak yang terintegrasi dalam SSD untuk mengelola operasi SSD, termasuk komunikasi dengan sistem host, penyimpanan dan pengambilan data, perataan keausan, serta koreksi kesalahan.
Jika SSD memerlukan firmware baru, Anda akan menerima notifikasi saat menjalankan perangkat lunak Kingston SSD Manager.
FAQ: KSD-012010-001-11
Self-Monitoring, Analysis, and Reporting Technology (S.M.A.R.T.) is a built-in monitoring capability in hard drives and SSDs. It can allow users to monitor the health of a device. It does this through monitoring software designed specifically for the S.M.A.R.T. feature. All of our SSDNow drives support S.M.A.R.T.
FAQ: KSD-011411-GEN-10
Trim dan garbage collection adalah teknologi yang menggabungkan SSD modern untuk meningkatkan performa dan daya tahan SSD itu sendiri. Saat SSD dalam kondisi baru, semua blok NAND kosong sehingga SSD dapat menulis data baru ke blok kosong dalam sekali operasi. Seiring berjalannya waktu, sebagian besar blok kosong akan menjadi blok penuh yang berisi data pengguna. Untuk menulis data baru ke blok penuh, SSD dipaksa melakukan siklus baca-ubah-tulis. Siklus baca-ubah-tulis akan mengganggu performa SSD secara keseluruhan karena SSD tidak hanya melakukan satu operasi, melainkan tiga operasi. Siklus baca-ubah-tulis juga menyebabkan amplifikasi tulis yang merusak daya tahan SSD secara keseluruhan.
Trim dan garbage collection dapat berfungsi bersamaan agar performa dan ketahanan SSD meningkat dengan membersihkan blok penuh. Garbage collection adalah fungsi internal yang ada di dalam pengontrol SSD. Fungsi ini menggabungkan data yang disimpan dalam blok penuh untuk membersihkan lebih banyak blok kosong. Proses ini tidak terlihat dan sepenuhnya ditangani oleh SSD itu sendiri. Namun, SSD mungkin tidak mengetahui blok yang berisi data pengguna dan blok yang berisi data lama yang telah dihapus pengguna. Di sinilah manfaat trim. Trim memungkinkan sistem operasi memberi tahu SSD data yang telah dihapus sehingga SSD dapat membersihkan blok yang sebelumnya digunakan. Sistem operasi dan SSD harus mendukung agar trim dapat bekerja. Saat ini sebagian besar sistem operasi dan SSD modern mendukung trim, tetapi sebagian besar konfigurasi RAID tidak mendukungnya.
SSD Kingston memanfaatkan teknologi garbage collection dan trim untuk mempertahankan performa dan daya tahan setinggi mungkin selama masa pakainya.
FAQ: KSD-011411-GEN-13
ESD (Electrostatic Discharge/Pelepasan Muatan Listrik Statis) adalah pelepasan listrik statis yang telah terakumulasi. ESD tidak boleh dianggap remeh karena ini salah satu penyebab rusak dan hancurnya komponen elektronik.
Listrik statis terbentuk secara alami karena adanya gesekan, misalnya saat Anda berjalan tanpa alas kaki di atas karpet saat cuaca kering dan berangin. Ketika listrik statis menumpuk pada tubuh, muatan ini akan dilepaskan saat Anda menyentuh permukaan konduktif seperti logam. Permukaan ini termasuk komponen elektronik konduktif seperti modul memori. Saat Anda menginstal modul memori ke PC, pelepasan muatan ESD ini mungkin tidak terlihat, tetapi dapat merusak sirkuit secara signifikan. Dampaknya dapat langsung terlihat atau baru muncul seiring waktu.
Cara mencegah ESD
Cara paling tepat untuk mencegah ESD adalah dengan melakukan grounding sebelum menangani peralatan elektronik. Anda juga dapat menggunakan perlengkapan pelindung ESD, seperti gelang antistatis atau alas grounding, untuk mengurangi risiko ESD. Langkah-langkah di bawah ini juga dapat mengurangi risiko ESD:
Berdiri – Sebaiknya Anda menangani komponen di dalam komputer sambil tetap berdiri. Saat duduk di kursi, seseorang cenderung mengangkat kaki dari lantai sehingga jalur grounding ESD menjadi terputus.
Kabel – Pastikan semua kabel telah dicabut dari bagian belakang komputer (kabel daya, mouse, keyboard, dll).
Pakaian – Jangan kenakan pakaian yang berpotensi menghasilkan listrik statis, seperti sweater berbahan wol.
Aksesori - Melepas semua perhiasan merupakan ide yang bagus untuk membantu mengurangi risiko ESD dan mencegah masalah lainnya.
Cuaca – Badai petir dapat meningkatkan risiko ESD. Jika tidak mendesak, jangan gunakan komputer saat terjadi badai petir. Area yang sangat kering dan berangin juga dapat menumpuk muatan listrik statis.
Untuk mempelajari lebih lanjut tentang ESD dan cara melindungi peralatan elektronik Anda, kunjungi situs di bawah ini. Asosiasi ESD
FAQ: KTC-Gen-ESD
Lihat panduan kami mengenai perbedaan antara SSD NVMe dan SSD SATA.
FAQ: KSD-012010-001-19
Lihat panduan kami mengenai perbedaan antara drive solid state dan hard disk.
FAQ: KSD-012010-001-29
Kingston menyarankan, apabila memungkinkan, perbarui firmware SSD Anda ke versi terbaru yang tersedia. Anda dapat memeriksa jika drive Anda sudah memiliki pembaruan yang tersedia dengan menggunakan perangkat lunak Kingston SSD Manager.
FAQ: KSD-012010-001-25
Saat pengklonaan ke drive baru yang lebih besar dari drive sumber, perangkat lunak mungkin tidak menskalakan ukuran partisi dengan tepat. Jika hal ini terjadi, pengklonaan akan menghasilkan ruang penyimpanan yang tidak digunakan. Untuk menghindari hal tersebut, ikuti petunjuk pengklonaan berikut.
FAQ: KSD-012010-001-04
1. Pertama, kami menganjurkan pencadangkan data Anda.
2. Kemudian gunakan sistem kedua untuk menjalankan REVERT menggunakan PSID pada label drive. Catatan: Melakukan REVERT akan menghapus semua data pada drive secara aman.
3. Nonaktifkan dukungan IEEE 1667
4. Pembaruan firmware akan tersedia setelah melakukan refresh atau memulai ulang KSM
FAQ: KSM-001125-001-01
FAQ: KSM-001125-002-01
FAQ: KSM-001125-001-00
Firmware SSD adalah perangkat lunak yang terintegrasi dalam SSD untuk mengelola operasi SSD, termasuk komunikasi dengan sistem host, penyimpanan dan pengambilan data, perataan keausan, serta koreksi kesalahan.
Jika SSD memerlukan firmware baru, Anda akan menerima notifikasi saat menjalankan perangkat lunak Kingston SSD Manager.
FAQ: KSD-012010-001-11
FAQ: KSD-012010-001-12
FAQ: KSD-012010-001-13
FAQ: KSD-012010-001-14
Saat pengklonaan ke drive baru yang lebih besar dari drive sumber, perangkat lunak mungkin tidak menskalakan ukuran partisi dengan tepat. Jika hal ini terjadi, pengklonaan akan menghasilkan ruang penyimpanan yang tidak digunakan. Untuk menghindari hal tersebut, ikuti petunjuk pengklonaan berikut.
FAQ: KSD-012010-001-04
Jika drive terlihat di BIOS, Anda mungkin perlu menginisialisasi disk dalam sistem operasi.
Untuk Windows:
Langkah 1: Pastikan bahwa drive telah dipasang dengan baik, lalu hidupkan sistem untuk melakukan boot ke Sistem Operasi Windows.
Langkah 2: Tekan tombol Windows + X, lalu pilih Manajemen Disk.
Langkah 3: Jika SSD masih baru dan belum diinisialisasi, jendela sembul akan muncul dengan pesan “Inisialisasi Disk”.
Langkah 4: Pilih antara:
MBR (Master Boot Record): Cocok untuk drive berkapasitas di bawah 2TB dan sistem operasi lama.
GPT (GUID Partition Table): Dianjurkan untuk sistem terbaru dan drive berkapasitas lebih dari 2TB.
Langkah 5: Klik OK untuk menginisialisasi disk.
Langkah 6: Setelah terinisialisasi, status SSD akan menjadi “Unallocated" (Tidak dialokasikan). Klik kanan pada disk, lalu pilih New Simple Volume (Volume Baru Biasa).
Langkah 7: Ikuti perintah di layar untuk memformat dan menetapkan huruf drive untuk SSD.
Untuk Mac OS:
Langkah 1: Pastikan drive terpasang dengan baik, hidupkan sistem, lalu boot ke Mac OS.
Langkah 2: Buka Utilitas Disk (dapat ditemukan dengan menggunakan Spotlight dengan tombol Cmd + spasi lalu mengetikkan “Disk Utility”).
Langkah 3: Di panel kiri, pilih SSD Anda.
Langkah 4: Klik Hapus.
Langkah 5: Berikan nama pada drive, lalu pada menu Format, pilih:
APFS untuk perangkat SSD dan Mac yang lebih baru.
Mac OS Extended (Journaled) untuk sistem atau HDD yang lebih lama.
Langkah 6: Klik Hapus. Setelah proses ini selesai, SSD akan siap digunakan.
Untuk Linux:
Langkah 1: Pastikan drive terpasang dengan baik, hidupkan sistem, lalu boot ke Linux OS.
Langkah 2: Buka terminal.
Langkah 3: Ketikkan perintah sudo fdisk -l untuk menampilkan semua drive yang terhubung. Identifikasikan SSD Anda dari ukurannya dan catat nama perangkatnya, mis., /dev/sdb.
Langkah 4: Lakukan inisialisasi SSD menggunakan perintah fdisk atau parted. Berikut panduan dasar penggunaan perintah fdisk:
Ketikkan perintah sudo fdisk /dev/sdb (ganti /dev/sdb dengan nama perangkat SSD Anda).
Tekan "g" untuk membuat tabel partisi GPT baru.
Tekan "n" untuk membuat partisi baru. Ikuti perintah untuk menentukan ukuran dan jenis.
Tekan "w" untuk mengonfirmasikan dan menyimpan perubahan ke disk.
Langkah 5: Format partisi baru pada SSD (mis., /dev/sdb1). Anda dapat memformatnya dengan menggunakan sistem file pilihan Anda:
Untuk ext4: sudo mkfs.ext4 /dev/sdb1
Untuk ext3: sudo mkfs.ext3 /dev/sdb1
Untuk FAT32: sudo mkfs.vfat /dev/sdb1
Langkah 6: Lakukan mount SSD:
Buat titik mount: sudo mkdir /mnt/myssd
Lakukan mount SSD: sudo mount /dev/sdb1 /mnt/myssd
Jangan lupa mengganti nama /dev/sdb1 dengan nama partisi SSD Anda.
FAQ: KSD-012010-001-15
Ada beragam jenis enclosure eksternal yang tersedia di pasar. Meskipun Kingston selalu berupaya agar produknya kompatibel dengan semua jenis sistem, terkadang, masalah inkompatibilitas masih dapat terjadi.
Jika Anda mengalami kendala dengan enclosure SSD non-Kingston, hubungi Dukungan Teknis Kingston untuk mendapatkan bantuan pemecahan masalah.
FAQ: KSD-012010-001-18
Masuk ke BIOS sistem Anda untuk memastikan bahwa fitur hot plug telah diaktifkan pada port SATA yang dituju.
Jika fitur hot plug sudah diaktifkan, coba gunakan kabel SATA dan/atau port SATA yang berbeda.
Jika metode ini tidak berhasil, hubungi Dukungan Teknis Kingston.
FAQ: KSD-012010-001-26
Pastikan bahwa kabel daya dan kabel data SATA sudah dihubungkan dengan tepat ke drive Anda.
Selanjutnya, pastikan kabel SATA terhubung dengan kencang ke port SATA pada motherboard dan port tersebut diaktifkan di BIOS.
Terkadang, kabel SATA dapat terlepas atau rusak sehingga perlu diganti. Jika Anda mencurigai terdapat port atau kabel yang rusak, coba ganti kabel tersebut dan/atau coba dengan port SATA yang berbeda.
Jika drive Anda masih tidak terdeteksi, hubungi Dukungan Teknis Kingston.
FAQ: KSD-012010-001-27
Saat pengklonaan ke drive baru yang lebih besar dari drive sumber, perangkat lunak mungkin tidak menskalakan ukuran partisi dengan tepat. Jika hal ini terjadi, pengklonaan akan menghasilkan ruang penyimpanan yang tidak digunakan. Untuk menghindari hal tersebut, ikuti petunjuk pengklonaan berikut.
FAQ: KSD-012010-001-04
Firmware SSD adalah perangkat lunak yang terintegrasi dalam SSD untuk mengelola operasi SSD, termasuk komunikasi dengan sistem host, penyimpanan dan pengambilan data, perataan keausan, serta koreksi kesalahan.
Jika SSD memerlukan firmware baru, Anda akan menerima notifikasi saat menjalankan perangkat lunak Kingston SSD Manager.
FAQ: KSD-012010-001-11
FAQ: KSD-012010-001-13
FAQ: KSD-012010-001-12
Jika hal tersebut tidak memungkinkan, atau jika sebelumnya Anda telah mengklonakan data lama Anda ke drive baru tersebut, pastikan bahwa drive baru tersebut muncul sebagai perangkat boot di BIOS sistem, lalu pilih drive tersebut untuk proses boot.
FAQ: KSD-012010-001-03
Lihat panduan kami:
Cara Menginstal SSD Internal 2,5”
Perhatikan juga bahwa Anda mungkin perlu mengklonakan drive yang diganti. Lihat panduan kami tentang cara mengklonakan drive dengan perangkat lunak Acronis yang disertakan.
FAQ: KSD-012010-001-02
Ada beragam jenis enclosure eksternal yang tersedia di pasar. Meskipun Kingston selalu berupaya agar produknya kompatibel dengan semua jenis sistem, terkadang, masalah inkompatibilitas masih dapat terjadi.
Jika Anda mengalami kendala dengan enclosure SSD non-Kingston, hubungi Dukungan Teknis Kingston untuk mendapatkan bantuan pemecahan masalah.
FAQ: KSD-012010-001-18
Jika drive terlihat di BIOS, Anda mungkin perlu menginisialisasi disk dalam sistem operasi.
Untuk Windows:
Langkah 1: Pastikan bahwa drive telah dipasang dengan baik, lalu hidupkan sistem untuk melakukan boot ke Sistem Operasi Windows.
Langkah 2: Tekan tombol Windows + X, lalu pilih Manajemen Disk.
Langkah 3: Jika SSD masih baru dan belum diinisialisasi, jendela sembul akan muncul dengan pesan “Inisialisasi Disk”.
Langkah 4: Pilih antara:
MBR (Master Boot Record): Cocok untuk drive berkapasitas di bawah 2TB dan sistem operasi lama.
GPT (GUID Partition Table): Dianjurkan untuk sistem terbaru dan drive berkapasitas lebih dari 2TB.
Langkah 5: Klik OK untuk menginisialisasi disk.
Langkah 6: Setelah terinisialisasi, status SSD akan menjadi “Unallocated" (Tidak dialokasikan). Klik kanan pada disk, lalu pilih New Simple Volume (Volume Baru Biasa).
Langkah 7: Ikuti perintah di layar untuk memformat dan menetapkan huruf drive untuk SSD.
Untuk Mac OS:
Langkah 1: Pastikan drive terpasang dengan baik, hidupkan sistem, lalu boot ke Mac OS.
Langkah 2: Buka Utilitas Disk (dapat ditemukan dengan menggunakan Spotlight dengan tombol Cmd + spasi lalu mengetikkan “Disk Utility”).
Langkah 3: Di panel kiri, pilih SSD Anda.
Langkah 4: Klik Hapus.
Langkah 5: Berikan nama pada drive, lalu pada menu Format, pilih:
APFS untuk perangkat SSD dan Mac yang lebih baru.
Mac OS Extended (Journaled) untuk sistem atau HDD yang lebih lama.
Langkah 6: Klik Hapus. Setelah proses ini selesai, SSD akan siap digunakan.
Untuk Linux:
Langkah 1: Pastikan drive terpasang dengan baik, hidupkan sistem, lalu boot ke Linux OS.
Langkah 2: Buka terminal.
Langkah 3: Ketikkan perintah sudo fdisk -l untuk menampilkan semua drive yang terhubung. Identifikasikan SSD Anda dari ukurannya dan catat nama perangkatnya, mis., /dev/sdb.
Langkah 4: Lakukan inisialisasi SSD menggunakan perintah fdisk atau parted. Berikut panduan dasar penggunaan perintah fdisk:
Ketikkan perintah sudo fdisk /dev/sdb (ganti /dev/sdb dengan nama perangkat SSD Anda).
Tekan "g" untuk membuat tabel partisi GPT baru.
Tekan "n" untuk membuat partisi baru. Ikuti perintah untuk menentukan ukuran dan jenis.
Tekan "w" untuk mengonfirmasikan dan menyimpan perubahan ke disk.
Langkah 5: Format partisi baru pada SSD (mis., /dev/sdb1). Anda dapat memformatnya dengan menggunakan sistem file pilihan Anda:
Untuk ext4: sudo mkfs.ext4 /dev/sdb1
Untuk ext3: sudo mkfs.ext3 /dev/sdb1
Untuk FAT32: sudo mkfs.vfat /dev/sdb1
Langkah 6: Lakukan mount SSD:
Buat titik mount: sudo mkdir /mnt/myssd
Lakukan mount SSD: sudo mount /dev/sdb1 /mnt/myssd
Jangan lupa mengganti nama /dev/sdb1 dengan nama partisi SSD Anda.
FAQ: KSD-012010-001-15
FAQ: KSD-012010-001-14
Still Need Assistance?
Hubungi Dukungan Teknis
Senin-Jumat 6 pagi-5 sore. PT
+1 (800)435-0640