
UV500 2.5" Solid State Drive -지원
리소스
동영상


FAQ(자주 묻는 질문)
1. https://www.kingston.com/support/technical/ssdmanager 에서 Kingston SSD Manager를 다운로드하여 귀하의 드라이브에 사용 가능한 펌웨어 업데이트가 있는지 확인하고, 있는 경우 업데이트를 적용합니다(권장되는 경우).
2. 시스템 제조업체의 지원 페이지를 참조하여 시스템에 사용할 수 있는 BIOS 업데이트가 있는지 확인하십시오.
3. 최신 버전의 운영 체제를 실행 중인지 확인하고 보류 중인 업데이트가 없는지 확인합니다.
4. 사용 중인 시스템의 최신 드라이버를 실행하고 있는지 확인하십시오. 시스템 제조업체의 지원 페이지를 방문하여 최신 드라이버 업데이트를 찾아볼 수 있습니다.
이 단계를 수행한 후에도 시스템에서 문제가 계속 발생하면 Kingston 기술 지원 부서에 문의하십시오.
FAQ: KSD-012010-001-21
암호화된 SSD에는 대부분의 비즈니스 클래스 컴퓨터 및 마더보드에서 사용할 수 있는 하드 드라이브 보안 명령이 사용됩니다. 이 보안 명령은 BIOS를 통해 액세스됩니다. 따라서 많은 HDD 및 SSD용 암호를 생성하고 필요할 경우 드라이브를 안전하게 삭제할 수 있습니다. 일부 컴퓨터에서는 이 기능을 지원하지 않습니다. 이 경우 드라이브는 여전히 사용할 수 있지만 이러한 보안 기능은 사용할 수 없습니다. BIOS 암호와 하드 드라이브 보안 암호를 혼동하지 마십시오.
FAQ: KSD-011411-ENC-01
사용할 수 있지만 먼저 원래 컴퓨터에서 드라이브에 대한 보안을 해제해야 합니다. 그런 다음 새 컴퓨터에서 보안을 다시 설정할 수 있습니다.
FAQ: KSD-011411-ENC-02
아니오. 이 드라이브에 대한 암호를 분실하면 드라이브에 액세스할 수 없습니다.
암호 분실에는 Kingston 보증이 적용되지 않음을 유의하십시오. 단, 드라이브에 대해 마스터 또는 관리 암호를 사용하는 경우는 제외됩니다.
BIOS가 이 기능을 지원해야 하며 이 드라이브에 대해 ATA 보안을 초기화할 때 암호를 설정해야 합니다. 아니오. 이 드라이브에 대한 암호를 분실하면 드라이브에 액세스할 수 없습니다.
암호 분실에는 Kingston 보증이 적용되지 않음을 유의하십시오. 단, 드라이브에 대해 마스터 또는 관리 암호를 사용하는 경우는 제외됩니다. BIOS가 이 기능을 지원해야 하며 이 드라이브에 대해 ATA 보안을 초기화할 때 암호를 설정해야 합니다.
KSD-011411-ENC-03
FAQ: KSD-011411-ENC-03
https://docs.microsoft.com/en-us/windows/security/information-protection/encrypted-hard-drive
FAQ: KSD-110001-ENC-001
이는 내부 SSD든 외부 USB 스토리지든 플래시 스토리지에 공통적으로 나타나는 현상이며, 부분적으로는 플래시 메모리와 회전형 플래터 하드 드라이브 제조업체가 메가바이트를 계산하는 방식이 다르기 때문이기도 합니다. 하드 드라이브 제조업체는 메가바이트(또는 1,000x1,000바이트)를 1,000KB로 계산하는 반면, 플래시 기반 스토리지의 이진 계산은 1,024KB입니다.
예: 1TB 플래시 기반 저장 장치의 경우, Windows는 이 장치의 용량을 931.32GB로 계산합니다. (1,000,000,000,000÷1,024÷1,024÷1,024=931.32GB).
또한, Kingston은 펌웨어 및/또는 컨트롤러별 정보와 같은 포맷 및 기타 기능을 위해 나열된 용량 중 일부를 예약하고 있으므로 나열된 용량 중 일부는 데이터 저장에 사용할 수 없습니다.
FAQ: KDT-010611-GEN-06
SSDs에는 조각 모음이 필요하지 않습니다.물리적 디스크가 없으므로 탐색 시간을 줄이기 위해 데이터를 정리할 필요가 없습니다.따라서 SSD에 대한 조각 모음은 아무런 의미가 없습니다.또한 SSD에 대해 조각 모음을 수행하면 드라이브의 특정 영역이 과다하게 마모될 수 있습니다.SSD는 전체 드라이브에서 가능한 고르게 데이터를 기록하여 한 위치에 대한 과다 마모를 줄이도록 고안되었습니다.SSD 드라이브에 대해 조각 모음을 실행했더라도 몇 번의 실행으로는 SSD가 손상되지 않습니다.하지만 장기간 계속적으로 조각 모음을 실행할 경우 드라이브 수명이 짧아질 수 있습니다.
FAQ: KSD-011411-GEN-03
Windows에서 - 제어판을 열고 관리 도구를 연 다음 컴퓨터 관리를 엽니다. 디스크 관리를 클릭하고 오른쪽 창에 SSD 드라이브가 표시되는지 확인합니다. 표시되면 디스크 1, 디스크 2 등의 레이블이 있는 위치를 마우스 오른쪽 버튼으로 클릭하고 "디스크 초기화"를 선택합니다. 이 영역은 디스크 관리로 이동할 때 자동으로 표시되기도 합니다. 그런 다음 디스크 레이블 오른쪽에 있는 영역을 마우스 오른쪽 버튼으로 클릭하고 "새 단순 볼륨"을 선택합니다. 파티션의 크기, 드라이브 문자 및 포맷을 선택하여 마법사를 계속 진행합니다.
macOS에서 - "디스크 삽입" 창이 나타납니다. "초기화" 버튼을 클릭합니다. 그러면 디스크 유틸리티로 이동합니다. 창 왼쪽에 표시된 드라이브 목록에서 Kingston 드라이브를 선택합니다. 사용할 수 있는 여러 작업 중에서 파티션을 선택합니다. "볼륨 구성"에서 "파티션 1"을 선택합니다. 포맷하려면 영구 드라이브의 경우 MacOS 확장형을 선택합니다. 외장 드라이브의 경우에는 ExFAT를 선택합니다(MacOS 10.6.6 이상에서 사용 가능). 적용을 클릭합니다. 드라이브의 모든 데이터가 삭제된다는 내용의 경고 창이 표시됩니다. 하단에 있는 파티션 버튼을 클릭합니다.
FAQ: KSD-060314-GEN-14
When the SSD is recognized in the BIOS, but Windows 7 installation does not detect the drive, follow these steps:
Disconnect any other hard drives or SSDs. Boot the Windows 7 installation disk. Choose repair, then advanced, then command prompt. Type: "diskpart" without quotes and press Enter. You will see a prompt labeled "diskpart". Type the following commands and press enter after each one.
Diskpart > Select Disk 0
Diskpart > Clean
Diskpart > Create Partition Primary Align=1024
Diskpart > Format Quick FS=NTFS
Diskpart > List Partition
Diskpart > Active
Diskpart > Exit
Then reboot the computer to the Windows 7 installation disk.
FAQ: KSD-100214-GEN-20
일반적으로 메인보드 또는 시스템에 포함된 모든 SATA 케이블로 충분합니다. Kingston은 가능하면 품질이 낮은 SATA 케이블을 사용하지 않을 것을 권장합니다.
FAQ: KSD-012010-001-23
IDE에서 AHCI로 변경한 후 잘못된 스토리지 드라이버가 로드되어 부팅 실패가 발생할 수 있습니다.
자세한 내용은 Microsoft 설명서, 부팅 드라이브의 SATA 모드를 변경한 후 오류 메시지 발생을 참조하십시오.
참고: Kingston은 시스템 BIOS에서 IDE를 AHCI로 수정하려는 경우 Windows를 새로 설치할 것을 권장합니다.
FAQ: KSD-012010-001-24
SATA 전원 및 데이터 케이블이 드라이브에 제대로 연결되어 있는지 확인합니다.
다음으로, SATA 케이블이 메인보드의 SATA 포트에 단단히 연결되어 있고 BIOS에서 포트가 활성화되어 있는지 확인합니다.
간혹 SATA 케이블이 분리되거나 손상되어 교체해야 하는 경우가 있습니다. 포트나 케이블에 문제가 있는 것으로 의심되면 케이블을 교체하거나 다른 SATA 포트를 테스트해 보십시오.
그래도 드라이브가 감지되지 않으면 Kingston 기술 지원팀에 문의하십시오.
FAQ: KSD-012010-001-27
드라이브가 존재하지 않는다면 시스템의 전원을 끄고 설치 및 연결 상태를 확인하여 드라이브가 제대로 장착 및/또는 연결되었는지 확인하십시오.
드라이브가 BIOS에 있는 경우 운영 체제 내에서 디스크를 초기화해야 할 수도 있습니다.
Windows의 경우:
1단계: 드라이브가 제대로 연결되었는지 확인하고 시스템의 전원을 켠 다음 Windows OS로 부팅합니다.
2단계: Windows + X를 누르고 디스크 관리를 선택합니다.
3단계: SSD가 새 것이고 초기화되지 않은 경우 "디스크 초기화"라는 팝업이 나타납니다.
4단계: 다음 중에서 선택합니다:
MBR(마스터 부트 레코드): 2TB 미만의 드라이브 및 구형 시스템에 적합합니다.
GPT(GUID 파티션 테이블): 최신 시스템 및 2TB 이상의 드라이브에 권장됩니다.
5단계: 확인을 클릭하여 디스크를 초기화합니다.
6단계: 초기화를 마치면 SSD가 "할당되지 않음"으로 표시됩니다. 마우스 오른쪽 버튼으로 클릭하고 새 단순 볼륨을 선택합니다.
7단계: 화면의 지시에 따라 SSD를 포맷하고 드라이브 문자를 할당합니다.
Mac OS의 경우:
1단계: 드라이브가 제대로 연결되었는지 확인하고 시스템의 전원을 켠 다음 Mac OS로 부팅합니다.
2단계: Disk Utility(디스크 유틸리티)를 엽니다(Spotlight에서 Cmd + 스페이스키를 누른 다음 "Disk Utility(디스크 유틸리티)"를 입력하면 찾을 수 있습니다).
3단계: 왼쪽 창에서 SSD를 선택합니다.
4단계: Erase(지우기)를 클릭합니다.
5단계: 드라이브의 이름을 입력하고 포맷 아래에서 다음을 선택합니다:
최신 Mac 및 SSD의 경우 APFS를 선택합니다.
구형 시스템 또는 HDD의 경우 Mac OS Extended(Journaled)(Mac OS 확장형(저널링))를 선택합니다.
6단계: Erase(지우기)를 클릭합니다. 프로세스가 완료되면 SSD를 사용할 준비가 된 것입니다.
Linux의 경우:
1단계: 드라이브가 제대로 연결되었는지 확인하고 시스템의 전원을 켠 다음 Linux OS로 부팅합니다.
2단계: 터미널을 엽니다.
3단계: sudo fdisk -l을 입력해 연결된 모든 드라이브를 나열합니다. 크기별로 SSD를 식별하고 장치 이름(예: /dev/sdb)을 기록합니다.
4단계: fdisk 또는 parted 명령어를 사용하여 SSD를 초기화합니다. 다음은 fdisk를 사용하는 기본 가이드입니다:
sudo fdisk /dev/sdb를 입력합니다(/dev/sdb를 귀하의 SSD의 장치 이름으로 바꿉니다).
g를 눌러 새 GPT 파티션 테이블을 생성합니다.
새 파티션을 생성하려면 n을 누릅니다. 메시지 프롬프트에 따라 크기와 유형을 지정합니다.
w를 눌러 변경 내용을 기록합니다.
5단계: SSD에서 새 파티션을 포맷합니다(예: /dev/sdb1). 원하는 파일 시스템으로 포맷할 수 있습니다:
ext4의 경우: sudo mkfs.ext4 /dev/sdb1
ext3의 경우: sudo mkfs.ext3 /dev/sdb1
FAT32의 경우: sudo mkfs.vfat /dev/sdb1
6단계: SSD를 마운트합니다:
마운트 지점 생성: sudo mkdir /mnt/myssd
SSD 마운트: sudo mount /dev/sdb1 /mnt/myssd
dev/sdb1을 귀하의 SSD의 파티션 이름으로 바꾸는 것을 잊지 마십시오.
FAQ: KSD-012010-001-15
시중에는 다양한 외장형 엔클로저가 판매되고 있습니다. Kingston은 모든 시스템 유형과 호환되는 것을 목표로 하고 있지만, 간혹 호환되지 않는 경우가 있을 수 있습니다.
비 Kingston SSD 엔클로저에 문제가 있는 경우, Kingston 기술 지원팀에 문의하여 문제 해결 지원을 받으십시오.
FAQ: KSD-012010-001-18
다음의 안내서를 참조하십시오.
내부 2.5" SSD를 설치하는 방법
또한 교체할 드라이브를 복제할 수도 있습니다. 포함된 Acronis 소프트웨어와 함께 드라이브 복제 안내서를 참조하십시오.
FAQ: KSD-012010-001-02
이것이 불가능하거나 이전에 기존 데이터를 새 드라이브에 복제한 경우에는 시스템 BIOS에서 새 드라이브가 부팅 장치로 표시되는지 확인한 다음 부팅용으로 선택합니다.
FAQ: KSD-012010-001-03
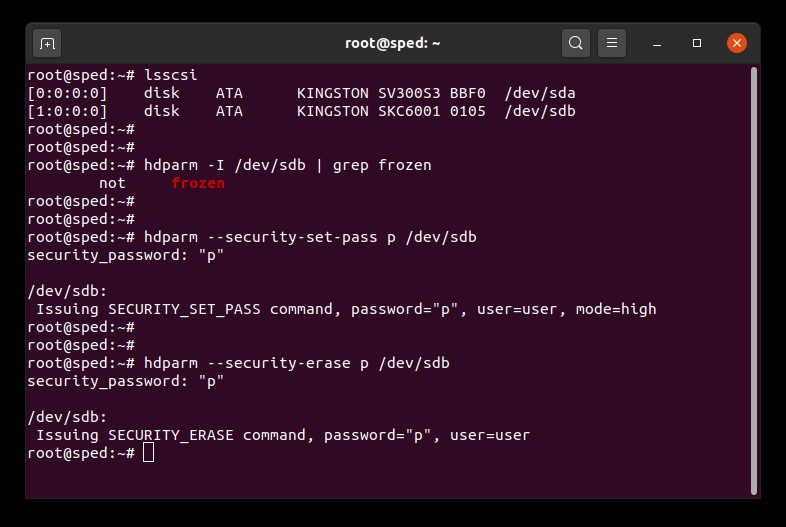
Linux용 보안기능 제거 사용자 가이드
이 가이드는 Linux 도구를 사용하여 Kingston SSD를 안전하게 제거하는 방법을 안내합니다.
SATA 보안기능 제거 절차
경고
진행하기 전에 중요한 모든 데이터가 완전히 백업되었는지 확인하십시오!
전제 조건
- 루트 권한이 있어야 합니다.
- 다른 (비 OS) 드라이브로서 SSD를 시스템에 연결해야 합니다.
- lsscsi 및 hdparm을 설치해야 합니다. 유통업체의 패키지 매니저로 lsscsi 및 hdparm을 설치해야 할 수 있습니다.
- 드라이브의 보안이 잠겨 있지 않아야 합니다.
- 드라이브를 비밀번호로 보호해서는 안 됩니다.
지침
1. 삭제하고자 하는 드라이브의 장치 이름(/dev/sdX)을 찾으십시오:
# lsscsi2. 드라이브의 보안이 잠겨 있지 않은지 확인합니다:
# hdparm -I /dev/sdX | grep frozen"frozen(잠김)"("not frozen(잠기지 않음” 아님) 결과가 표시되면 다음 단계를 계속 진행할 수 없습니다. 다음 방법 중 하나를 시도하여 보안 잠금 기능 제거를 시도해야 합니다.
방법 1:
시스템이 절전 모드이면(RAM 절전 대기) 이를 해제합니다. 대부분의 배포에서 절전 명령은 다음과 같습니다.
# systemctl suspend이제 hdparm 명령을 다시 발급합니다. 명령이 기능한 경우 "frozen(잠김)"("not frozen(잠기지 않음” 아님) 결과가 표시됩니다.
방법 2:
드라이브를 핫 플러그에 연결합니다. 핫 플러그에 연결하려면 SATA 전원 케이블을 드라이브에서 물리적으로 분리하고 시스템에 전원이 공급되는 동안 케이블을 다시 연결합니다. BIOS에 핫 플러그를 연결해야 할 수 있습니다. 일부 시스템은 핫 플러그를 지원하지 않을 수 있습니다.
이제 hdparm 명령을 다시 발급합니다. 명령이 기능한 경우 "frozen(잠김)"("not frozen(잠기지 않음” 아님) 결과가 표시됩니다.
3. 드라이브에 사용자 비밀번호를 설정합니다. 모든 형태의 비밀번호를 사용할 수 있습니다. 여기에서는 비밀번호를 "p"로 설정합니다.
# hdparm --security-set-pass p /dev/sdX4. 같은 비밀번호를 사용하여 보안기능 제거 명령을 드라이브에 발급합니다: 1234567890 - 1234567890 -
# hdparm --security-erase p /dev/sdX이 명령을 완료하는 데 몇 분이 소요될 수 있습니다. 완료에 성공하면 드라이브 비밀번호를 삭제합니다. 보안기능 제거가 일시 중단되거나 달리 실패한 경우 드라이브 보안이 잠금 상태가 될 수 있습니다. 이러한 경우 아래의 명령을 사용하여 보안 잠금 기능을 제거한 다음 보안기능 제거 절차를 다시 시도할 수 있습니다.
# hdparm --security-disable p /dev/sdXSATA 보안기능 제거 예시
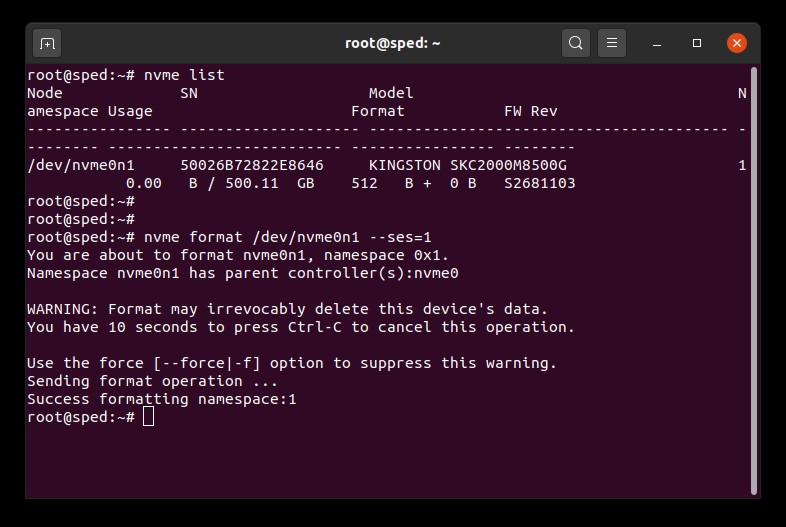
SATA 보안기능 제거 절차
경고
진행하기 전에 중요한 모든 데이터가 완전히 백업되었는지 확인하십시오!
전제 조건
- 루트 권한이 있어야 합니다.
- 다른 (비 OS) 드라이브로서 SSD를 시스템에 연결해야 합니다.
- nvme-cli를 설치해야 합니다. 유통업체의 패키지 매니저로 nvme-cli를 설치해야 할 수 있습니다.
- 드라이브를 비밀번호로 보호해서는 안 됩니다.
지침
1. 삭제하고자 하는 드라이브의 장치 이름(/dev/nvmeXn1)을 찾으십시오:
# nvme list2. 형식 명령을 드라이브에 발급합니다. 여기에서 보안기능 제거 설정을 1로 설정하며 이는 사용자 데이터 삭제를 나타냅니다.
# nvme format /dev/nvmeXn1 --ses=1이 명령을 완료하는 데 몇 분이 소요될 수 있습니다.
NVMe 보안기능 제거 예시
FAQ: KSM-SE-LIX
아니오. 이 드라이브에 대한 암호를 분실하면 드라이브에 액세스할 수 없습니다.
암호 분실에는 Kingston 보증이 적용되지 않음을 유의하십시오. 단, 드라이브에 대해 마스터 또는 관리 암호를 사용하는 경우는 제외됩니다.
BIOS가 이 기능을 지원해야 하며 이 드라이브에 대해 ATA 보안을 초기화할 때 암호를 설정해야 합니다. 아니오. 이 드라이브에 대한 암호를 분실하면 드라이브에 액세스할 수 없습니다.
암호 분실에는 Kingston 보증이 적용되지 않음을 유의하십시오. 단, 드라이브에 대해 마스터 또는 관리 암호를 사용하는 경우는 제외됩니다. BIOS가 이 기능을 지원해야 하며 이 드라이브에 대해 ATA 보안을 초기화할 때 암호를 설정해야 합니다.
KSD-011411-ENC-03
FAQ: KSD-011411-ENC-03
사용할 수 있지만 먼저 원래 컴퓨터에서 드라이브에 대한 보안을 해제해야 합니다. 그런 다음 새 컴퓨터에서 보안을 다시 설정할 수 있습니다.
FAQ: KSD-011411-ENC-02
암호화된 SSD에는 대부분의 비즈니스 클래스 컴퓨터 및 마더보드에서 사용할 수 있는 하드 드라이브 보안 명령이 사용됩니다. 이 보안 명령은 BIOS를 통해 액세스됩니다. 따라서 많은 HDD 및 SSD용 암호를 생성하고 필요할 경우 드라이브를 안전하게 삭제할 수 있습니다. 일부 컴퓨터에서는 이 기능을 지원하지 않습니다. 이 경우 드라이브는 여전히 사용할 수 있지만 이러한 보안 기능은 사용할 수 없습니다. BIOS 암호와 하드 드라이브 보안 암호를 혼동하지 마십시오.
FAQ: KSD-011411-ENC-01
먼저 관리자 권한 명령 프롬프트 창을 엽니다.
관리자 권한 명령 프롬프트 창을 열려면: 시작 버튼을 클릭하고 > 검색 상자에 "CMD.exe"를 입력한 다음 > "CMD"를 마우스 오른쪽 버튼으로 클릭하고 "관리자 권한으로 실행"을 선택합니다(프롬프트 확인 메시지가 표시된 경우 "예"를 클릭).
TRIM 명령이 활성화되었는지 확인하려면 관리자 권한 명령에서 다음을 입력하고 Enter를 누릅니다.
fsutil behavior query disabledeletenotify
결과는 다음과 같습니다. DisableDeleteNotify = 1 (Windows TRIM commands are disabled) DisableDeleteNotify = 0 (Windows TRIM commands are enabled)
TRIM 명령을 활성화하려면 관리자 권한 명령에서 다음을 입력하고 Enter를 누릅니다.
fsutil behavior set disabledeletenotify 0
TRIM 명령을 비활성화하려면 관리자 권한 명령에서 다음을 입력하고 Enter를 누릅니다.
fsutil behavior set disabledeletenotify 1
FAQ: KSD-072211-GEN-18
Kingston은 고객의 개인 데이터 및 정보의 기밀성과 보안성을 유지하는 일이 얼마나 중요한지 잘 알고 있습니다.Kingston은 보증 교환 또는 수리를 위해 SSD(Solid State Drive)를 당사 RMA 시설로 반품할 때 고객의 모든 개인 정보에 대한 보안을 유지하기 위한 조치를 취합니다.SSD가 수리 센터에 도착하면 철저한 테스트 공정을 거치게 됩니다.첫 번째 테스트 단계에서는 SSD에 대해 ATA 보안 삭제 공정을 수행하여 모든 데이터 및 정보를 지웁니다.ATA 보안 삭제(ATA Secure Erase) 공정은 미국 국립 표준 기술원(NIST 800-88)으로부터 기밀 데이터의 법적 완전 삭제(Sanitization)를 위한 연방 승인을 받았습니다.SSD가 작동 가능한 상태가 아니며 ATA 보안 공정을 실시할 수 없는 경우에는 SSD가 분해되고 NAND 플래시 메모리는 파괴됩니다.
FAQ: KSD-022411-GEN-15
당사의 모든 SSD는 RAID에서 사용할 수 있습니다.하지만 내구성 사양으로 인해 특정 부품 번호만 RAID에서 사용해야 합니다. 서버의 경우 Kingston에 문의하여 워크로드에 사용할 최상의 Kingston SSD를 결정하십시오.
FAQ: KSD-052511-GEN-17
S.M.A.R.T란 (Self-Monitoring(자체 모니터링), Analysis(분석) 및 Reporting Technology(보고 기술))의 약자로서, 하드 드라이브 및 SSD의 내장 모니터링 기능을 말합니다.이 기능을 통해 사용자는 장치의 상태를 모니터링할 수 있습니다.이러한 모니터링은 S.M.A.R.T. 기능용으로 특별히 고안된 모니터링 소프트웨어를 통해 수행됩니다.모든 SSDNow 드라이브는 S.M.A.R.T.를 지원합니다.
FAQ: KSD-011411-GEN-10
SSD 펌웨어는 호스트 시스템과의 통신, 데이터 저장 및 검색, 웨어 레벨링 및 오류 수정을 포함하여 SSD의 작동을 관리하는 SSD 내의 통합 소프트웨어입니다.
SSD에 새 펌웨어가 필요한 경우, Kingston의 SSD Manager 소프트웨어를 실행하면 알림을 받게 됩니다.
FAQ: KSD-012010-001-11
S.M.A.R.T란 (Self-Monitoring(자체 모니터링), Analysis(분석) 및 Reporting Technology(보고 기술))의 약자로서, 하드 드라이브 및 SSD의 내장 모니터링 기능을 말합니다.이 기능을 통해 사용자는 장치의 상태를 모니터링할 수 있습니다.이러한 모니터링은 S.M.A.R.T. 기능용으로 특별히 고안된 모니터링 소프트웨어를 통해 수행됩니다.모든 SSDNow 드라이브는 S.M.A.R.T.를 지원합니다.
FAQ: KSD-011411-GEN-10
TRIM 및 가비지 컬렉션은 최신 SSD가 성능과 내구성을 모두 개선하기 위해 통합한 기술입니다. SSD가 신제품(fresh out of box) 상태인 경우 모든 NAND 블록이 비워져 있어 SSD는 단일 작업으로 빈 블록에 새로운 데이터를 쓸 수 있습니다. 시간이 지나면서 대부분의 빈 블록은 사용자 데이터를 포함하는 이미 사용된 블록이 됩니다. 이미 사용된 블록에 새로운 데이터를 쓰기 위해 SSD는 읽기-수정-쓰기 주기를 수행해야 합니다. 읽기-수정-쓰기 주기로 인해 SSD 전반적인 성능이 저하될 수 있는데 그 이유는 단일 작업 대신 세 개의 작업을 수행하기 때문입니다. 읽기-수정-쓰기 주기는 또한 SSD 전반적인 내구성을 저하시키는 쓰기 증폭을 유발할 수 있습니다.
TRIM 및 가비지 컬렉션은 이미 사용된 블록을 확보하여 SSD 성능과 내구성을 향상시키기 위해 함께 작동할 수 있습니다. 가비지 컬렉션은 SSD 컨트롤러에 내장된 기능이며 빈 블록을 더 많이 확보하기 위해 이미 사용된 블록에 저장된 데이터를 통합합니다. 이 과정은 백그라운드에서 이루어지고 SSD 자체가 이 과정을 완전히 관리합니다. 하지만 SSD는 어느 블록이 사용자 데이터를 포함하고 어느 블록이 사용자가 이미 삭제한 오래된 데이터를 포함하는지 감지하지 못할 수 있습니다. 여기에 TRIM 기능이 적용됩니다. TRIM을 통해 작업 시스템은 데이터가 삭제한 SSD를 알려 주어 SSD는 이전에 사용된 블록을 확보할 수 있습니다. TRIM이 작동하려면 작업 시스템과 SSD 모두 이것을 지원해야 합니다. 현재 최신 작업 시스템 및 SSD는 TRIM을 지원하지만 대부분의 RAID 구성은 이것을 지원하지 않습니다.
Kingston SSD는 수명주기 내내 최고의 성능 및 내구성을 유지하기 위해 가비지 컬렉션 및 TRIM 기술 모두를 활용합니다.
FAQ: KSD-011411-GEN-13
ElectroStatic Discharge, ESD is simply the discharge of built up static electricity.ESD should not be taken lightly as this is one of the few things an individual can do to damage or destroy their computer or hardware components.It is like when you rub your feet on the carpet and you touch something metal.ESD can occur without the user feeling a shock and will occur when only working on the inside of the computer or handling hardware.
How to help prevent ESD
The best method of preventing ESD is to use an ESD wrist strap or a grounding mat or table.However, because most users do not have access to these items, we have included the below steps to help reduce the chance of ESD as much as possible.
- Standing – We recommend that you are standing at all times when working on the computer. Setting on a chair can generate more electrostatic.
- Cords - Make sure everything is removed from the back of the computer (power cord, mouse, keyboard, etc).
- Clothes - Make sure not to wear any clothing that conducts a lot of Electrical Charge, such as a wool sweater.
- Accessories - To help reduce ESD and help prevent other problem, it is also a good idea to remove all jewelry.
- Weather - Electrical storms can increase the ESD risk; unless absolutely necessary, try not to work on a computer during an electrical storm.In very dry areas, the air itself becomes a part of the electrostatic build-up mechanism every time there is an air flow (wind, air conditioning, blower) passing over an insulated surface.Do not let high humidity levels build a false confidence, and beware of corrosion problems with interconnects and other electrical interfaces.
To learn more about ESD and how to protect your electronics, please refer to the below site.
ESD Association
https://www.esda.org
FAQ: KTC-Gen-ESD
이러한 NVMe와 SATA SSD의 차이점에 대해서는 가이드를 참조하세요.
FAQ: KSD-012010-001-19
솔리드 스테이트 드라이브와 하드 디스크 드라이브의 차이점에 관한 가이드를 참조하십시오.
FAQ: KSD-012010-001-29
Kingston은 가능한 경우 SSD를 사용 가능한 최신 펌웨어로 업데이트할 것을 권장합니다. Kingston의 SSD Manager 소프트웨어를 사용하여 드라이브에 사용 가능한 업데이트가 있는지 확인할 수 있습니다.
FAQ: KSD-012010-001-25
원본 드라이브보다 큰 새 드라이브에 복제할 때 소프트웨어가 파티션 크기를 제대로 조정하지 못할 수 있습니다. 이 경우 미사용 공간이 발생할 수 있습니다. 이를 방지하려면 복제 지침을 따르십시오.
FAQ: KSD-012010-001-04
1. 먼저, 데이터를 백업하는 것이 좋습니다.
2. 그 다음 다른 시스템으로 드라이브 라벨의 PSID를 사용하여 REVERT(되돌리기)를 완료합니다. 참고: REVERT(되돌리기)를 수행함으로써 드라이브의 모든 데이터가 안전하게 삭제됩니다.
3. IEEE 1667 지원을 불활성화합니다.
4. KSM을 새로 고침하거나 재시작하면 펌웨어 업데이트를 사용할 수 있습니다.
FAQ: KSM-001125-001-01
FAQ: KSM-001125-002-01
FAQ: KSM-001125-001-00
SSD 펌웨어는 호스트 시스템과의 통신, 데이터 저장 및 검색, 웨어 레벨링 및 오류 수정을 포함하여 SSD의 작동을 관리하는 SSD 내의 통합 소프트웨어입니다.
SSD에 새 펌웨어가 필요한 경우, Kingston의 SSD Manager 소프트웨어를 실행하면 알림을 받게 됩니다.
FAQ: KSD-012010-001-11
FAQ: KSD-012010-001-12
FAQ: KSD-012010-001-13
FAQ: KSD-012010-001-14
원본 드라이브보다 큰 새 드라이브에 복제할 때 소프트웨어가 파티션 크기를 제대로 조정하지 못할 수 있습니다. 이 경우 미사용 공간이 발생할 수 있습니다. 이를 방지하려면 복제 지침을 따르십시오.
FAQ: KSD-012010-001-04
드라이브가 존재하지 않는다면 시스템의 전원을 끄고 설치 및 연결 상태를 확인하여 드라이브가 제대로 장착 및/또는 연결되었는지 확인하십시오.
드라이브가 BIOS에 있는 경우 운영 체제 내에서 디스크를 초기화해야 할 수도 있습니다.
Windows의 경우:
1단계: 드라이브가 제대로 연결되었는지 확인하고 시스템의 전원을 켠 다음 Windows OS로 부팅합니다.
2단계: Windows + X를 누르고 디스크 관리를 선택합니다.
3단계: SSD가 새 것이고 초기화되지 않은 경우 "디스크 초기화"라는 팝업이 나타납니다.
4단계: 다음 중에서 선택합니다:
MBR(마스터 부트 레코드): 2TB 미만의 드라이브 및 구형 시스템에 적합합니다.
GPT(GUID 파티션 테이블): 최신 시스템 및 2TB 이상의 드라이브에 권장됩니다.
5단계: 확인을 클릭하여 디스크를 초기화합니다.
6단계: 초기화를 마치면 SSD가 "할당되지 않음"으로 표시됩니다. 마우스 오른쪽 버튼으로 클릭하고 새 단순 볼륨을 선택합니다.
7단계: 화면의 지시에 따라 SSD를 포맷하고 드라이브 문자를 할당합니다.
Mac OS의 경우:
1단계: 드라이브가 제대로 연결되었는지 확인하고 시스템의 전원을 켠 다음 Mac OS로 부팅합니다.
2단계: Disk Utility(디스크 유틸리티)를 엽니다(Spotlight에서 Cmd + 스페이스키를 누른 다음 "Disk Utility(디스크 유틸리티)"를 입력하면 찾을 수 있습니다).
3단계: 왼쪽 창에서 SSD를 선택합니다.
4단계: Erase(지우기)를 클릭합니다.
5단계: 드라이브의 이름을 입력하고 포맷 아래에서 다음을 선택합니다:
최신 Mac 및 SSD의 경우 APFS를 선택합니다.
구형 시스템 또는 HDD의 경우 Mac OS Extended(Journaled)(Mac OS 확장형(저널링))를 선택합니다.
6단계: Erase(지우기)를 클릭합니다. 프로세스가 완료되면 SSD를 사용할 준비가 된 것입니다.
Linux의 경우:
1단계: 드라이브가 제대로 연결되었는지 확인하고 시스템의 전원을 켠 다음 Linux OS로 부팅합니다.
2단계: 터미널을 엽니다.
3단계: sudo fdisk -l을 입력해 연결된 모든 드라이브를 나열합니다. 크기별로 SSD를 식별하고 장치 이름(예: /dev/sdb)을 기록합니다.
4단계: fdisk 또는 parted 명령어를 사용하여 SSD를 초기화합니다. 다음은 fdisk를 사용하는 기본 가이드입니다:
sudo fdisk /dev/sdb를 입력합니다(/dev/sdb를 귀하의 SSD의 장치 이름으로 바꿉니다).
g를 눌러 새 GPT 파티션 테이블을 생성합니다.
새 파티션을 생성하려면 n을 누릅니다. 메시지 프롬프트에 따라 크기와 유형을 지정합니다.
w를 눌러 변경 내용을 기록합니다.
5단계: SSD에서 새 파티션을 포맷합니다(예: /dev/sdb1). 원하는 파일 시스템으로 포맷할 수 있습니다:
ext4의 경우: sudo mkfs.ext4 /dev/sdb1
ext3의 경우: sudo mkfs.ext3 /dev/sdb1
FAT32의 경우: sudo mkfs.vfat /dev/sdb1
6단계: SSD를 마운트합니다:
마운트 지점 생성: sudo mkdir /mnt/myssd
SSD 마운트: sudo mount /dev/sdb1 /mnt/myssd
dev/sdb1을 귀하의 SSD의 파티션 이름으로 바꾸는 것을 잊지 마십시오.
FAQ: KSD-012010-001-15
시중에는 다양한 외장형 엔클로저가 판매되고 있습니다. Kingston은 모든 시스템 유형과 호환되는 것을 목표로 하고 있지만, 간혹 호환되지 않는 경우가 있을 수 있습니다.
비 Kingston SSD 엔클로저에 문제가 있는 경우, Kingston 기술 지원팀에 문의하여 문제 해결 지원을 받으십시오.
FAQ: KSD-012010-001-18
시스템 BIOS로 들어가서 대상 SATA 포트에 핫 플러그가 활성화되어 있는지 확인합니다.
핫 플러그가 이미 활성화되어 있는 경우, 다른 SATA 케이블 및/또는 SATA 포트를 사용해 보십시오.
그래도 문제가 해결되지 않으면 Kingston 기술 지원팀에 문의하십시오.
FAQ: KSD-012010-001-26
SATA 전원 및 데이터 케이블이 드라이브에 제대로 연결되어 있는지 확인합니다.
다음으로, SATA 케이블이 메인보드의 SATA 포트에 단단히 연결되어 있고 BIOS에서 포트가 활성화되어 있는지 확인합니다.
간혹 SATA 케이블이 분리되거나 손상되어 교체해야 하는 경우가 있습니다. 포트나 케이블에 문제가 있는 것으로 의심되면 케이블을 교체하거나 다른 SATA 포트를 테스트해 보십시오.
그래도 드라이브가 감지되지 않으면 Kingston 기술 지원팀에 문의하십시오.
FAQ: KSD-012010-001-27
원본 드라이브보다 큰 새 드라이브에 복제할 때 소프트웨어가 파티션 크기를 제대로 조정하지 못할 수 있습니다. 이 경우 미사용 공간이 발생할 수 있습니다. 이를 방지하려면 복제 지침을 따르십시오.
FAQ: KSD-012010-001-04
SSD 펌웨어는 호스트 시스템과의 통신, 데이터 저장 및 검색, 웨어 레벨링 및 오류 수정을 포함하여 SSD의 작동을 관리하는 SSD 내의 통합 소프트웨어입니다.
SSD에 새 펌웨어가 필요한 경우, Kingston의 SSD Manager 소프트웨어를 실행하면 알림을 받게 됩니다.
FAQ: KSD-012010-001-11
FAQ: KSD-012010-001-13
FAQ: KSD-012010-001-12
이것이 불가능하거나 이전에 기존 데이터를 새 드라이브에 복제한 경우에는 시스템 BIOS에서 새 드라이브가 부팅 장치로 표시되는지 확인한 다음 부팅용으로 선택합니다.
FAQ: KSD-012010-001-03
다음의 안내서를 참조하십시오.
내부 2.5" SSD를 설치하는 방법
또한 교체할 드라이브를 복제할 수도 있습니다. 포함된 Acronis 소프트웨어와 함께 드라이브 복제 안내서를 참조하십시오.
FAQ: KSD-012010-001-02
시중에는 다양한 외장형 엔클로저가 판매되고 있습니다. Kingston은 모든 시스템 유형과 호환되는 것을 목표로 하고 있지만, 간혹 호환되지 않는 경우가 있을 수 있습니다.
비 Kingston SSD 엔클로저에 문제가 있는 경우, Kingston 기술 지원팀에 문의하여 문제 해결 지원을 받으십시오.
FAQ: KSD-012010-001-18
드라이브가 존재하지 않는다면 시스템의 전원을 끄고 설치 및 연결 상태를 확인하여 드라이브가 제대로 장착 및/또는 연결되었는지 확인하십시오.
드라이브가 BIOS에 있는 경우 운영 체제 내에서 디스크를 초기화해야 할 수도 있습니다.
Windows의 경우:
1단계: 드라이브가 제대로 연결되었는지 확인하고 시스템의 전원을 켠 다음 Windows OS로 부팅합니다.
2단계: Windows + X를 누르고 디스크 관리를 선택합니다.
3단계: SSD가 새 것이고 초기화되지 않은 경우 "디스크 초기화"라는 팝업이 나타납니다.
4단계: 다음 중에서 선택합니다:
MBR(마스터 부트 레코드): 2TB 미만의 드라이브 및 구형 시스템에 적합합니다.
GPT(GUID 파티션 테이블): 최신 시스템 및 2TB 이상의 드라이브에 권장됩니다.
5단계: 확인을 클릭하여 디스크를 초기화합니다.
6단계: 초기화를 마치면 SSD가 "할당되지 않음"으로 표시됩니다. 마우스 오른쪽 버튼으로 클릭하고 새 단순 볼륨을 선택합니다.
7단계: 화면의 지시에 따라 SSD를 포맷하고 드라이브 문자를 할당합니다.
Mac OS의 경우:
1단계: 드라이브가 제대로 연결되었는지 확인하고 시스템의 전원을 켠 다음 Mac OS로 부팅합니다.
2단계: Disk Utility(디스크 유틸리티)를 엽니다(Spotlight에서 Cmd + 스페이스키를 누른 다음 "Disk Utility(디스크 유틸리티)"를 입력하면 찾을 수 있습니다).
3단계: 왼쪽 창에서 SSD를 선택합니다.
4단계: Erase(지우기)를 클릭합니다.
5단계: 드라이브의 이름을 입력하고 포맷 아래에서 다음을 선택합니다:
최신 Mac 및 SSD의 경우 APFS를 선택합니다.
구형 시스템 또는 HDD의 경우 Mac OS Extended(Journaled)(Mac OS 확장형(저널링))를 선택합니다.
6단계: Erase(지우기)를 클릭합니다. 프로세스가 완료되면 SSD를 사용할 준비가 된 것입니다.
Linux의 경우:
1단계: 드라이브가 제대로 연결되었는지 확인하고 시스템의 전원을 켠 다음 Linux OS로 부팅합니다.
2단계: 터미널을 엽니다.
3단계: sudo fdisk -l을 입력해 연결된 모든 드라이브를 나열합니다. 크기별로 SSD를 식별하고 장치 이름(예: /dev/sdb)을 기록합니다.
4단계: fdisk 또는 parted 명령어를 사용하여 SSD를 초기화합니다. 다음은 fdisk를 사용하는 기본 가이드입니다:
sudo fdisk /dev/sdb를 입력합니다(/dev/sdb를 귀하의 SSD의 장치 이름으로 바꿉니다).
g를 눌러 새 GPT 파티션 테이블을 생성합니다.
새 파티션을 생성하려면 n을 누릅니다. 메시지 프롬프트에 따라 크기와 유형을 지정합니다.
w를 눌러 변경 내용을 기록합니다.
5단계: SSD에서 새 파티션을 포맷합니다(예: /dev/sdb1). 원하는 파일 시스템으로 포맷할 수 있습니다:
ext4의 경우: sudo mkfs.ext4 /dev/sdb1
ext3의 경우: sudo mkfs.ext3 /dev/sdb1
FAT32의 경우: sudo mkfs.vfat /dev/sdb1
6단계: SSD를 마운트합니다:
마운트 지점 생성: sudo mkdir /mnt/myssd
SSD 마운트: sudo mount /dev/sdb1 /mnt/myssd
dev/sdb1을 귀하의 SSD의 파티션 이름으로 바꾸는 것을 잊지 마십시오.
FAQ: KSD-012010-001-15
FAQ: KSD-012010-001-14