SSD KC2000 NVMe PCIe - 技术支持
资源
视频
常见问题
1. 从 https://www.kingston.com/support/technical/ssdmanager 下载 Kingston SSD Manager,以确认您的驱动器是否有可用的固件更新,如果有,请进行更新(如果推荐这样做)。
2. 查看您的系统制造商的支持页面,以确认是否有适用于您系统的 BIOS 更新。
3. 确认您正在运行操作系统的最新版本,并确保没有任何待处理的更新。
4. 确认您正在运行适用于您系统的最新驱动程序。您可以通过访问系统制造商的支持页面并查找最新的驱动程序更新来完成此操作。
如果在执行这些步骤后您的系统仍然遇到问题,请联系 Kingston 技术支持。
FAQ: KSD-012010-001-21
这有用吗?
这在闪存中很常见,无论是内部固态硬盘还是外部 USB 存储,部分原因是闪存与旋转硬盘制造商计算兆字节的方式不同。硬盘制造商将兆字节(或 1000x1000 字节)计算为 1000KB,而基于闪存的存储的二进制计算为 1024KB。
示例:对于基于 1TB 闪存的存储设备,Windows 将计算其容量为 931.32GB。(1,000,000,000,000÷1,024÷1,024÷1,024=931.32GB)。
此外,Kingston 保留了一些列出的容量用于格式化和其他功能,例如固件和/或控制器特定信息,因此一些列出的容量不可用于数据存储。
FAQ: KDT-010611-GEN-06
这有用吗?
注意:当 SMART 温度达到 80°C,散热调节将激活
FAQ: KSD-060117-NVME-02
这有用吗?
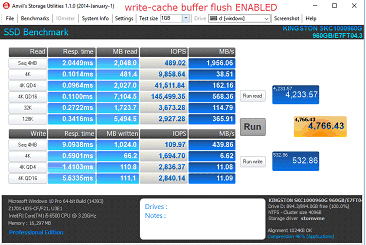
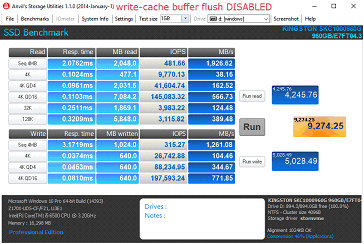
停用写缓存缓冲区刷新的步骤
1. 打开“设备管理器”
2. 选择“磁盘驱动器”并展开,然后选择目标固态硬盘。
3. 右击并选择“属性”
4. 勾选“关闭设备上的 Windows 写入高速缓存缓冲区刷新”
a. 注意:如果禁用设备的写缓存缓冲区刷新,当发生断电时,您有可能丢失传输中的数据和/或出现数据损坏。仅在您了解相关风险的情况下禁用此功能。
性能对比
FAQ: KSD-060117-KC1000-04
这有用吗?
FAQ: KSD-060117-NVME-01
这有用吗?
FAQ: KSD-001525-001-00
这有用吗?
แต่หากทำแบบนั้นไม่ได้หรือหากคุณเคยโคลนข้อมูลเก่าไปยังไดรฟ์นั้นมาก่อน ยืนยันว่าไดรฟ์ใหม่ปรากฏเป็นอุปกรณ์บู๊ตใน BIOS ของระบบ จากนั้นเลือกไดรฟ์นั้นระหว่างการบู๊ตเครื่อง
FAQ: KSD-012010-001-03
这有用吗?
Windows 7 本身不支持 NVMe SSD。请参考 Microsoft 的修复程序说明,以在您的 NVMe 固态硬盘上安装 Windows 7。
FAQ: KSD-012010-001-06
这有用吗?
FAQ: KSD-012010-001-07
这有用吗?
Kingston 不提供 NVMe 捆绑升级套件。
FAQ: KSD-012010-001-30
这有用吗?
如果驱动器在 BIOS 中存在,您可能需要在操作系统中初始化磁盘。
对于 Windows:
第 1 步:确认驱动器已正确连接,然后开机并进入 Windows 操作系统。
第 2 步:按 Windows + X 并选择 Disk Management(磁盘管理)。
第 3 步:如果 SSD 是新的且尚未初始化,将会弹出一个窗口,提示“Initialize Disk”(初始化磁盘)。
第 4 步:选择以下之一:
MBR(主启动记录):适用于 2TB 及更旧系统下的驱动器。
GPT(GUID 分区表):建议用于现代系统和大于 2TB 的驱动器。
第 5 步:单击 OK(确定)初始化磁盘。
第 6 步:初始化后,您将会看到 SSD 显示为“Unallocated”(未分配)。右键单击它并选择 New Simple Volume(新建简单卷)。
第 7 步:按照屏幕上的提示对 SSD 进行格式化并分配驱动器号。
对于 Mac OS:
第 1 步:确认驱动器已正确连接,然后开机并进入 Mac OS。
第 2 步:打开 Disk Utility(磁盘工具),可以使用 Cmd + 空格键调出 Spotlight 搜索,然后输入“Disk Utility”来找到它。
第 3 步:在左窗格中,选择您的 SSD。
第 4 步:单击 Erase(擦除)。
第 5 步:为该驱动器提供一个名称,在 Format(格式)下,选择:
对于较新的 Mac 和 SSD,选择 APFS。
对于较旧的系统或机械硬盘,选择 Mac OS Extended (Journaled)。
第 6 步:单击 Erase(擦除)。此过程完成后,SSD 就可以使用了。
对于 Linux:
第 1 步:确认驱动器已正确连接,然后开机并进入 Linux OS。
第 2 步:打开终端。
第 3 步:输入 sudo fdisk -l 来列出所有连接的驱动器。通过其大小识别您的 SSD,并记下设备名称,例如 /dev/sdb。
第 4 步:使用 fdisk 或 parted 初始化 SSD。以下是一个使用 fdisk 的基本指南:
输入sudo fdisk /dev/sdb(将 /dev/sdb 替换为您的 SSD 的设备名称)。
按 g 键创建一个新的 GPT 分区表。
按 n 键创建一个新分区。按照提示指定分区的大小和类型。
按 w 键写入更改。
第 5 步:格式化 SSD 上的新分区(如 /dev/sdb1)。可以使用您选择的文件系统对其进行格式化:
对于 ext4:sudo mkfs.ext4 /dev/sdb1
对于 ext3:sudo mkfs.ext3 /dev/sdb1
对于 FAT32:sudo mkfs.vfat /dev/sdb1
第 6 步:挂载 SSD:
创建挂载点:sudo mkdir /mnt/myssd
挂载 SSD:sudo mount /dev/sdb1 /mnt/myssd
记得将 /dev/sdb1 替换为您的 SSD 的分区名称。
FAQ: KSD-012010-001-15
这有用吗?
市场上有很多种外部外壳可供选择。虽然 Kingston 致力于与所有系统类型兼容,但偶尔可能会存在不兼容的情况。
如果在使用非 Kingston 固态硬盘外置盒时遇到问题,请联系 Kingston 技术支持部门以获取故障排查协助。
FAQ: KSD-012010-001-18
这有用吗?
请参阅“适用于 Linux 的安全擦除用户指南”
该指南将指导您使用 Linux 工具安全地擦除 Kingston SSD
SATA 安全擦除程序
警告
请确保在继续之前先完全备份所有重要数据!
前提条件
- 您必须拥有根权限。
- 您必须将 SSD 连接到系统作为辅助(非操作系统)驱动器。
- 您必须安装了 lsscsi 和 hdparm。您可能需要使用分发版的包管理器安装它们。
- 驱动器不得处于安全冻结状态。
- 驱动器不得有密码保护。
说明
1. 找到要擦除的驱动器的设备名称 (/dev/sdX):
# lsscsi2. 确保驱动器安全性未冻结:
# hdparm -I /dev/sdX | grep frozen如果输出显示 "frozen"(而非 "not frozen"),则无法继续下一步。您必须尝试以下一种方法,消除安全性冻结状态:
方法 1:
使系统进入睡眠(挂起至 RAM),然后唤醒。在大多数分发版上,挂起的命令为:
# systemctl suspend此时再次发出 hdparm 命令。如果可行,输出将显示 "not frozen"(而非 "frozen")。
方法 2:
热插入驱动器。在系统通电的状态下,以物理方式从驱动器拔下 SATA 电源线后再插回,便完成了热插入。您可能需要在 BIOS 中启用热插拔。并非所有系统都支持热插拔。
此时再次发出 hdparm 命令。如果可行,输出将显示 "not frozen"(而非 "frozen")。
3. 在驱动器上设置用户密码。密码可以随意设置。这里我们将密码设置为 "p":
# hdparm --security-set-pass p /dev/sdX4. 使用同一密码向驱动器发出安全擦除命令:1234567890 - 1234567890 -
# hdparm --security-erase p /dev/sdX此命令执行完成可能需要几分钟。驱动器密码在成功完成后将会删除。
如果安全擦除中断或失败,您的驱动器可能变成安全锁定。在此情况下,您可以使用下面的命令取消安全锁定,然后重试安全擦除程序:
# hdparm --security-disable p /dev/sdXSATA 安全擦除示例
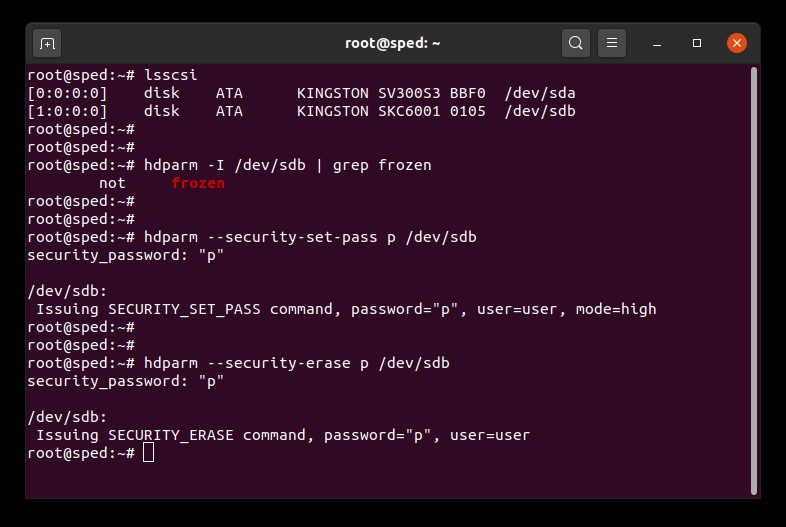
请参阅“适用于 Linux 的安全擦除用户指南”
该指南将指导您使用 Linux 工具安全地擦除 Kingston SSD
SATA 安全擦除程序
警告
请确保在继续之前先完全备份所有重要数据!
前提条件
- 您必须拥有根权限。
- 您必须将 SSD 连接到系统作为辅助(非操作系统)驱动器。
- 您必须安装 nvme-cli。您可能需要使用分发版的包管理器安装它。
- 驱动器不得有密码保护。
说明
1. 找到要擦除的驱动器的设备名称 (/dev/nvmeXn1):
# nvme list2. 向驱动器发出格式化命令。在此我们将安全擦除设置为 1,以指示用户数据擦除:
# nvme format /dev/nvmeXn1 --ses=1此命令执行完成可能需要几分钟。
NVMe 安全擦除示例
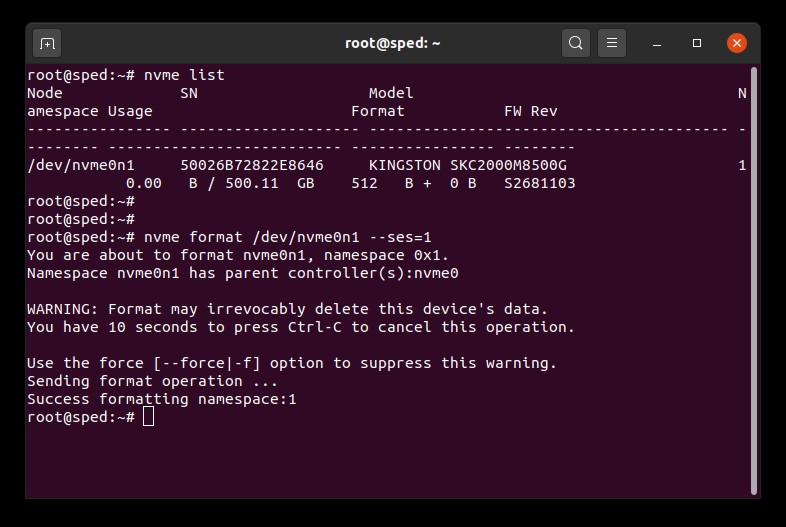
FAQ: KSM-SE-LIX
这有用吗?
SSD 固件是 SSD 内部集成的软件,负责管理 SSD 的操作,包括与主机系统的通信、数据的存储和检索、磨损均衡以及错误校正。
如果您的 SSD 需要新的固件,您会在运行 Kingston 的 SSD Manager 软件时收到通知。
FAQ: KSD-012010-001-11
这有用吗?
Trim 和垃圾回收是现代 SSD 采用的技术,用于改善性能和耐用性。当 SSD 刚刚从箱中取出时,所有 NAND 块都是空的,因此 SSD 可以通过一次操作将新数据写入空块。随着时间推移,所有空块会被使用并包含用户数据。为了向已用块写入新数据,SSD 将被强制执行读取-修改-写入周期。读取-修改-写入周期会降低 SSD 整体性能,因为 SSD 现在必须执行三次操作,而非一次。读取-修改-写入周期还会导致写入放大,从而降低 SSD 整体耐用性。
Trim 和垃圾回收可以联合释放已用块,从而改善 SSD 性能和耐用性。垃圾回收是 SSD 控制器内置的一项功能,用于整合已用块中的数据,以释放更多空块。此流程在后台进行,完全由 SSD 自己操作。不过,SSD 可能不知道哪些块包含用户数据,哪些块包含用户已删除的陈旧数据。这正是 Trim 发挥作用的地方。Trim 允许操作系统让 SSD 了解数据已被删除,因此 SSD 可以释放之前的已用块。要让 Trim 正常运行,操作系统和 SSD 必须都支持 Trim。目前,多数现代操作系统和 SSD 支持 Trim,不过多数 RAID 配置不支持 Trim。
金士顿 SSD 充分利用了垃圾回收和 Trim 两项技术,可在 SSD 整个生命周期内保持尽可能高的性能和耐用性。
FAQ: KSD-011411-GEN-13
这有用吗?
M.2 是物理外观尺寸。SATA 和 PCIe 是指存储接口,主要不同之处在于 M.2 固态硬盘的性能和所使用的协议(语言)。
M.2 规范设计适用于 SATA 和 PCIe 两种接口的固态硬盘。M.2 SATA 固态硬盘可以使用与典型 2.5 英寸 SATA 固态硬盘相同的控制器。M.2 PCIe 固态硬盘使用专为支持 PCIe 协议而专门设计的控制器。M.2 固态硬盘只能支持一种协议,但某些系统的 M.2 插槽可以支持 SATA 或 PCIe。
FAQ: KSD-004005-001-00
这有用吗?
静电放电 (ESD) 就是指积聚的静电放电的过程。 不应忽视静电放电,因为这是会导致计算机或硬件组件被人为损坏或毁坏的为数不多的几种方式之一。 就像脚在地毯上摩擦之后,再触摸金属物质时有可能会出现静电放电。 静电放电发生时,用户不一定会感受到触电,并且只有在计算机内部操作或移动硬件时才会发生。
如何防止静电放电
防止静电放电的最佳方法是使用静电放电腕带、接地垫或接地工作台。 但是,由于大多数用户都没有这些装置,我们罗列了以下步骤来尽可能降低发生静电放电的几率。
- 站立 – 我们建议您在计算机上工作时保持站立。 坐在椅子上会产生更多静电。
- 线缆 - 确保计算机背面的所有线缆都已被拔下(电源线、鼠标、键盘等)。
- 衣服 - 确保不要穿着会产生大量静电的衣物,如毛衣。
- 配饰 - 为了减少静电放电和防止其他问题,最好取下所有的首饰。
- 天气 - 雷暴天气会增加静电放电的风险;除非绝对必要,否则不要在雷暴天气时,在计算机上工作。 在十分干燥的地区,每次有气流(风、空调、鼓风机)经过绝缘表面时,空气本身就会成为静电积聚机制的一部分。 不要被高湿度所误导,并注意连接处以及其他电气接口的腐蚀问题。
若要了解更多有关静电放电以及如何保护电子元件的信息,请参见以下网站。
静电放电协会
https://www.esda.org
FAQ: KTC-Gen-ESD
这有用吗?
1. 首先,我们建议备份您的数据。
2. 然后使用驱动器标签上的 PSID 通过辅助系统完成 REVERT。注意:执行 REVERT 将会安全地擦除驱动器上的所有数据。
3. 禁用 IEEE 1667 支持
4. 固件更新将在 KSM 刷新或重启后变成可用
FAQ: KSM-001125-001-01
这有用吗?
Kingston 建议尽可能将固态硬盘更新到最新的可用固件版本。可以使 用 Kingston 的 SSD Manager 软件来检查您的硬盘是否有可用的更新。
FAQ: KSD-012010-001-25
这有用吗?
FAQ: KSM-001125-001-00
这有用吗?
FAQ: KSM-001125-002-01
这有用吗?
小心!下面的方法会中断 RST RAID 阵列,可能导致数据丢失。
如果您的系统有 RST RAID 阵列,您应考虑替代的解决方案。
方法 1:在 BIOS 中禁用 RST 控制
此方法需要 BIOS 选项来启用或禁用 RST 控制,并非适用于所有系统。
注意:请在继续之前先备份所有重要数据!
- 重新启动并进入系统 BIOS
- 在 BIOS 中找到 RST 配置设置
- 将 "RST Controlled" 更改为 "Not RST Controlled"
- 保存并退出 BIOS
- 打开 KSM 并更新驱动器固件
在这些步骤完成后,您可以选择在 BIOS 中切换回 "RST Controlled"。
方法 2:在 BIOS 中从 RAID 切换到 AHCI
此方法会将您的系统存储模式从 RAID 更改为 AHCI,应适用于所有系统。
注意:请在继续之前先备份所有重要数据!
- 打开 msconfig
- 选择“引导”选项卡
- 勾选“安全引导”(最小值)
- 单“确定”和“重新启动”
- 当系统重启时,进入系统 BIOS
- 将存储模式从 RAID 更改为 AHCI
- 保存并退出 BIOS
- 等待 Windows 引导至安全模式
- 打开 msconfig
- 选择“引导”选项卡
- 取消勾选“安全引导”
- 单“确定”和“重新启动”
- 等待 Windows 正常引导
- 打开 KSM 并更新驱动器固件
在这些步骤完成后,您可以选择在 BIOS 中将存储模式切换回 RAID。
FAQ: KSD-001525-001-01
这有用吗?
当克隆到比源驱动器更大的新驱动器时,软件可能无法正确调整分区大小。当发生这种情况时,您可能会发现有一些未使用的空间。为避免这种情况,请遵循我们的克隆说明。
FAQ: KSD-012010-001-04
这有用吗?
SSD 固件是 SSD 内部集成的软件,负责管理 SSD 的操作,包括与主机系统的通信、数据的存储和检索、磨损均衡以及错误校正。
如果您的 SSD 需要新的固件,您会在运行 Kingston 的 SSD Manager 软件时收到通知。
FAQ: KSD-012010-001-11
这有用吗?
FAQ: KSD-012010-001-12
这有用吗?
FAQ: KSD-012010-001-13
这有用吗?
FAQ: KSD-012010-001-14
这有用吗?
当克隆到比源驱动器更大的新驱动器时,软件可能无法正确调整分区大小。当发生这种情况时,您可能会发现有一些未使用的空间。为避免这种情况,请遵循我们的克隆说明。
FAQ: KSD-012010-001-04
这有用吗?
市场上有很多种外部外壳可供选择。虽然 Kingston 致力于与所有系统类型兼容,但偶尔可能会存在不兼容的情况。
如果在使用非 Kingston 固态硬盘外置盒时遇到问题,请联系 Kingston 技术支持部门以获取故障排查协助。
FAQ: KSD-012010-001-18
这有用吗?
如果驱动器在 BIOS 中存在,您可能需要在操作系统中初始化磁盘。
对于 Windows:
第 1 步:确认驱动器已正确连接,然后开机并进入 Windows 操作系统。
第 2 步:按 Windows + X 并选择 Disk Management(磁盘管理)。
第 3 步:如果 SSD 是新的且尚未初始化,将会弹出一个窗口,提示“Initialize Disk”(初始化磁盘)。
第 4 步:选择以下之一:
MBR(主启动记录):适用于 2TB 及更旧系统下的驱动器。
GPT(GUID 分区表):建议用于现代系统和大于 2TB 的驱动器。
第 5 步:单击 OK(确定)初始化磁盘。
第 6 步:初始化后,您将会看到 SSD 显示为“Unallocated”(未分配)。右键单击它并选择 New Simple Volume(新建简单卷)。
第 7 步:按照屏幕上的提示对 SSD 进行格式化并分配驱动器号。
对于 Mac OS:
第 1 步:确认驱动器已正确连接,然后开机并进入 Mac OS。
第 2 步:打开 Disk Utility(磁盘工具),可以使用 Cmd + 空格键调出 Spotlight 搜索,然后输入“Disk Utility”来找到它。
第 3 步:在左窗格中,选择您的 SSD。
第 4 步:单击 Erase(擦除)。
第 5 步:为该驱动器提供一个名称,在 Format(格式)下,选择:
对于较新的 Mac 和 SSD,选择 APFS。
对于较旧的系统或机械硬盘,选择 Mac OS Extended (Journaled)。
第 6 步:单击 Erase(擦除)。此过程完成后,SSD 就可以使用了。
对于 Linux:
第 1 步:确认驱动器已正确连接,然后开机并进入 Linux OS。
第 2 步:打开终端。
第 3 步:输入 sudo fdisk -l 来列出所有连接的驱动器。通过其大小识别您的 SSD,并记下设备名称,例如 /dev/sdb。
第 4 步:使用 fdisk 或 parted 初始化 SSD。以下是一个使用 fdisk 的基本指南:
输入sudo fdisk /dev/sdb(将 /dev/sdb 替换为您的 SSD 的设备名称)。
按 g 键创建一个新的 GPT 分区表。
按 n 键创建一个新分区。按照提示指定分区的大小和类型。
按 w 键写入更改。
第 5 步:格式化 SSD 上的新分区(如 /dev/sdb1)。可以使用您选择的文件系统对其进行格式化:
对于 ext4:sudo mkfs.ext4 /dev/sdb1
对于 ext3:sudo mkfs.ext3 /dev/sdb1
对于 FAT32:sudo mkfs.vfat /dev/sdb1
第 6 步:挂载 SSD:
创建挂载点:sudo mkdir /mnt/myssd
挂载 SSD:sudo mount /dev/sdb1 /mnt/myssd
记得将 /dev/sdb1 替换为您的 SSD 的分区名称。
FAQ: KSD-012010-001-15
这有用吗?
当克隆到比源驱动器更大的新驱动器时,软件可能无法正确调整分区大小。当发生这种情况时,您可能会发现有一些未使用的空间。为避免这种情况,请遵循我们的克隆说明。
FAQ: KSD-012010-001-04
这有用吗?
แต่หากทำแบบนั้นไม่ได้หรือหากคุณเคยโคลนข้อมูลเก่าไปยังไดรฟ์นั้นมาก่อน ยืนยันว่าไดรฟ์ใหม่ปรากฏเป็นอุปกรณ์บู๊ตใน BIOS ของระบบ จากนั้นเลือกไดรฟ์นั้นระหว่างการบู๊ตเครื่อง
FAQ: KSD-012010-001-03
这有用吗?
FAQ: KSD-012010-001-07
这有用吗?
Windows 7 本身不支持 NVMe SSD。请参考 Microsoft 的修复程序说明,以在您的 NVMe 固态硬盘上安装 Windows 7。
FAQ: KSD-012010-001-06
这有用吗?
如果驱动器在 BIOS 中存在,您可能需要在操作系统中初始化磁盘。
对于 Windows:
第 1 步:确认驱动器已正确连接,然后开机并进入 Windows 操作系统。
第 2 步:按 Windows + X 并选择 Disk Management(磁盘管理)。
第 3 步:如果 SSD 是新的且尚未初始化,将会弹出一个窗口,提示“Initialize Disk”(初始化磁盘)。
第 4 步:选择以下之一:
MBR(主启动记录):适用于 2TB 及更旧系统下的驱动器。
GPT(GUID 分区表):建议用于现代系统和大于 2TB 的驱动器。
第 5 步:单击 OK(确定)初始化磁盘。
第 6 步:初始化后,您将会看到 SSD 显示为“Unallocated”(未分配)。右键单击它并选择 New Simple Volume(新建简单卷)。
第 7 步:按照屏幕上的提示对 SSD 进行格式化并分配驱动器号。
对于 Mac OS:
第 1 步:确认驱动器已正确连接,然后开机并进入 Mac OS。
第 2 步:打开 Disk Utility(磁盘工具),可以使用 Cmd + 空格键调出 Spotlight 搜索,然后输入“Disk Utility”来找到它。
第 3 步:在左窗格中,选择您的 SSD。
第 4 步:单击 Erase(擦除)。
第 5 步:为该驱动器提供一个名称,在 Format(格式)下,选择:
对于较新的 Mac 和 SSD,选择 APFS。
对于较旧的系统或机械硬盘,选择 Mac OS Extended (Journaled)。
第 6 步:单击 Erase(擦除)。此过程完成后,SSD 就可以使用了。
对于 Linux:
第 1 步:确认驱动器已正确连接,然后开机并进入 Linux OS。
第 2 步:打开终端。
第 3 步:输入 sudo fdisk -l 来列出所有连接的驱动器。通过其大小识别您的 SSD,并记下设备名称,例如 /dev/sdb。
第 4 步:使用 fdisk 或 parted 初始化 SSD。以下是一个使用 fdisk 的基本指南:
输入sudo fdisk /dev/sdb(将 /dev/sdb 替换为您的 SSD 的设备名称)。
按 g 键创建一个新的 GPT 分区表。
按 n 键创建一个新分区。按照提示指定分区的大小和类型。
按 w 键写入更改。
第 5 步:格式化 SSD 上的新分区(如 /dev/sdb1)。可以使用您选择的文件系统对其进行格式化:
对于 ext4:sudo mkfs.ext4 /dev/sdb1
对于 ext3:sudo mkfs.ext3 /dev/sdb1
对于 FAT32:sudo mkfs.vfat /dev/sdb1
第 6 步:挂载 SSD:
创建挂载点:sudo mkdir /mnt/myssd
挂载 SSD:sudo mount /dev/sdb1 /mnt/myssd
记得将 /dev/sdb1 替换为您的 SSD 的分区名称。
FAQ: KSD-012010-001-15
这有用吗?
市场上有很多种外部外壳可供选择。虽然 Kingston 致力于与所有系统类型兼容,但偶尔可能会存在不兼容的情况。
如果在使用非 Kingston 固态硬盘外置盒时遇到问题,请联系 Kingston 技术支持部门以获取故障排查协助。
FAQ: KSD-012010-001-18
这有用吗?
FAQ: KSD-012010-001-14
这有用吗?
FAQ: KSD-012010-001-13
这有用吗?
FAQ: KSD-012010-001-12
这有用吗?
SSD 固件是 SSD 内部集成的软件,负责管理 SSD 的操作,包括与主机系统的通信、数据的存储和检索、磨损均衡以及错误校正。
如果您的 SSD 需要新的固件,您会在运行 Kingston 的 SSD Manager 软件时收到通知。
FAQ: KSD-012010-001-11
这有用吗?
