
A2000 NVMe PCIe SSD - 技術支援
資源
影片


常見問題
2. 請參閱系統製造商的支援頁面,確認是否有適用於您系統的 BIOS 更新。
3. 確認您正執行最新版本的作業系統,並確保沒有任何待更新的程式。
4. 確認您正在執行適用於您系統的最新驅動程式。您可以造訪系統製造商的支援頁面,尋找最新的驅動程式,並進行更新。
如果執行這些步驟後,您的系統仍然遇到問題,請聯絡 Kingston 技術支援部門。
FAQ: KSD-012010-001-21
對於快閃儲存裝置來說這很常見,無論是內接式 SSD 固態硬碟還是外接式 USB 儲存裝置,部分原因是快閃記憶體與傳統旋轉碟片的硬碟製造商在計算百萬位元組的方式上存在差異。硬碟機製造商將百萬位元組 (或 1,000x1,000 位元組) 計算為 1,000KB,而快閃記憶體儲存裝置的二進位計算結果為 1,024KB。
範例:對於 1TB 快閃記憶體儲存裝置來說,Windows 會將其容量計算為 931.32GB。(1,000,000,000,000÷1,024÷1,024÷1,024=931.32GB)。
此外,Kingston 有保留一些儲存容量,作為格式化和其他功能之用,例如韌體和/或控制器特定資訊,因此所宣稱的部分儲存容量不可作為資料儲存之用。
FAQ: KDT-010611-GEN-06
注意:溫度達到 80°C 時,便會進行熱調節
FAQ: KSD-060117-NVME-02
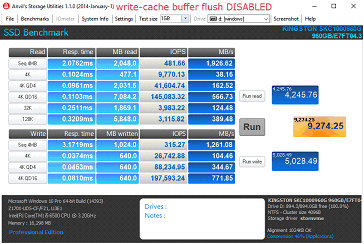
停用寫入快取緩衝區排清的步驟
1. 開啟裝置管理員
2. 選取硬碟並展開,然後選取目標硬碟。
3. 按一下滑鼠右鍵並選取「內容」
4. 核取「關閉裝置的 Windows 寫入快取緩衝區排清」
a. 注意:停用裝置上的寫入快取緩衝區排清,您會面臨在傳輸中遺失資料及/或停電時資料毀損的風險。只有當您察覺與之相關聯風險時,才停用此功能。
效能比較

FAQ: KSD-060117-KC1000-04
FAQ: KSD-060117-NVME-01
FAQ: KSD-001525-001-00
請參閱我們的安裝指南:安裝 M.2 SSD 固態硬碟
另請注意,您可能需要複製要更換的磁碟機。請參閱我們的指南,以了解如何使用隨附的 Acronis 硬碟軟體來複製您的磁碟機。
FAQ: KSD-012010-001-00
請參閱我們的安裝指南:
FAQ: KSD-012010-001-01
如果無法達成這一點,您也可以複製舊資料到新磁碟機,確保在此流程中新磁碟機在系統 BIOS 中被設置為開機裝置,然後選擇它來啟動系統。
FAQ: KSD-012010-001-03
市場上有各式各樣的外接盒。Kingston 的目標是與所有系統類型相容,但有時可能會出現不相容的情況。
如果您在使用非 Kingston SSD 固態硬碟外接盒時遇到問題,請聯絡 Kingston 技術支援以取得故障排除協助。
FAQ: KSD-012010-001-18
請參閱我們的 M.2 SSD 固態硬碟技術指南。
FAQ: KSD-012010-001-16
-確認系統 BIOS 能夠識別您的新 SSD 固態硬碟,如果無法識別,請造訪主機板/系統製造商的網站,查看是否有可用的新 BIOS。
-驗證您的 BIOS 設定是否已配置為接受新的 NVMe SSD 固態硬碟。
-確認您的目標作業系統支援 NVMe SSD 固態硬碟 (例如:Windows 8 以上版本)
注意:Kingston SSD 固態硬碟不需要額外的驅動程式即可運作。
FAQ: KSD-012010-001-05
Windows 7 本身不支援 NVMe SSD 固態硬碟。請參閱 Microsoft 的修補程式說明,以了解如何在 NVMe SSD 固態硬碟中安裝 Windows 7。
FAQ: KSD-012010-001-06
FAQ: KSD-012010-001-07
如果磁碟機不存在,請關閉系統電源,檢查安裝和連接,確認磁碟機已正確定位和/或正確連接。
如果 BIOS 中找得到磁碟機,您可能需要在作業系統中初始化該磁碟。
Windows:
步驟 1:確認已正確連接磁碟機,請開啟系統電源,接著開機進入 Windows 作業系統。
步驟 2:按「Windows + X」鍵,並選擇磁碟管理。
步驟 3:如果 SSD 固態硬碟是全新的且未初始化,會出現一個彈出窗口,顯示「初始化磁碟」。
步驟 4:選擇:
MBR (主開機記錄):適用於 2TB 以下的硬碟及較舊的系統。
GPT (GUID 分區表):建議用於現代系統和大於 2TB 的硬碟。
步驟 5:按下「確定」然後初始化磁碟。
步驟 6:初始化後,您將看到 SSD 固態硬碟顯示為「未配置」。對它按一下右鍵,並選擇「新卷宗」。
步驟 7:依照螢幕提示格式化 SSD 固態硬碟,並為其指派磁碟機代號。
Mac 作業系統:
步驟 1:確認已正確連接磁碟機,請開啟系統電源,接著開機進入 Mac OS 作業系統。
步驟 2:開啟磁碟工具程式 (可以使用「Spotlight」並使用「Cmd + 空格鍵」找到它,然後鍵入「磁碟工具程式」)。
步驟 3:在左側視窗中,選擇您的 SSD 固態硬碟。
步驟 4:按一下「清除」。
步驟 5:提供磁碟機的名稱,然後在格式下選擇:
適用於較新 Mac 和 SSD 固態硬碟的 APFS。
適用於較舊系統或 HDD 傳統硬碟的 Mac OS Extended (日誌式)。
步驟 6:按一下「清除」。完成流程後,就能使用 SSD 固態硬碟。
Linux:
步驟 1:確認已正確連接磁碟機,請開啟系統電源,接著開機進入 Linux 作業系統。
步驟 2:開啟終端機。
步驟 3:輸入「sudo fdisk -l」,列出所有連接的磁碟機。透過大小識別出您的 SSD 固態硬碟,並記下裝置名稱,例如「/dev/sdb」。
步驟 4:使用「fdisk」或「parted」初始化SSD 固態硬碟。這是使用「fdisk」的基本指南:
輸入「sudo fdisk /dev/sdb」 (將「/dev/sdb」替換為 SSD 固態硬碟的裝置名稱)。
按「g」建立新的 GPT 分割區表。
按「n」建立一個新分割區。依照提示指定尺寸和類型。
按「w」寫入變更。
步驟 5:格式化 SSD 固態硬碟上的新分割區 (例如「/dev/sdb1」)。格式化成您選擇的檔案系統:
ext4:sudo mkfs.ext4 /dev/sdb1
ext3:sudo mkfs.ext3 /dev/sdb1
FAT32:sudo mkfs.vfat /dev/sdb1
步驟 6:安裝 SSD 固態硬碟:
建立掛載點:sudo mkdir /mnt/myssd
掛載 SSD 固態硬碟:sudo mount /dev/sdb1 /mnt/myssd
請記得將「/dev/sdb1」替換為 SSD 固態硬碟的分割區名稱。
FAQ: KSD-012010-001-15
不,Kingston 不提供 NVMe 升級套裝套件。
FAQ: KSD-012010-001-30
Linux 安全抹除使用者指南
本指南將引導您使用 Linux 工具安全地抹除 Kingston SSD 固態硬碟。
SATA 安全抹除程序
警告
在繼續之前,請確認所有重要資料均已完成備份!
必備條件
- 您必須具有 root 權限。
- 您必須將 SSD 固態硬碟作為備份系統 (非作業系統),用磁碟機連接至系統。
- 您必須安裝 lsscsi 和 hdparm。您可能需要使用您發行版本的套件管理系統來進行安裝。
- 您的磁碟機不得處於安全凍結狀態。
- 您的磁碟機不得有密碼保護。
說明
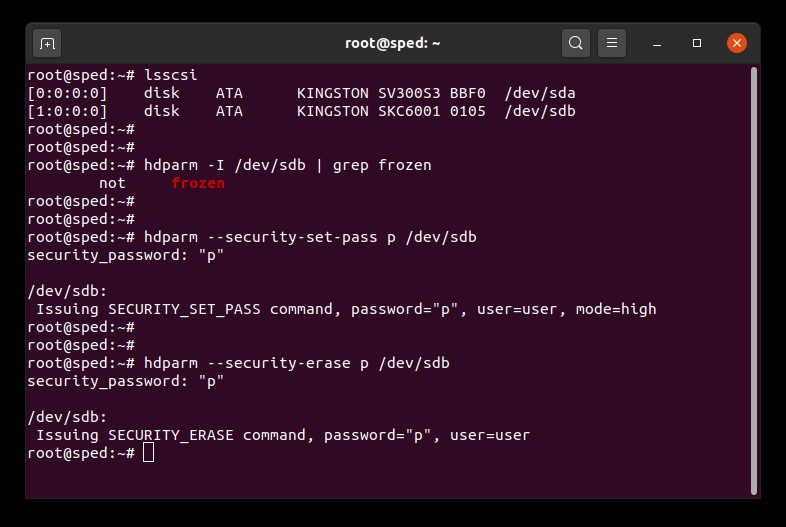
1.找到您要抹除的磁碟機名稱 (/dev/sdX):
# lsscsi2.確認磁碟機安全且非處於凍結狀態:
# hdparm -I /dev/sdX | grep frozen如果輸出顯示「凍結」(不是「非凍結」),則您無法繼續下一步。您必須嘗試進行下列方法來解處安全凍結狀態:
方法 1:
讓系統進入休眠 (或輸入 suspend to RAM 進入待命) 狀態,再喚醒系統。多數發行版本中,休眠指令是:
# systemctl suspend現在,再次輸入 hdparm 指令。如果操作成功,輸出將顯示「非凍結」(不是「凍結」)。
方法 2:
熱插拔磁碟機。實際拔掉磁碟機上連結的 SATA 電源線,並在系統供電的情況下重新插回去。您可能需要在 BIOS 中啟用熱插拔。並非所有系統都支援熱插拔。現在,再次輸入 hdparm 指令。如果操作成功,輸出將顯示「非凍結」(不是「凍結」)。
3.在磁碟機上設定使用者密碼。密碼可為任何字元。此處我們將密碼設定為「p」。
# hdparm --security-set-pass p /dev/sdX4.使用相同的密碼,輸入對磁碟機進行安全抹除的指令。1234567890 - 1234567890 -
# hdparm --security-erase p /dev/sdX此步驟可能需要幾分鐘才能完成。成功完成後,磁碟機的密碼將被抹除。
如果抹除動作中斷,或其他原因導致作業沒有完成,您的磁碟機可能會變成安全鎖定狀態。此時您需要使用下列指令移除安全鎖定狀態,然後再嘗試依次安全抹除步驟。
# hdparm --security-disable p /dev/sdXSATA 安全抹除範例
NVMe 安全抹除程序
警告
在繼續之前,請確認所有重要資料均已完成備份!
必備條件
- 您必須具有 root 權限。
- 您必須將 SSD 固態硬碟作為備份系統 (非作業系統),用磁碟機連接至系統。
- 您必須安裝 nvme-cli。您可能需要使用您發行版本的套件管理系統來進行安裝。
- 您的磁碟機不得有密碼保護。
說明
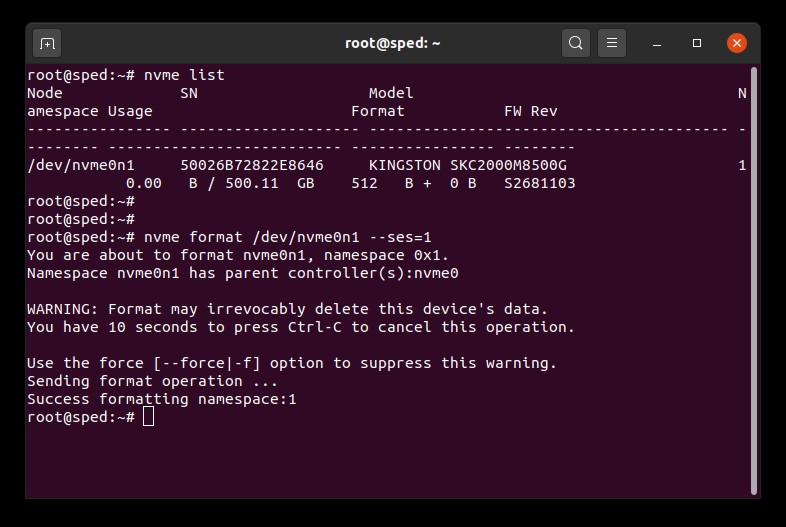
1.找到您要抹除的磁碟機名稱 (/dev/nvmeXn1):
# nvme list2.輸入指令對磁碟機進行格式化。在此,我們將安全抹除設定為 1,這代表抹除使用者資料:
# nvme format /dev/nvmeXn1 --ses=1此步驟可能需要幾分鐘才能完成。
NVMe 安全抹除範例
FAQ: KSM-SE-LIX
SSD 固態硬碟韌體是 SSD 固態硬碟內的整合軟體,用於管理其操作,包括與主機系統的通訊、資料儲存和檢索、磨損均衡和糾錯。
如果您的 SSD 固態硬碟需要新韌體,您將在執行 Kingston SSD Manager 軟體時收到通知 ,該軟體位於此處。
FAQ: KSD-012010-001-11
裁切技術與垃圾資料回收是現今 SSD 固態硬碟所採用的技術,為的是要提高其效能和耐久性。
剛開始使用 SSD 固態硬碟時,全部的 NAND 區塊都是空白,因此 SSD 固態硬碟可以在一次的操作中將新資料寫入空白區塊。
隨著使用時間拉長,大部分的區塊將成為存有使用者資料的已使用區塊。
為了將新的資料寫入已使用區塊,SSD 固態硬碟被迫執行讀取 - 修改 - 寫入之週期。讀取 - 修改 - 寫入之週期會損害 SSD 固態硬碟的整體效能,因為必須執行三個動作,而不是單一操作就能結束。讀取 - 修改-寫入之週期也會造成寫入放大,而損害 SSD 固態硬碟的整體耐久性。
裁切技術與垃圾資料回收兩者可相互合作,透過釋放已使用的區塊,改善 SSD 固態硬碟的效能和耐久性。
垃圾資料回收是 SSD 固態硬碟控制器的內建功能,用於整合儲存在已使用區塊中的資料,以便釋放更多空白區塊。
這個程序是在背景進行處理,而且完全由 SSD 固態硬碟本身執行。
然而,SSD 固態硬碟不會知道哪些區塊存有使用者資料,以及哪些區塊存有使用者已刪除的舊資料。
這就是裁切技術功能的作用所在。裁切技術讓操作系統得以在資料刪除時,通知 SSD 固態硬碟,接著 SSD 固態硬碟就能將已使用之區塊釋放。
若想執行裁切技術,必須使用支援此技術的操作系統和 SSD 固態硬碟。現今的現代操作系統及 SSD 固態硬碟大多都支援裁切技術,然而大部分的 RAID 設定卻尚未支援。
Kingston SSD 固態硬碟皆有採用裁切技術與垃圾資料回收技術,為了在產品使用壽命中,維持最高的效能及耐久性。
FAQ: KSD-011411-GEN-13
M.2 是指實體的外觀尺寸。SATA 和 PCIe 則是指儲存裝置介面,主要的差異在於 M.2 固態硬碟的效能和採用通訊協定 (語言)。
M.2 規格是為了能適用固態硬碟的 SATA 和 PCIe 介面所設計的。M.2 SATA 固態硬碟將會使用目前於典型 2.5 吋 SATA 固態硬碟上的同一種控制器。M.2 PCIe 固態硬碟會使用特別為支援 PCIe 通訊協定所設定的控制器。一個 M.2 固態硬碟只能支援一種通訊協定,但是某些系統的 M.2 插槽只支援 SATA 或 PCIe 的其中一種。
FAQ: KSD-004005-001-00
靜電放電 (ESD) 是累積靜電釋放的現象。ESD 不可輕忽,因為這是少數可能直接損壞或毀壞電子元件的原因之一。
靜電會因摩擦自然產生,例如在乾燥有風的天氣踩在地毯上行走時。當人體累積靜電並接觸金屬等導電物時,就會放電。這也包含記憶體模組等導電電子元件。ESD 放電到記憶體時,在安裝到 PC 的過程中可能無明顯感覺,但仍可能對電路造成嚴重損害。損害可能立即發生,也可能在之後逐漸顯現。
如何預防 ESD
預防 ESD 最佳方法是在接觸電子產品前先讓自己接地。您也可以使用防靜電設備,例如防靜電手環或接地墊,以減少 ESD 發生的機會。以下步驟也助於減少發生 ESD 的機會:
站立 - 建議在處理電腦內部零件時站著。當坐在椅子上時,人們通常會抬腳,這會中斷接地路徑。
線材 - 確保拔除電腦後方所有線材 (電源線、滑鼠、鍵盤等)。
衣服 - 避免穿著容易產生靜電的衣物,例如羊毛毛衣。
配件 - 另一個最佳作法是摘下所有珠寶配件,有助於降低靜電與其他可能風險。
天氣 - 雷雨天會增加靜電風險,非必要不要在雷雨時處理電腦組裝。非常乾燥與有風的環境也會增加靜電積聚。
若要了解更多 ESD 與電子保護方式,請參考以下網站。 ESD 協會
FAQ: KTC-Gen-ESD
請參閱我們的指南,以了解這些 NVMe 和 SATA SSD 固態硬碟之間的差異。
FAQ: KSD-012010-001-19
請參閱我們的指南,以了解 SSD 固態硬碟與 HDD 傳統硬碟之間的差異。
FAQ: KSD-012010-001-29
Kingston 建議盡可能將您的 SSD 固態硬碟更新至最新可用韌體。您可以使用 Kingston SSD Manager 軟體來檢查您的磁碟機是否有可用的更新。
FAQ: KSD-012010-001-25
FAQ: KSM-001125-001-00
FAQ: KSM-001125-002-01
1.首先,我們建議備份資料。
2.接著,使用備份系統,利用磁碟機標籤上的 PSID 完成還原作業。備註:執行還原作業將安全地抹除磁碟上所有資料。
3.停用 IEEE 1667 支援
4.更新或重新啟動 KSM 後就能執行韌體更新。
FAQ: KSM-001125-001-01
警告!下述解決方法將破壞 RST RAID 陣列,且可能導致資料遺失。如果您的系統中有 RST RAID 陣列,建議您考慮替代的解決方法。
解決方法 1:在 BIOS 中停用 RST Control 功能。
此方法需要在 BIOS 中啟用/停用 RST Control 功能,並非所有系統都支援。
備註:繼續執行前,請先備份所有重要資料!
- 重新啟動,並進入系統 BIOS 介面。
- 在 BIOS 中找到 RST 組態設定。
- 將「RST Controlled」變更為「Not RST Controlled」
- 儲存並退出 BIOS
- 開啟 KSM 並更新磁碟機韌體
完成以上步驟後,您可以回到 BIOS 設定中,切換為「RST Controlled」。
解決方法 2:在 BIOS 設定中,將「RAID」切換為「AHCI」
這是將系統儲存模式從「RAID」變更為「AHCI」,此方法適用所有系統。
備註:繼續執行前,請先備份所有重要資料!
- 執行「系統設定」(輸入 msconfig)
- 選擇「開機」頁籤
- 勾選「安全開機」/「最基本安全開機方式」
- 按下「確定」並重新啟動
- 系統重新啟動時,請進入 BIOS 設定介面
- 將儲存模式從「RAID」變更為「AHCI」
- 儲存並退出 BIOS
- 等待 Windows 啟動並進入安全模式
- 執行「系統設定」(輸入 msconfig)
- 選擇「開機」頁籤
- 取消勾選「安全開機」
- 按下「確定」並重新啟動
- 等待 Windows 啟動並進入一般模式
- 開啟 KSM 並更新磁碟機韌體
完成以上步驟後,您可以在 BIOS 設定中,將儲存模式切換回「RAID」。
FAQ: KSD-001525-001-01
當複製到比來源磁碟機更大的新磁碟機時,軟體可能無法正確縮放分割區大小。發生這種情況時,您可能會有沒有使用到的空間。為避免這種情況,請遵循我們的硬碟複製說明。
FAQ: KSD-012010-001-04
SSD 固態硬碟韌體是 SSD 固態硬碟內的整合軟體,用於管理其操作,包括與主機系統的通訊、資料儲存和檢索、磨損均衡和糾錯。
如果您的 SSD 固態硬碟需要新韌體,您將在執行 Kingston SSD Manager 軟體時收到通知 ,該軟體位於此處。
FAQ: KSD-012010-001-11
FAQ: KSD-012010-001-14
FAQ: KSD-012010-001-12
FAQ: KSD-012010-001-13
當複製到比來源磁碟機更大的新磁碟機時,軟體可能無法正確縮放分割區大小。發生這種情況時,您可能會有沒有使用到的空間。為避免這種情況,請遵循我們的硬碟複製說明。
FAQ: KSD-012010-001-04
如果磁碟機不存在,請關閉系統電源,檢查安裝和連接,確認磁碟機已正確定位和/或正確連接。
如果 BIOS 中找得到磁碟機,您可能需要在作業系統中初始化該磁碟。
Windows:
步驟 1:確認已正確連接磁碟機,請開啟系統電源,接著開機進入 Windows 作業系統。
步驟 2:按「Windows + X」鍵,並選擇磁碟管理。
步驟 3:如果 SSD 固態硬碟是全新的且未初始化,會出現一個彈出窗口,顯示「初始化磁碟」。
步驟 4:選擇:
MBR (主開機記錄):適用於 2TB 以下的硬碟及較舊的系統。
GPT (GUID 分區表):建議用於現代系統和大於 2TB 的硬碟。
步驟 5:按下「確定」然後初始化磁碟。
步驟 6:初始化後,您將看到 SSD 固態硬碟顯示為「未配置」。對它按一下右鍵,並選擇「新卷宗」。
步驟 7:依照螢幕提示格式化 SSD 固態硬碟,並為其指派磁碟機代號。
Mac 作業系統:
步驟 1:確認已正確連接磁碟機,請開啟系統電源,接著開機進入 Mac OS 作業系統。
步驟 2:開啟磁碟工具程式 (可以使用「Spotlight」並使用「Cmd + 空格鍵」找到它,然後鍵入「磁碟工具程式」)。
步驟 3:在左側視窗中,選擇您的 SSD 固態硬碟。
步驟 4:按一下「清除」。
步驟 5:提供磁碟機的名稱,然後在格式下選擇:
適用於較新 Mac 和 SSD 固態硬碟的 APFS。
適用於較舊系統或 HDD 傳統硬碟的 Mac OS Extended (日誌式)。
步驟 6:按一下「清除」。完成流程後,就能使用 SSD 固態硬碟。
Linux:
步驟 1:確認已正確連接磁碟機,請開啟系統電源,接著開機進入 Linux 作業系統。
步驟 2:開啟終端機。
步驟 3:輸入「sudo fdisk -l」,列出所有連接的磁碟機。透過大小識別出您的 SSD 固態硬碟,並記下裝置名稱,例如「/dev/sdb」。
步驟 4:使用「fdisk」或「parted」初始化SSD 固態硬碟。這是使用「fdisk」的基本指南:
輸入「sudo fdisk /dev/sdb」 (將「/dev/sdb」替換為 SSD 固態硬碟的裝置名稱)。
按「g」建立新的 GPT 分割區表。
按「n」建立一個新分割區。依照提示指定尺寸和類型。
按「w」寫入變更。
步驟 5:格式化 SSD 固態硬碟上的新分割區 (例如「/dev/sdb1」)。格式化成您選擇的檔案系統:
ext4:sudo mkfs.ext4 /dev/sdb1
ext3:sudo mkfs.ext3 /dev/sdb1
FAT32:sudo mkfs.vfat /dev/sdb1
步驟 6:安裝 SSD 固態硬碟:
建立掛載點:sudo mkdir /mnt/myssd
掛載 SSD 固態硬碟:sudo mount /dev/sdb1 /mnt/myssd
請記得將「/dev/sdb1」替換為 SSD 固態硬碟的分割區名稱。
FAQ: KSD-012010-001-15
-確認系統 BIOS 能夠識別您的新 SSD 固態硬碟,如果無法識別,請造訪主機板/系統製造商的網站,查看是否有可用的新 BIOS。
-驗證您的 BIOS 設定是否已配置為接受新的 NVMe SSD 固態硬碟。
-確認您的目標作業系統支援 NVMe SSD 固態硬碟 (例如:Windows 8 以上版本)
注意:Kingston SSD 固態硬碟不需要額外的驅動程式即可運作。
FAQ: KSD-012010-001-05
請參閱我們的 M.2 SSD 固態硬碟技術指南。
FAQ: KSD-012010-001-16
市場上有各式各樣的外接盒。Kingston 的目標是與所有系統類型相容,但有時可能會出現不相容的情況。
如果您在使用非 Kingston SSD 固態硬碟外接盒時遇到問題,請聯絡 Kingston 技術支援以取得故障排除協助。
FAQ: KSD-012010-001-18
當複製到比來源磁碟機更大的新磁碟機時,軟體可能無法正確縮放分割區大小。發生這種情況時,您可能會有沒有使用到的空間。為避免這種情況,請遵循我們的硬碟複製說明。
FAQ: KSD-012010-001-04
請參閱我們的安裝指南:安裝 M.2 SSD 固態硬碟
另請注意,您可能需要複製要更換的磁碟機。請參閱我們的指南,以了解如何使用隨附的 Acronis 硬碟軟體來複製您的磁碟機。
FAQ: KSD-012010-001-00
請參閱我們的安裝指南:
FAQ: KSD-012010-001-01
如果無法達成這一點,您也可以複製舊資料到新磁碟機,確保在此流程中新磁碟機在系統 BIOS 中被設置為開機裝置,然後選擇它來啟動系統。
FAQ: KSD-012010-001-03
市場上有各式各樣的外接盒。Kingston 的目標是與所有系統類型相容,但有時可能會出現不相容的情況。
如果您在使用非 Kingston SSD 固態硬碟外接盒時遇到問題,請聯絡 Kingston 技術支援以取得故障排除協助。
FAQ: KSD-012010-001-18
請參閱我們的 M.2 SSD 固態硬碟技術指南。
FAQ: KSD-012010-001-16
-確認系統 BIOS 能夠識別您的新 SSD 固態硬碟,如果無法識別,請造訪主機板/系統製造商的網站,查看是否有可用的新 BIOS。
-驗證您的 BIOS 設定是否已配置為接受新的 NVMe SSD 固態硬碟。
-確認您的目標作業系統支援 NVMe SSD 固態硬碟 (例如:Windows 8 以上版本)
注意:Kingston SSD 固態硬碟不需要額外的驅動程式即可運作。
FAQ: KSD-012010-001-05
Windows 7 本身不支援 NVMe SSD 固態硬碟。請參閱 Microsoft 的修補程式說明,以了解如何在 NVMe SSD 固態硬碟中安裝 Windows 7。
FAQ: KSD-012010-001-06
SSD 固態硬碟韌體是 SSD 固態硬碟內的整合軟體,用於管理其操作,包括與主機系統的通訊、資料儲存和檢索、磨損均衡和糾錯。
如果您的 SSD 固態硬碟需要新韌體,您將在執行 Kingston SSD Manager 軟體時收到通知 ,該軟體位於此處。
FAQ: KSD-012010-001-11
FAQ: KSD-012010-001-07
如果磁碟機不存在,請關閉系統電源,檢查安裝和連接,確認磁碟機已正確定位和/或正確連接。
如果 BIOS 中找得到磁碟機,您可能需要在作業系統中初始化該磁碟。
Windows:
步驟 1:確認已正確連接磁碟機,請開啟系統電源,接著開機進入 Windows 作業系統。
步驟 2:按「Windows + X」鍵,並選擇磁碟管理。
步驟 3:如果 SSD 固態硬碟是全新的且未初始化,會出現一個彈出窗口,顯示「初始化磁碟」。
步驟 4:選擇:
MBR (主開機記錄):適用於 2TB 以下的硬碟及較舊的系統。
GPT (GUID 分區表):建議用於現代系統和大於 2TB 的硬碟。
步驟 5:按下「確定」然後初始化磁碟。
步驟 6:初始化後,您將看到 SSD 固態硬碟顯示為「未配置」。對它按一下右鍵,並選擇「新卷宗」。
步驟 7:依照螢幕提示格式化 SSD 固態硬碟,並為其指派磁碟機代號。
Mac 作業系統:
步驟 1:確認已正確連接磁碟機,請開啟系統電源,接著開機進入 Mac OS 作業系統。
步驟 2:開啟磁碟工具程式 (可以使用「Spotlight」並使用「Cmd + 空格鍵」找到它,然後鍵入「磁碟工具程式」)。
步驟 3:在左側視窗中,選擇您的 SSD 固態硬碟。
步驟 4:按一下「清除」。
步驟 5:提供磁碟機的名稱,然後在格式下選擇:
適用於較新 Mac 和 SSD 固態硬碟的 APFS。
適用於較舊系統或 HDD 傳統硬碟的 Mac OS Extended (日誌式)。
步驟 6:按一下「清除」。完成流程後,就能使用 SSD 固態硬碟。
Linux:
步驟 1:確認已正確連接磁碟機,請開啟系統電源,接著開機進入 Linux 作業系統。
步驟 2:開啟終端機。
步驟 3:輸入「sudo fdisk -l」,列出所有連接的磁碟機。透過大小識別出您的 SSD 固態硬碟,並記下裝置名稱,例如「/dev/sdb」。
步驟 4:使用「fdisk」或「parted」初始化SSD 固態硬碟。這是使用「fdisk」的基本指南:
輸入「sudo fdisk /dev/sdb」 (將「/dev/sdb」替換為 SSD 固態硬碟的裝置名稱)。
按「g」建立新的 GPT 分割區表。
按「n」建立一個新分割區。依照提示指定尺寸和類型。
按「w」寫入變更。
步驟 5:格式化 SSD 固態硬碟上的新分割區 (例如「/dev/sdb1」)。格式化成您選擇的檔案系統:
ext4:sudo mkfs.ext4 /dev/sdb1
ext3:sudo mkfs.ext3 /dev/sdb1
FAT32:sudo mkfs.vfat /dev/sdb1
步驟 6:安裝 SSD 固態硬碟:
建立掛載點:sudo mkdir /mnt/myssd
掛載 SSD 固態硬碟:sudo mount /dev/sdb1 /mnt/myssd
請記得將「/dev/sdb1」替換為 SSD 固態硬碟的分割區名稱。
FAQ: KSD-012010-001-15
FAQ: KSD-012010-001-14
FAQ: KSD-012010-001-13
FAQ: KSD-012010-001-12