
SSD KC2000 NVMe PCIe - Supporto
Risorse
Video


Domande frequenti (FAQ)
1. Scaricare il software Kingston SSD Manager all'indirizzo https://www.kingston.com/support/technical/ssdmanager; controllare se è disponibile un aggiornamento del firmware e se ne viene consigliato l'applicazione e, in questo caso, procedere all'aggiornamento.
2. Consultare la pagina di supporto del produttore del sistema per verificare se è disponibile un aggiornamento del BIOS relativo al sistema utilizzato.
3. Verificare che il sistema operativo stia eseguendo la versione più recente e che non vi siano aggiornamenti in attesa di installazione.
4. Verificare che i driver in uso nel sistema siano aggiornati. A questo scopo, visitare la pagina di supporto del produttore del sistema e verificare se vi sono aggiornamenti disponibili per i driver.
Se il problema persiste anche dopo queste operazioni, contattare il Supporto Tecnico Kingston.
FAQ: KSD-012010-001-21
Si tratta di un problema comune a tutte le memorie flash, siano esse drive SSD interne o drive USB esterni, dovuto in parte a una differenza nel modo in cui viene calcolato il megabyte dai produttori di memorie flash e di dischi rigidi a disco rotante. Questi ultimi calcolano il megabyte (ovvero 1.000x1.000 byte) come 1.000KB, mentre il calcolo binario per lo storage di tipo flash è di 1.024KB.
Ad esempio: nel caso di un dispositivo di storage basato su memoria flash da 1 TB, Windows calcola una capacità di 931,32 GB (1.000.000.000.000÷1.024÷1.024÷1.024=931,32GB).
Inoltre, Kingston dedica parte della capacità totale riportata per la formattazione e per altre funzioni, quali la conservazione delle informazioni del firmware e/o del controller, e pertanto tale spazio non è disponibile per la memorizzazione dei dati.
FAQ: KDT-010611-GEN-06
Nota: il firmware attiva la mitigazione termica quando la temperatura registrata dal sistema SMART raggiunge gli 80°C
FAQ: KSD-060117-NVME-02
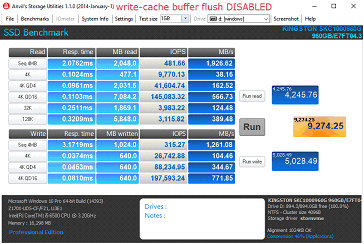
Procedura di disabilitazione dello scaricamento del buffer della cache di scrittura
1. Aprire "Gestione dispositivi"
2. Selezionare “Unità disco” e quindi espandere il menu per selezionare il drive di destinazione.
3. Fare clic su “Proprietà” con il tasto destro del mouse
4. Selezionare l’opzione “Disattiva scaricamento buffer cache in scrittura di Windows sul dispositivo”.
a. Nota: Selezionando questa opzione, si corre il rischio di perdere i dati in transito e/o di subire una perdita di dati in caso di interruzione imprevista dell'alimentazione. Si consiglia di effettuare questa operazione solo se consapevoli del rischio che comporta.
Confronto delle prestazioni

FAQ: KSD-060117-KC1000-04
FAQ: KSD-060117-NVME-01
FAQ: KSD-001525-001-00
Nel caso in cui ciò non fosse possibile, così come nel caso in cui la nuova unità fosse stata utilizzata per clonare i dati di una precedente unità, accertarsi che il nuovo drive venga visualizzato come unità di avvio nel BIOS del sistema, quindi confermare la selezione di unità di avvio.
FAQ: KSD-012010-001-03
Windows 7 non supporta in modo nativo i drive SSD NVMe. Per installare Windows 7 in un drive SSD NVMe, fare riferimento alla spiegazione della hotfix Microsoft.
FAQ: KSD-012010-001-06
FAQ: KSD-012010-001-07
No, Kingston non offre un kit NVMe in bundle.
FAQ: KSD-012010-001-30
Se invece l'unità risulta presente nel BIOS, potrebbe essere necessario inizializzare il disco nel sistema operativo.
Windows:
Fase 1 – Accertarsi che il drive sia collegato correttamente e accendere il dispositivo per avviare il sistema operativo Windows.
Fase 2 – Premere Windows + X e selezionare Gestione disco.
Fase 3 – Se il drive SSD non è stato ancora inizializzato, verrà visualizzato un popup che richiede di inizializzare il disco.
Fase 4 – Scegliere fra:
MBR (Master Boot Record): adatto ai drive fino a 2TB e ai sistemi meno recenti.
GPT (GUID Partition Table): consigliato per i sistemi moderni e i drive di capacità maggiore di 2TB.
Fase 5 – Fare clic su OK per avviare l'inizializzazione del disco.
Fase 6 – Al termine della procedura, il drive SSD verrà contrassegnato come "non allocato". Fare clic con il tasto destro del mouse sul drive e selezionare l'opzione Nuovo volume semplice.
Fase 7 – Seguire le istruzioni visualizzate sullo schermo per formattare il drive SSD e assegnargli una lettera di unità.
MacOS:
Fase 1 – Accertarsi che il drive sia collegato correttamente e accendere il dispositivo per avviare il sistema operativo Mac.
Fase 2 – Aprire l'Utility Disco (accessibile tramite Spotlight, premendo Cmd + Spazio e digitando "Utility Disco").
Fase 3 – Sul lato sinistro dello schermo, selezionare il drive SSD.
Fase 4 – Fare clic su Erase (cancella).
Fase 5 – Digitare un nome da assegnare al drive e in Formato, scegliere:
APFS per i drive SSD e i Mac più recenti.
Mac OS Extended (Journaled) per i drive HDD e i sistemi meno recenti.
Fase 6 – Fare clic su Erase (cancella). Al termine della procedura, il drive SSD sarà pronto per l'uso.
Linux:
Fase 1 – Accertarsi che il drive sia collegato correttamente e accendere il dispositivo per avviare il sistema operativo Linux.
Fase 2 – Aprire una finestra terminale.
Fase 3 – Digitare sudo fdisk -l per elencare tutti di drive connessi. Individuare il drive SSD in base alla sua dimensione e annotarsi il nome del dispositivo, ad esempio: /dev/sdb.
Fase 4 – Inizializzare il drive SSD con i comandi fdisk o parted. Ecco una guida di riferimento all'uso di fdisk:
Digitare sudo fdisk /dev/sdb (sostituire a "/dev/sdb" il nome del proprio drive SSD).
Premere g per creare una nuova tabella di partizione GPT.
Premere n per creare una nuova partizione. Seguire le istruzioni per specificare la dimensione e il tipo.
Premere w per scrivere le modifiche.
Fase 5 – Formattare la nuova partizione nel drive SSD (ad esempio, /dev/sdb1). Di seguito vengono indicati i comandi che consentono di scegliere il filesystem da usare per la formattazione:
Per ext4: sudo mkfs.ext4 /dev/sdb1
Per ext3: sudo mkfs.ext3 /dev/sdb1
Per FAT32: sudo mkfs.vfat /dev/sdb1
Fase 6 – Montare il drive SSD:
Creare un punto di montaggio: sudo mkdir /mnt/myssd
Montare il drive SSD: sudo mount /dev/sdb1 /mnt/myssd
Ricordarsi di sostituire "/dev/sdb1" con il nome assegnato alla partizione del drive SSD.
FAQ: KSD-012010-001-15
Consultare la nostra guida dedicata alla tecnologia SSD M.2.
FAQ: KSD-012010-001-16
In commercio esistono tanti tipi di alloggiamenti per SSD esterni. Kingston si adopera per assicurare la compatibilità con tutti i tipi di sistemi, ma talvolta possono verificarsi delle incompatibilità.
Se il problema si verifica con un alloggiamento per SSD non prodotto da Kingston, contattate il Supporto Tecnico Kingston per ricevere assistenza nella risoluzione dei problemi.
FAQ: KSD-012010-001-18
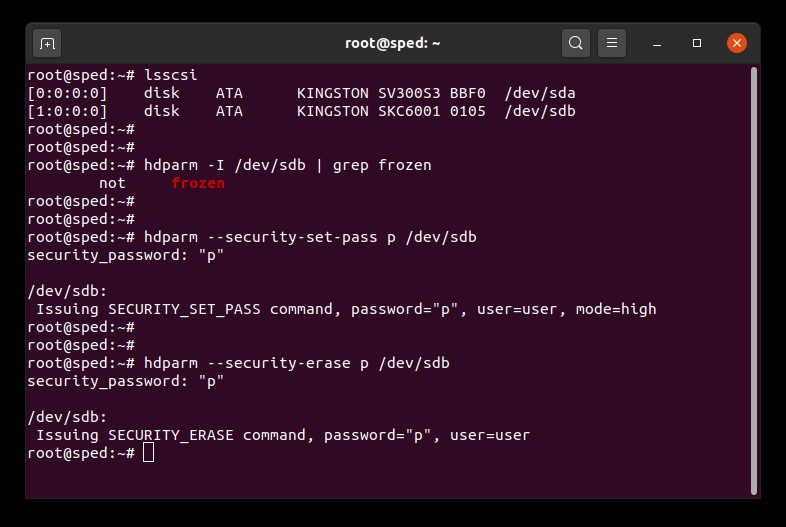
Guida la procedura di cancellazione sicura su sistemi Linux
Questa guida illustra la procedura di cancellazione sicura dei dati su un SSD Kingston utilizzando gli strumenti Linux
Procedura di cancellazione sicura SATA
Attenzione
Prima di procedere, assicurarsi di aver effettuato un backup completo di tutti i dati importanti.
Prerequisiti
- È necessario disporre di privilegi di root.
- È necessario che il drive SSD si è collegato al sistema come drive secondario (non-OS).
- È necessario che lsscsi e hdparm siano installati. L'installazione di tali strumenti potrebbe dover essere effettuata attraverso lo strumento di gestione dei pacchetti di distribuzione.
- Il drive non deve essere impostato in modalità di congelamento di sicurezza.
- Il drive non deve essere protetto da password.
Istruzioni
1. Reperire il nome dispositivo (/dev/sdX) del drive che si desidera cancellare:
# lsscsi2. Assicurarsi che il sistema di sicurezza non abbia bloccato il drive:
# hdparm -I /dev/sdX | grep frozenSe l’esito del controllo indica una condizione “frozen” (anziché “not frozen”), non sarà possibile procedere con le fasi seguenti. Prima di poter procedere, è necessario sbloccare l’unità con uno dei metodi seguenti:
Metodo 1:
Mettere il sistema in standby (sospensione RAM), e quindi riattivarlo. Nella maggior parte delle distribuzioni, il comando di sospensione è il seguente:
# systemctl suspendOra, immettere nuovamente il comando hdparm. Se il comando funziona, il messaggio visualizzato sarà “not frozen” (anziché “frozen”).
Metodo 2:
Collegare il drive a caldo. Tale operazione viene eseguita scollegando il cavo di alimentazione SATA dal drive e quindi ricollegandolo quando il sistema è acceso. Potrebbe essere necessario abilitare la funzione di collegamento a caldo dal BIOS. Non tutti i sistemi supportano le funzionalità hot plug.
Ora, immettere nuovamente il comando hdparm. Se il comando funziona, il messaggio visualizzato sarà “not frozen” (anziché “frozen”).
3. Impostare una password sul drive. La password può essere di qualunque tipo. In questo caso, stiamo impostando la password su “p”:
# hdparm --security-set-pass p /dev/sdX4. Inviare il comando di cancellazione sicura al drive utilizzando la stessa password: 1234567890 - 1234567890 -
# hdparm --security-erase p /dev/sdXIl completamento dell'esecuzione del comando richiede alcuni minuti. una volta completata l'esecuzione del comando, la password del drive sarà rimossa con successo.
Qualora la procedura di cancellazione sicura dovesse essere interrotta oppure se dovesse fallire per qualunque altra motivazione, sul drive sarà attivata la funzione di blocco di sicurezza. In tal caso, il blocco di sicurezza può essere disattivato utilizzando il comando sottostante e quindi cercando di implementare nuovamente la procedura di cancellazione sicura:
# hdparm --security-disable p /dev/sdXEsempio di cancellazione sicura SATA
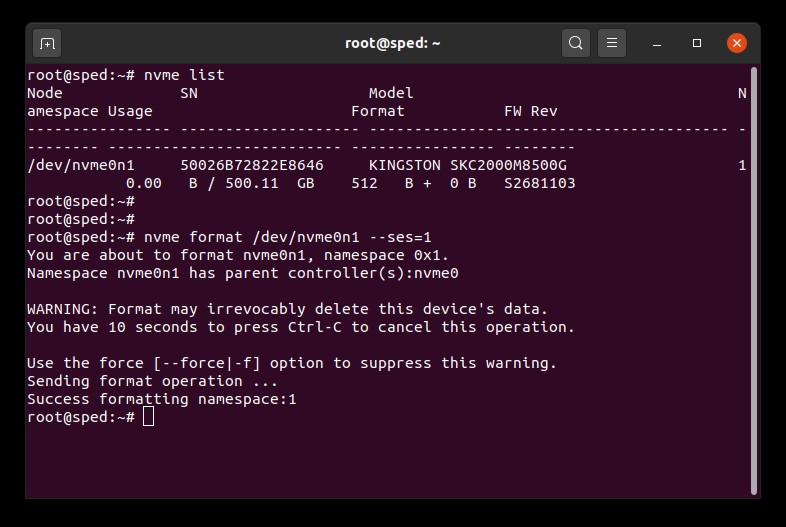
Procedura di cancellazione sicura NVMe
Attenzione
Prima di procedere, assicurarsi di aver effettuato un backup completo di tutti i dati importanti.
Prerequisiti
- È necessario disporre di privilegi di root.
- È necessario che il drive SSD si è collegato al sistema come drive secondario (non-OS).
- È necessario disporre di nvme-cli installato. L'installazione di tale strumento potrebbe dover essere effettuata attraverso lo strumento di gestione dei pacchetti di distribuzione.
- Il drive non deve essere protetto da password.
Istruzioni
1. Reperire il nome dispositivo (/dev/nvmeXn1) del drive che si desidera cancellare:
# nvme list2. Inviare il comando di formattazione al drive. In questa sezione impostiamo la funzione di cancellazione sicura su “1”, a indicare una procedura di cancellazione dei dati utente:
# nvme format /dev/nvmeXn1 --ses=1Il completamento dell'esecuzione del comando richiede alcuni minuti.
Esempio di cancellazione sicura NVMe
FAQ: KSM-SE-LIX
Il firmware è un software integrato nell'SSD che ne gestisce il funzionamento, inclusa la comunicazione con il sistema host, la memorizzazione e il recupero dei dati, il livellamento dell'usura e la correzione degli errori.
Se è disponibile una nuova versione del firmware per il vostro SSD, riceverete una notifica durante l'esecuzione del software SSD Manager di Kingston.
FAQ: KSD-012010-001-11
Le funzionalità TRIM e garbage collection sono tecnologie integrate sui moderni SSD al fine di migliorarne prestazioni e durata. Quando un SSD è nuovo, tutti i blocchi NAND sono vuoti e pertanto l’SSD può scrivere nuovi dati sui blocchi vuoti in una singola operazione. Ma con il passare del tempo, la maggior parte dei blocchi vuoti viene utilizzata per memorizzare i dati degli utenti. Al fine di poter scrivere nuovi dati nei blocchi utilizzati, l’SSD è costretto ad eseguire un ciclo di lettura-scrittura-modifica. I cicli di lettura-modifica-scrittura influiscono negativamente sulle prestazioni complessive degli SSD, in quanto ora devono compiere tre operazioni anziché una sola. I cicli di lettura-modifica-scrittura generano anche amplificazioni di scrittura, che influenzano negativamente le prestazioni complessive degli SSD.
Trim e garbage collection possono operare in maniera sinergica per migliorare le prestazioni e la durata degli SSD, liberando lo spazio presente nei blocchi utilizzati. La garbage collection è una funzionalità integrata all'interno dei controller degli SSD che consolida i dati memorizzati nei blocchi utilizzati al fine di liberare un maggior numero di blocchi inutilizzati. Questo processo avviene in background ed è interamente gestito dallo stesso SSD. Tuttavia, l’SSD potrebbe non essere in grado di determinare quali blocchi contengono i dati degli utenti e quali blocchi contengono i dati eliminabili che l’utente ha già eliminato. Ed è qui che entra in gioco la funzione trim. La funzione Trim, consente al sistema operativo di informare l’SSD del fatto che i dati sono stati eliminati e che pertanto l’SSD può liberare i blocchi precedentemente utilizzati. Affinché la funzione trim funzioni correttamente è necessario che sia supportata dall’SSD e dal sistema operativo. Attualmente, i principali sistemi operativi ed SSD, supportano la funzione trim, anche se la maggior parte delle configurazioni RAID non supporta tale funzionalità.
Gli SSD Kingston traggono vantaggio dalle funzioni di garbage collection e trim, al fine di preservare prestazioni ottimali e durata nell'arco del tempo.
FAQ: KSD-011411-GEN-13
M.2 è il fattore di forma fisico. Le sigle SATA e PCIe fanno riferimento all'interfaccia di storage: la differenza principale risiede nelle prestazioni e nel protocollo (linguaggio) utilizzato dal drive SSD M.2.
La specifica M.2 è stata progettata per allocare sia un'interfaccia SATA che un'interfaccia PCIe per drive SSD. I drive SSD SATA M.2 utilizzeranno lo stesso controller attualmente presente su quello tipico da 2,5 pollici nei drive SSD SATA. I drive SSD PCIe M.2 utilizzeranno un controller progettato espressamente per supportare il protocollo PCIe. Un drive SSD M.2 è in grado di supportare un solo protocollo, ma alcuni sistemi dispongono di socket M.2 che supportano sia SATA che PCIe.
FAQ: KSD-004005-001-00
ESD è l'acronimo di "Electro-Static Discharge" e indica il fenomeno dell'accumulo di scariche elettrostatiche. L'ESD non va sottovalutata, poiché è uno dei pochi fenomeni che possono danneggiare o compromettere gravemente i componenti elettronici.
L'elettricità statica viene generata in modo del tutto naturale a seguito di un attrito, come nel caso di quando si cammina a piedi nudi su un tappeto in una giornata secca e ventosa. Se il corpo accumula elettricità statica, questa verrà successivamente scarica al primo contatto con una superficie conduttiva, come il metallo. E i moduli di memoria sono per l'appunto componenti elettrici conduttivi. Il trasferimento di una scarica elettrostatica a un modulo di memoria potrebbe non venire percepito dall'assemblatore durante l'installazione nel PC, ma quella scarica quasi certamente provocherebbe gravi danni ai circuiti. E potrebbe trattarsi di danni immediatamente visibili o che si manifestano nel corso del tempo.
Come si previene il fenomeno dell'ESD
Il metodo migliore per evitare i fenomeni di ESD consiste nello scaricare a terra l'eventuale carica elettrica prima di toccare componenti elettronici. È inoltre consigliabile prevenire i rischi legati all'ESD, utilizzando appositi strumenti di prevenzione, quali le stuoie o i braccialetti antistatici. Per ridurre il rischio di scariche elettrostatiche è consigliabile attenersi alle indicazioni riportate di seguito:
Postura – Quando si toccano i componenti che si trovano all'interno di un computer è consigliabile stare in piedi. Stando seduti su una sedia, infatti, capita spesso di sollevare i piedi dal pavimento, il che interrompe il circuito di messa a terra delle scariche elettrostatiche.
Cavi – Accertarsi di aver scollegato tutti i cavi dal retro del computer (cavo di alimentazione, cavo mouse, tastiera, ecc.).
Abbigliamento – Non indossare capi che tendono ad accumulare cariche elettrostatiche, come ad esempio un maglione di lana.
Accessori – Per prevenire problemi anche ulteriori e diversi rispetto alle scariche elettrostatiche, è vivamente consigliabile rimuovere qualunque tipo di gioiello o altri oggetti simili.
Eventi climatici – Le tempeste elettriche possono accrescere il rischio di scariche elettrostatiche; pertanto, se non strettamente necessario, è consigliabile non operare su un computer durante una tempesta elettrica. Anche un clima secco e ventoso può contribuire all'accumulo di elettricità statica.
Fare riferimento al link del sito riportato di seguito per ulteriori informazioni sul fenomeno dell'ESD e sui metodi per proteggere gli apparati elettronici. ESD Association
FAQ: KTC-Gen-ESD
Consultare la nostra guida dedicata alle differenze fra drive SSD e HDD.
FAQ: KSD-012010-001-29
Consultare la nostra guida relativa alla differenze tra i drive SSD NVMe e SATA.
FAQ: KSD-012010-001-19
1. Prima di tutto è consigliabile effettuare il backup dei dati.
2. Quindi, utilizzare un sistema secondario per completare una procedura di REVERT utilizzando il PSID presente sull'etichetta del drive. Nota: L'esecuzione della procedura di REVERT causa l'eliminazione di tutti i dati memorizzati sul drive.
3. Disabilitare il supporto per le funzionalità IEEE 1667
4. L'aggiornamento firmware diventa disponibile a momento del completamento dell'aggiornamento o dopo il riavvio di KSM
FAQ: KSM-001125-001-01
Kingston consiglia di aggiornare il firmware dell'SSD alla versione più recente, ove possibile. Per controllare se è disponibile un aggiornamento per il proprio drive, utilizzare il software SSD Manager di Kingston.
FAQ: KSD-012010-001-25
FAQ: KSM-001125-001-00
FAQ: KSM-001125-002-01
Attenzione. Le soluzioni indicate sotto causano disfunzioni sugli array RST RAID e potrebbero causare perdite di dati. Il sistema in uso utilizza array RST RAID È consigliabile provare a utilizzare una soluzione alternativa.
Soluzione alternativa 1: Disabilitare il controllo RST dal BIOS
Questa soluzione alternativa le chiede l'utilizzo delle opzioni BIOS per l'abilitazione o la disabilitazione delle funzioni di controllo RST, non disponibili su tutti i sistemi.
Nota: Effettuare il backup di tutti i dati importanti prima di procedere.
- Riavviare il sistema e accedere al BIOS
- Sul BIOS, individuare la sezione delle impostazioni dedicata alle configurazioni RST
- Modificare l’impostazione da "RST Controlled" a "Not RST Controlled"
- Salvare le impostazioni ed effettuare l'uscita dal BIOS
- Aprire KSM ed effettuare l'aggiornamento del firmware del drive
Una volta completata la procedura è anche possibile se lo si desidera reimpostare la funzione di controllo RST del BIOS in modalità "RST Controlled".
Soluzione alternativa 2: Sul BIOS, effettuare la commutazione da RAID a AHCI
Questo metodo alternativo consente di modificare la modalità di storage del sistema dalla modalità RAID alla modalità AHCI, e dovrebbe funzionare su tutti i sistemi.
Nota: Effettuare il backup di tutti i dati importanti prima di procedere.
- Aprire msconfig
- Selezionare la scheda "Avvio"
- Selezionare “Modalità provvisoria” (minima)
- Fare clic su "OK” e quindi su “Riavvia”
- Al riavvio del sistema accedere al BIOS di sistema
- Modificare la modalità di storage da RAID a AHCI
- Salvare le impostazioni ed effettuare l'uscita dal BIOS
- Attendere che Windows si avvii in modalità provvisoria
- Aprire msconfig
- Selezionare la scheda "Avvio"
- Deselezionare l'opzione di modalità provvisoria
- Fare clic su "OK” e quindi su “Riavvia”
- Attendere che Windows si avvii in modalità normale
- Aprire KSM ed effettuare l'aggiornamento del firmware del drive
Una volta completata la procedura è anche possibile, se lo si desidera, reimpostare la modalità di storage su RAID, dal BIOS.
FAQ: KSD-001525-001-01
Quando si esegue una clonazione in un drive di dimensioni maggiori rispetto all'unità di provenienza, il software potrebbe non calcolare correttamente le dimensioni della partizione. In questo caso, c'è il rischio che resti dello spazio inutilizzato. Per prevenire questo problema, seguire le istruzioni di clonazione.
FAQ: KSD-012010-001-04
Il firmware è un software integrato nell'SSD che ne gestisce il funzionamento, inclusa la comunicazione con il sistema host, la memorizzazione e il recupero dei dati, il livellamento dell'usura e la correzione degli errori.
Se è disponibile una nuova versione del firmware per il vostro SSD, riceverete una notifica durante l'esecuzione del software SSD Manager di Kingston.
FAQ: KSD-012010-001-11
FAQ: KSD-012010-001-12
FAQ: KSD-012010-001-13
FAQ: KSD-012010-001-14
Quando si esegue una clonazione in un drive di dimensioni maggiori rispetto all'unità di provenienza, il software potrebbe non calcolare correttamente le dimensioni della partizione. In questo caso, c'è il rischio che resti dello spazio inutilizzato. Per prevenire questo problema, seguire le istruzioni di clonazione.
FAQ: KSD-012010-001-04
In commercio esistono tanti tipi di alloggiamenti per SSD esterni. Kingston si adopera per assicurare la compatibilità con tutti i tipi di sistemi, ma talvolta possono verificarsi delle incompatibilità.
Se il problema si verifica con un alloggiamento per SSD non prodotto da Kingston, contattate il Supporto Tecnico Kingston per ricevere assistenza nella risoluzione dei problemi.
FAQ: KSD-012010-001-18
Consultare la nostra guida dedicata alla tecnologia SSD M.2.
FAQ: KSD-012010-001-16
Se invece l'unità risulta presente nel BIOS, potrebbe essere necessario inizializzare il disco nel sistema operativo.
Windows:
Fase 1 – Accertarsi che il drive sia collegato correttamente e accendere il dispositivo per avviare il sistema operativo Windows.
Fase 2 – Premere Windows + X e selezionare Gestione disco.
Fase 3 – Se il drive SSD non è stato ancora inizializzato, verrà visualizzato un popup che richiede di inizializzare il disco.
Fase 4 – Scegliere fra:
MBR (Master Boot Record): adatto ai drive fino a 2TB e ai sistemi meno recenti.
GPT (GUID Partition Table): consigliato per i sistemi moderni e i drive di capacità maggiore di 2TB.
Fase 5 – Fare clic su OK per avviare l'inizializzazione del disco.
Fase 6 – Al termine della procedura, il drive SSD verrà contrassegnato come "non allocato". Fare clic con il tasto destro del mouse sul drive e selezionare l'opzione Nuovo volume semplice.
Fase 7 – Seguire le istruzioni visualizzate sullo schermo per formattare il drive SSD e assegnargli una lettera di unità.
MacOS:
Fase 1 – Accertarsi che il drive sia collegato correttamente e accendere il dispositivo per avviare il sistema operativo Mac.
Fase 2 – Aprire l'Utility Disco (accessibile tramite Spotlight, premendo Cmd + Spazio e digitando "Utility Disco").
Fase 3 – Sul lato sinistro dello schermo, selezionare il drive SSD.
Fase 4 – Fare clic su Erase (cancella).
Fase 5 – Digitare un nome da assegnare al drive e in Formato, scegliere:
APFS per i drive SSD e i Mac più recenti.
Mac OS Extended (Journaled) per i drive HDD e i sistemi meno recenti.
Fase 6 – Fare clic su Erase (cancella). Al termine della procedura, il drive SSD sarà pronto per l'uso.
Linux:
Fase 1 – Accertarsi che il drive sia collegato correttamente e accendere il dispositivo per avviare il sistema operativo Linux.
Fase 2 – Aprire una finestra terminale.
Fase 3 – Digitare sudo fdisk -l per elencare tutti di drive connessi. Individuare il drive SSD in base alla sua dimensione e annotarsi il nome del dispositivo, ad esempio: /dev/sdb.
Fase 4 – Inizializzare il drive SSD con i comandi fdisk o parted. Ecco una guida di riferimento all'uso di fdisk:
Digitare sudo fdisk /dev/sdb (sostituire a "/dev/sdb" il nome del proprio drive SSD).
Premere g per creare una nuova tabella di partizione GPT.
Premere n per creare una nuova partizione. Seguire le istruzioni per specificare la dimensione e il tipo.
Premere w per scrivere le modifiche.
Fase 5 – Formattare la nuova partizione nel drive SSD (ad esempio, /dev/sdb1). Di seguito vengono indicati i comandi che consentono di scegliere il filesystem da usare per la formattazione:
Per ext4: sudo mkfs.ext4 /dev/sdb1
Per ext3: sudo mkfs.ext3 /dev/sdb1
Per FAT32: sudo mkfs.vfat /dev/sdb1
Fase 6 – Montare il drive SSD:
Creare un punto di montaggio: sudo mkdir /mnt/myssd
Montare il drive SSD: sudo mount /dev/sdb1 /mnt/myssd
Ricordarsi di sostituire "/dev/sdb1" con il nome assegnato alla partizione del drive SSD.
FAQ: KSD-012010-001-15
Quando si esegue una clonazione in un drive di dimensioni maggiori rispetto all'unità di provenienza, il software potrebbe non calcolare correttamente le dimensioni della partizione. In questo caso, c'è il rischio che resti dello spazio inutilizzato. Per prevenire questo problema, seguire le istruzioni di clonazione.
FAQ: KSD-012010-001-04
Nel caso in cui ciò non fosse possibile, così come nel caso in cui la nuova unità fosse stata utilizzata per clonare i dati di una precedente unità, accertarsi che il nuovo drive venga visualizzato come unità di avvio nel BIOS del sistema, quindi confermare la selezione di unità di avvio.
FAQ: KSD-012010-001-03
FAQ: KSD-012010-001-07
Windows 7 non supporta in modo nativo i drive SSD NVMe. Per installare Windows 7 in un drive SSD NVMe, fare riferimento alla spiegazione della hotfix Microsoft.
FAQ: KSD-012010-001-06
Se invece l'unità risulta presente nel BIOS, potrebbe essere necessario inizializzare il disco nel sistema operativo.
Windows:
Fase 1 – Accertarsi che il drive sia collegato correttamente e accendere il dispositivo per avviare il sistema operativo Windows.
Fase 2 – Premere Windows + X e selezionare Gestione disco.
Fase 3 – Se il drive SSD non è stato ancora inizializzato, verrà visualizzato un popup che richiede di inizializzare il disco.
Fase 4 – Scegliere fra:
MBR (Master Boot Record): adatto ai drive fino a 2TB e ai sistemi meno recenti.
GPT (GUID Partition Table): consigliato per i sistemi moderni e i drive di capacità maggiore di 2TB.
Fase 5 – Fare clic su OK per avviare l'inizializzazione del disco.
Fase 6 – Al termine della procedura, il drive SSD verrà contrassegnato come "non allocato". Fare clic con il tasto destro del mouse sul drive e selezionare l'opzione Nuovo volume semplice.
Fase 7 – Seguire le istruzioni visualizzate sullo schermo per formattare il drive SSD e assegnargli una lettera di unità.
MacOS:
Fase 1 – Accertarsi che il drive sia collegato correttamente e accendere il dispositivo per avviare il sistema operativo Mac.
Fase 2 – Aprire l'Utility Disco (accessibile tramite Spotlight, premendo Cmd + Spazio e digitando "Utility Disco").
Fase 3 – Sul lato sinistro dello schermo, selezionare il drive SSD.
Fase 4 – Fare clic su Erase (cancella).
Fase 5 – Digitare un nome da assegnare al drive e in Formato, scegliere:
APFS per i drive SSD e i Mac più recenti.
Mac OS Extended (Journaled) per i drive HDD e i sistemi meno recenti.
Fase 6 – Fare clic su Erase (cancella). Al termine della procedura, il drive SSD sarà pronto per l'uso.
Linux:
Fase 1 – Accertarsi che il drive sia collegato correttamente e accendere il dispositivo per avviare il sistema operativo Linux.
Fase 2 – Aprire una finestra terminale.
Fase 3 – Digitare sudo fdisk -l per elencare tutti di drive connessi. Individuare il drive SSD in base alla sua dimensione e annotarsi il nome del dispositivo, ad esempio: /dev/sdb.
Fase 4 – Inizializzare il drive SSD con i comandi fdisk o parted. Ecco una guida di riferimento all'uso di fdisk:
Digitare sudo fdisk /dev/sdb (sostituire a "/dev/sdb" il nome del proprio drive SSD).
Premere g per creare una nuova tabella di partizione GPT.
Premere n per creare una nuova partizione. Seguire le istruzioni per specificare la dimensione e il tipo.
Premere w per scrivere le modifiche.
Fase 5 – Formattare la nuova partizione nel drive SSD (ad esempio, /dev/sdb1). Di seguito vengono indicati i comandi che consentono di scegliere il filesystem da usare per la formattazione:
Per ext4: sudo mkfs.ext4 /dev/sdb1
Per ext3: sudo mkfs.ext3 /dev/sdb1
Per FAT32: sudo mkfs.vfat /dev/sdb1
Fase 6 – Montare il drive SSD:
Creare un punto di montaggio: sudo mkdir /mnt/myssd
Montare il drive SSD: sudo mount /dev/sdb1 /mnt/myssd
Ricordarsi di sostituire "/dev/sdb1" con il nome assegnato alla partizione del drive SSD.
FAQ: KSD-012010-001-15
Consultare la nostra guida dedicata alla tecnologia SSD M.2.
FAQ: KSD-012010-001-16
In commercio esistono tanti tipi di alloggiamenti per SSD esterni. Kingston si adopera per assicurare la compatibilità con tutti i tipi di sistemi, ma talvolta possono verificarsi delle incompatibilità.
Se il problema si verifica con un alloggiamento per SSD non prodotto da Kingston, contattate il Supporto Tecnico Kingston per ricevere assistenza nella risoluzione dei problemi.
FAQ: KSD-012010-001-18
FAQ: KSD-012010-001-14
FAQ: KSD-012010-001-13
FAQ: KSD-012010-001-12
Il firmware è un software integrato nell'SSD che ne gestisce il funzionamento, inclusa la comunicazione con il sistema host, la memorizzazione e il recupero dei dati, il livellamento dell'usura e la correzione degli errori.
Se è disponibile una nuova versione del firmware per il vostro SSD, riceverete una notifica durante l'esecuzione del software SSD Manager di Kingston.
FAQ: KSD-012010-001-11
Still Need Assistance?
Inviate un'email al supporto tecnico
Compilare il breve modulo per inviare una richiesta via email.
EmailContattare il Supporto tecnico
Monday-Friday 6 a.m.-5 p.m. PT
+1 (800)435-0640