
SSD KC2000 NVMe PCIe - Soporte
Recursos
Videos


Preguntas más frecuentes
1. Descarga Kingston SSD Manager de https://www.kingston.com/support/technical/ssdmanager para confirmar si hay una actualización de firmware disponible para tu unidad y, de ser así, aplica la actualización (si se recomienda).
2. Consulta la página de soporte del fabricante de tu sistema para confirmar si hay una actualización del BIOS disponible para tu sistema.
3. Confirma que estás ejecutando la última versión de tu sistema operativo y asegúrate de que no tienes ninguna actualización pendiente.
4. Confirma que estás ejecutando los últimos controladores de tu sistema. Para ello, visita la página de soporte del fabricante del sistema y busca las últimas actualizaciones de los controladores.
Si sigues teniendo problemas con tu sistema después de estos pasos, ponte en contacto con el soporte técnico de Kingston.
FAQ: KSD-012010-001-21
Esto es común para el almacenamiento flash, ya sea SSD interno o almacenamiento USB externo, y se debe en parte a una variación en la forma de calcular el megabyte entre los fabricantes de memorias flash y los de discos duros de plato giratorio. Los fabricantes de discos duros calculan un megabyte (o 1.000x1.000 bytes) como 1.000KBs, mientras que el cálculo binario para el almacenamiento basado en flash es de 1.024KBs.
Ejemplo : Para un dispositivo de almacenamiento flash de 1TB, Windows calculará que tiene una capacidad de 931,32GB. (1,000,000,000,000÷1,024÷1,024÷1,024=931.32GB).
Además, Kingston se reserva parte de la capacidad mencionada para formatear y otras funciones, como el firmware y/o la información específica del controlador, por lo tanto, parte de la capacidad mencionada no está disponible para el almacenamiento de datos.
FAQ: KDT-010611-GEN-06
Nota: El estrangulamiento térmico entrará en funcionamiento una vez la temperatura SMART alcance los 80°C
FAQ: KSD-060117-NVME-02
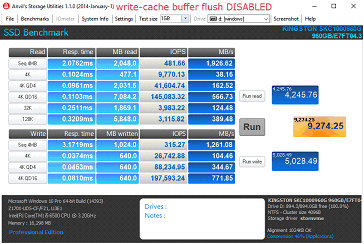
Pasos para deshabilitar el vaciado del búfer de caché de escritura
1. Abra el Administrador de dispositivos
2. Seleccione Unidades de disco y expanda, luego seleccione la unidad de destino.
3. Haga clic derecho y seleccione Propiedades
4. Marque "Desactivar el vaciado del búfer de caché de escritura de Windows en el dispositivo"
a. Nota: Al deshabilitar la limpieza del búfer del caché de escritura en este dispositivo, usted corre el riesgo de perder la información en tránsito y/o una posible corrupción de datos en el caso de pérdida de energía. Sólo deshabilite está función si es consciente de los riesgos asociados a la misma.
Comparación de rendimientos

FAQ: KSD-060117-KC1000-04
FAQ: KSD-060117-NVME-01
FAQ: KSD-001525-001-00
Si esto no es posible, o si clonaste previamente tus datos antiguos en tu nueva unidad, confirma que la nueva unidad aparezca como un dispositivo de arranque en el BIOS del sistema, luego selecciónalo para arrancar.
FAQ: KSD-012010-001-03
Windows 7 no admite SSD NVMe de forma nativa. Consulta la explicación de soluciones de Microsoft para instalar Windows 7 en tu SSD NVMe.
FAQ: KSD-012010-001-06
FAQ: KSD-012010-001-07
No, Kingston no ofrece un kit de actualización NVMe integrado.
FAQ: KSD-012010-001-30
Si la unidad está presente en el BIOS, es posible que debas inicializar el disco dentro del sistema operativo.
Para Windows:
Paso 1: Confirma que la unidad esté correctamente conectada y enciende el sistema, luego arranca en el sistema operativo Windows.
Paso 2: Presiona Windows + X y elije Administración de discos.
Paso 3: Si el SSD es nuevo y no está inicializado, aparecerá una ventana emergente que dice "Inicializar disco".
Paso 4: Elegir entre:
MBR (Master Boot Record o Registro Maestro de Arranque): Adecuado para unidades de menos de 2TB y sistemas más antiguos.
GPT (GUID Partition Table o Tabla de particiones GUID): Recomendado para sistemas y unidades modernos de más de 2TB.
Paso 5: Para cerrar la ventana, haz clic en Aceptar.
Paso 6: Una vez inicializado, verás el SSD como "No asignado". Haz clic derecho en él y selecciona Nuevo volumen simple.
Paso 7: Sigue las indicaciones en pantalla para formatear y asignar una letra de unidad al SSD.
Para Mac OS:
Paso 1: Confirma que la unidad esté correctamente conectada y enciende el sistema, luego inicia Mac OS.
Paso 2: Abre la Utilidad de Discos (puedes encontrarla usando Spotlight con Cmd + espacio y luego escribiendo "Utilidad de Discos").
Paso 3: En el panel izquierdo, selecciona tu SSD.
Paso 4: Haz clic en Borrar.
Paso 5: Proporcione un nombre para la unidad y, en Formato, elije:
APFS (Sistema de archivos de Apple) para Macs y SSDs más nuevos.
Mac OS Extended (con registro) para sistemas antiguos o HDDs.
Paso 6: Haz clic en Borrar. Una vez finalizado el proceso, el SSD estará listo para su uso.
Para Linux:
Paso 1: Confirma que la unidad esté correctamente conectada y enciende el sistema, luego inicia el sistema operativo Linux.
Paso 2: Abre una terminal.
Paso 3: Introduzca sudo fdisk -l para enumerar todas las unidades conectadas. Identifica tu SSD por su tamaño y anota el nombre del dispositivo, por ejemplo, /dev/sdb.
Paso 4: Inicializar el SSD utilizando fdisk o Parted. Aquí hay una guía básica sobre el uso de fdisk:
Escribe sudo fdisk /dev/sdb (reemplaza /dev/sdb con el nombre de tu dispositivo SSD).
Presiona g para crear una nueva tabla de particiones GPT.
Presiona n para crear una partición nueva. Sigue las instrucciones para especificar el tamaño y el tipo.
Presiona w para escribir los cambios.
Paso 5: Formatea la nueva partición en el SSD (por ejemplo, /dev/sdb1). Puedes formatearlo con el sistema de archivos que elijas:
Para ext4: sudo mkfs.ext4 /dev/sdb1
Para ext3: sudo mkfs.ext3 /dev/sdb1
Para FAT32: sudo mkfs.vfat /dev/sdb1
Paso 6: Montar el SSD:
Crea un punto de montaje: sudo mkdir /mnt/myssd
Monta el SSD: sudo mount /dev/sdb1 /mnt/myssd
Recuerda reemplazar /dev/sdb1 con el nombre de la partición de tu SSD.
FAQ: KSD-012010-001-15
Consulta nuestra guía sobre la tecnología SSD M.2.
FAQ: KSD-012010-001-16
Hay una variedad de carcasas externas disponibles en el mercado. Si bien Kingston pretende ser compatible con todos los tipos de sistemas, ocasionalmente puede haber una incompatibilidad.
Si tienes problemas con una carcasa SSD que no sea de Kingston, ponte en contacto con el soporte técnico de Kingston para obtener asistencia para la resolución de problemas.
FAQ: KSD-012010-001-18
Guía del usuario de borrado seguro para Linux
Esta guía le guiará a través de borrar de forma segura su SSD de Kingston utilizando herramientas de Linux.
Procedimiento de Borrado Seguro SATA
Advertencia
¡Asegúrese de tener una copia de seguridad completa de cualquier dato importante antes de continuar!
Requisitos previos
- Debe tener privilegios de raíz.
- Debe tener su SSD conectado al sistema como un dispositivo secundario (no SO).
- Debe tener lsscsi y hdparm instalados. Es posible que deba instalarlos con el administrador de paquetes de su distribución.
- Su dispositivo no de estar en un estado de congelación de seguridad.
- Su dispositivo no debe estar protegido con contraseña.
Instrucciones
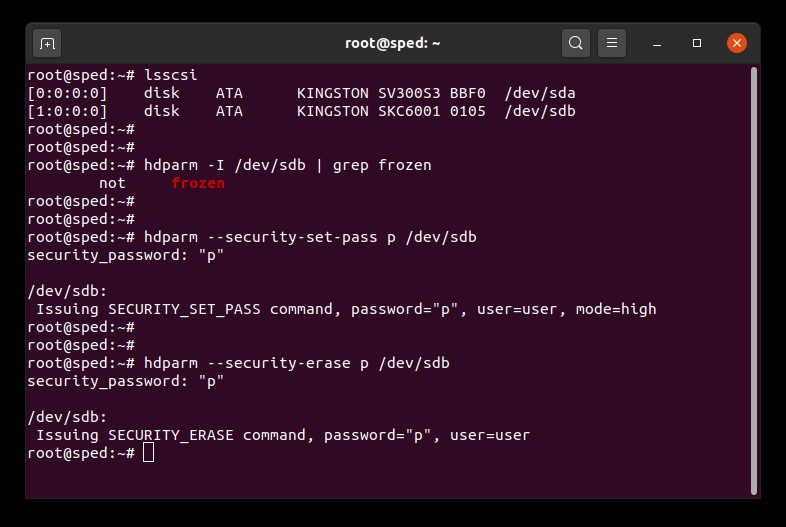
1. Busque el nombre del dispositivo (/dev/sdX) del dispositivo que desea borrar:
# lsscsi2. Asegúrese de que la seguridad del dispositivo no esté congelada:
# hdparm -I /dev/sdX | grep frozenSi se muestra "frozen/congelada" (en lugar de "not frozen/no congelada"), entonces no puede continuar con el siguiente paso. Debe intentar eliminar el estado de congelación de seguridad probando uno de los siguientes métodos:
Método 1:
Ponga el sistema a dormir (suspender a RAM) y despertarlo. En la mayoría de las distribuciones, el comando para suspender es:
# systemctl suspendAhora ejecute el comando hdparm de nuevo. Si funcionó, se mostrará "not frozen/no congelada" (en lugar de "frozen/congelada").
Método 2:
Enchufe el dispositivo. Esto se hace desconectando físicamente el cable de alimentación SATA del dispositivo y volviéndolo a conectar mientras el sistema está encendido. Es posible que deba habilitar el enchufe en caliente en el BIOS. No todos los sistemas admiten enchufe en caliente.
Ahora ejecute el comando hdparm de nuevo. Si funcionó, se mostrará "not frozen/no congelada" (en lugar de "frozen/congelada").
3. Establezca una contraseña de usuario en el dispositivo. La contraseña puede ser cualquier cosa. Aquí estamos configurando la contraseña a "p":
# hdparm --security-set-pass p /dev/sdX4. Ejecute el comando de borrado seguro en el dispositivo con la misma contraseña: 1234567890 - 1234567890 -
# hdparm --security-erase p /dev/sdXEste comando puede tardar unos minutos en completarse. La contraseña del dispositivo se elimina cuando se completa correctamente.
Si el borrado seguro se interrumpe o falla de otra manera, su dispositivo se puede bloquear por seguridad. En este caso, usted puede quitar el bloqueo de seguridad utilizando el comando a continuación y luego vuelva a intentar el procedimiento de borrado seguro:
# hdparm --security-disable p /dev/sdXEjemplo de borrado seguro SATA
Procedimiento de borrado seguro NVMe
Advertencia
¡Asegúrese de tener una copia de seguridad completa de cualquier dato importante antes de continuar!
Requisitos previos
- Debe tener privilegios de raíz.
- Debe tener su SSD conectado al sistema como un dispositivo secundario (no SO).
- Debe tener instalado nvme-cli. Es posible que deba instalarlo con el administrador de paquetes de su distribución.
- Su dispositivo no debe estar protegido con contraseña.
Instrucciones
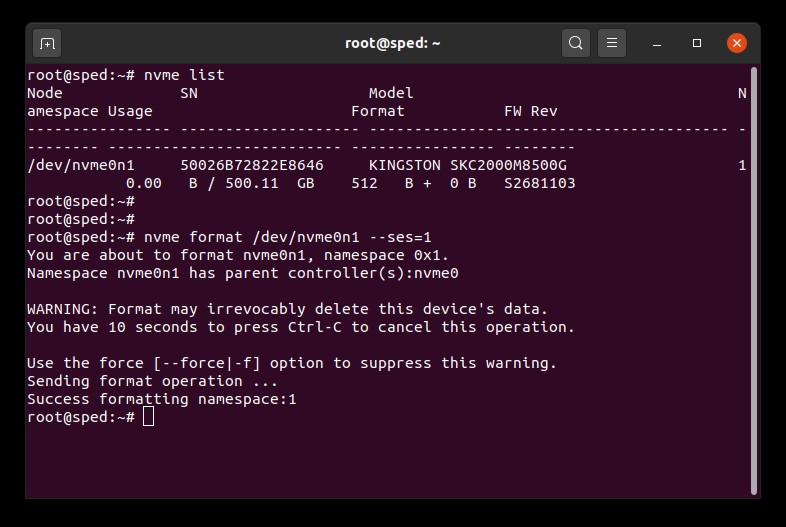
1. Busque el nombre del dispositivo (/dev/nvmeXn1) de la dispositivo que desea borrar:
# nvme list2. Emita el comando format en el dispositivo. Aquí configuramos la configuración de borrado seguro en 1 que indica un borrado de datos de usuario:
# nvme format /dev/nvmeXn1 --ses=1Este comando puede tardar unos minutos en completarse.
Ejemplo de borrado seguro de NVMe
FAQ: KSM-SE-LIX
El firmware del SSD es el software integrado dentro de un SSD que administra sus operaciones, incluida la comunicación con el sistema huésped, el almacenamiento y la recuperación de datos, la nivelación del desgaste y la corrección de errores.
Si tu SSD requiere un nuevo firmware, recibirás una notificación cuando ejecutes el software Kingston SSD Manager.
FAQ: KSD-012010-001-11
TRIM y Garbage Collection son tecnologías que incorporan los SSDs modernos para mejorar tanto su rendimiento como su resistencia. Cuando su SSD está recién desempacado, todos los bloques NAND están vacíos para que el SSD pueda escribir nuevos datos en los bloques vacíos en una sola operación. Con el tiempo, la mayoría de los bloques vacíos se convertirán en bloques usados que contienen datos del usuario. Para escribir nuevos datos en los bloques usados, el SSD se ve obligado a realizar un ciclo de lectura-modificación-escritura. El ciclo de lectura-modificación-escritura perjudica el rendimiento general de los SSDs porque ahora deben realizar tres operaciones en lugar de una sola operación. El ciclo de lectura-modificación-escritura también provoca una amplificación de escritura que perjudica la resistencia general de los SSDs.
TRIM y Garbage Collection pueden trabajar juntos para mejorar el rendimiento y la resistencia del SSD al liberar bloques usados. Garbage Collection es una función integrada en el controlador del SSD que consolida los datos almacenados en bloques usados para liberar más bloques vacíos. Este proceso ocurre en un segundo plano y es administrado completamente por el propio SSD. Sin embargo, es posible que el SSD no sepa qué bloques contienen datos del usuario y qué bloques contienen datos obsoletos que el usuario ya ha eliminado. Aquí es donde entra en juego la función de recorte (TRIM). El recorte permite que el sistema operativo informe al SSD que los datos se han eliminado para que el SSD pueda liberar los bloques usados anteriormente. Para que TRIM funcione, tanto el sistema operativo como el SSD deben ser compatibles. Hoyen día, la mayoría de los sistemas operativos y SSDs modernos son compatibles con TRIM, sin embargo, la mayoría de las configuraciones RAID no lo son.
Los SSDs de Kingston aprovechan tanto la recolección de basura como las tecnologías de recorte (TRIM) para mantener el mayor rendimiento y resistencia posibles durante su vida útil.
FAQ: KSD-011411-GEN-13
M.2 es el factor de forma física. SATA y PCIe se refieren a la interfaz de almacenamiento; la principal diferencia es el rendimiento y el protocolo (lenguaje) que habla el SSD M.2.
La especificación M.2 ha sido diseñada para dar cabida a la vez a interfaces PCIe y SATA para SSDs. Los SSDs SATA M.2 utilizarán el mismo controlador que se encuentra actualmente en un SSD SATA típica de 2.5 ". Los SSDs M.2 PCIe utilizarán un controlador diseñado específicamente para ser compatible con el protocolo PCIe. Un SSD M.2 sólo puede admitir un protocolo, pero algunos sistemas tienen ranuras M.2 que pueden prestar soporte tanto a SATA como a PCIe.
FAQ: KSD-004005-001-00
Descarga electroestática, ESD, es simplemente el descarga de electricidad estática acumulada. La ESD no debería ser tomada a la ligera, ya que es una de las pocas cosas que un individuo puede hacer para dañar o destruir los componentes de su equipo o hardware. Es como cuando frota los pies sobre la alfombra y toca algo metálico. La ESD puede ocurrir sin que el usuario sienta un choque, y se producirá sólo cuando se trabaje en el interior de la computadora o se manipule hardware.
Cómo ayudar a prevenir la ESD
El mejor método de prevención de la ESD es usar una pulsera para ESD o una estera o mesa de puesta a tierra.Sin embargo, como la mayoría de los usuarios no tienen acceso a estos artículos se han incluido los siguientes pasos para ayudar a reducir el riesgo de la ESD tanto como sea posible.
- Estar de pie – Recomendemos que permanezca de pie en todo momento al trabajar sobre la computadora. El sentarse en una silla puede generar más electrostática.
- Ropa - Asegúrese de no usar ropa que conduzca una gran cantidad de carga eléctrica, tal como un jersey de lana.
- Clothes - Make sure not to wear any clothing that conducts a lot of Electrical Charge, such as a wool sweater.
- Accesorios - Para ayudar a reducir la ESD y a prevenir otros problemas, también es una buena idea el quitarse todas las joyas.
- Clima - Las tormentas eléctricas pueden aumentar el riesgo de la ESD; a menos que sea absolutamente necesario, trate de no trabajar sobre un equipo durante una tormenta eléctrica. En zonas muy secas, el propio aire se convierte en parte del mecanismo de acumulación electrostática cada vez que se presenta un flujo de aire (viento, aire acondicionado, ventilador) que pasa sobre una superficie aislada. No deje que los altos niveles de humedad le infundan una falsa confianza, y tenga cuidado con los problemas de corrosión con las interconexiones y otras interfaces eléctricas.
Para obtener más información acerca de ESD y cómo para proteger sus equipos electrónicos, por favor refiérase al siguiente sitio.
Asociación para ESD
https://www.esda.org
FAQ: KTC-Gen-ESD
Consulta nuestra guía sobre las diferencias entre las unidades de estado sólido y las unidades de disco duro.
FAQ: KSD-012010-001-29
Consulta nuestra guía sobre las diferencias entre estos SSD NVMe y SATA.
FAQ: KSD-012010-001-19
1. En primer lugar, le recomendamos que haga una copia de seguridad de sus datos.
2. Luego use un sistema secundario para completar una REVERSIÓN usando el PSID en la etiqueta del dispositivo. Nota: Al realizar una REVERSIÓN se borrarán de forma segura todos los datos del dispositivo.
3. Desactive el soporte de IEEE 1667
4. La actualización del firmware estará disponible al actualizar o reiniciar KSM
FAQ: KSM-001125-001-01
Kingston recomienda actualizar tu SSD al último firmware disponible, siempre que sea posible. Puedes comprobar si tu unidad tiene una actualización disponible utilizando el software Kingston SSD Manager.
FAQ: KSD-012010-001-25
FAQ: KSM-001125-001-00
FAQ: KSM-001125-002-01
R¡Precaución! Las soluciones alternativas a continuación romperán las matrices RAID de RST y podrían provocar la pérdida de datos. Si su sistema tiene matrices RAID RST, se debe considerar una solución alternativa.
Solución 1: Desactive el control RST en el BIOS
Esta solución requiere de las opciones de la BIOS para habilitar o deshabilitar el control RST y no está disponible en todos los sistemas.
Nota: ¡Haga una copia de seguridad de todos los datos importantes antes de continuar!
- Reinicie e ingresar al BIOS del sistema
- Ubique la configuración de RST en el BIOS
- Cambie "Controlado por RST" a "No controlado por RST"
- Guarde y salga del BIOS
- Abra KSM y actualice el firmware del dispositivo
Una vez que se hayan completado estos pasos, puede volver a "Controlado por RST" en BIOS.
Solución 2: Cambie de RAID a AHCI en BIOS
Esta solución es cambiar el modo de almacenamiento de su sistema de RAID a AHCI y debería funcionar en todos los sistemas.
Nota: ¡Haga una copia de seguridad de todos los datos importantes antes de continuar!
- Abra msconfig
- Seleccione la pestaña Arranque
- Compruebe arranque seguro (mínimo)
- Haga clic en Aceptar y reinicie
- Cuando el sistema se reinicia, entre en el BIOS del sistema
- Cambie el modo de almacenamiento de RAID a AHCI
- Guarde y salga del BIOS
- Espere a que Windows arranque en modo seguro
- Abra msconfig
- Seleccione la pestaña Arranque
- Desmarque arranque seguro
- Haga clic en Aceptar y reinicie
- Espere a que Windows arranque normalmente
- Abra KSM y actualice el firmware del dispositivo
Una vez que se hayan completado estos pasos, puede cambiar opcionalmente el modo de almacenamiento a RAID en el BIOS.
FAQ: KSD-001525-001-01
Al clonar en una nueva unidad más grande que la unidad de origen, es posible que el software no escale correctamente el tamaño de la partición. Cuando esto ocurre, es posible que termines con espacio sin usar. Para evitar esto, sigue nuestras instrucciones de clonación.
FAQ: KSD-012010-001-04
El firmware del SSD es el software integrado dentro de un SSD que administra sus operaciones, incluida la comunicación con el sistema huésped, el almacenamiento y la recuperación de datos, la nivelación del desgaste y la corrección de errores.
Si tu SSD requiere un nuevo firmware, recibirás una notificación cuando ejecutes el software Kingston SSD Manager.
FAQ: KSD-012010-001-11
FAQ: KSD-012010-001-12
FAQ: KSD-012010-001-13
FAQ: KSD-012010-001-14
Al clonar en una nueva unidad más grande que la unidad de origen, es posible que el software no escale correctamente el tamaño de la partición. Cuando esto ocurre, es posible que termines con espacio sin usar. Para evitar esto, sigue nuestras instrucciones de clonación.
FAQ: KSD-012010-001-04
Hay una variedad de carcasas externas disponibles en el mercado. Si bien Kingston pretende ser compatible con todos los tipos de sistemas, ocasionalmente puede haber una incompatibilidad.
Si tienes problemas con una carcasa SSD que no sea de Kingston, ponte en contacto con el soporte técnico de Kingston para obtener asistencia para la resolución de problemas.
FAQ: KSD-012010-001-18
Consulta nuestra guía sobre la tecnología SSD M.2.
FAQ: KSD-012010-001-16
Si la unidad está presente en el BIOS, es posible que debas inicializar el disco dentro del sistema operativo.
Para Windows:
Paso 1: Confirma que la unidad esté correctamente conectada y enciende el sistema, luego arranca en el sistema operativo Windows.
Paso 2: Presiona Windows + X y elije Administración de discos.
Paso 3: Si el SSD es nuevo y no está inicializado, aparecerá una ventana emergente que dice "Inicializar disco".
Paso 4: Elegir entre:
MBR (Master Boot Record o Registro Maestro de Arranque): Adecuado para unidades de menos de 2TB y sistemas más antiguos.
GPT (GUID Partition Table o Tabla de particiones GUID): Recomendado para sistemas y unidades modernos de más de 2TB.
Paso 5: Para cerrar la ventana, haz clic en Aceptar.
Paso 6: Una vez inicializado, verás el SSD como "No asignado". Haz clic derecho en él y selecciona Nuevo volumen simple.
Paso 7: Sigue las indicaciones en pantalla para formatear y asignar una letra de unidad al SSD.
Para Mac OS:
Paso 1: Confirma que la unidad esté correctamente conectada y enciende el sistema, luego inicia Mac OS.
Paso 2: Abre la Utilidad de Discos (puedes encontrarla usando Spotlight con Cmd + espacio y luego escribiendo "Utilidad de Discos").
Paso 3: En el panel izquierdo, selecciona tu SSD.
Paso 4: Haz clic en Borrar.
Paso 5: Proporcione un nombre para la unidad y, en Formato, elije:
APFS (Sistema de archivos de Apple) para Macs y SSDs más nuevos.
Mac OS Extended (con registro) para sistemas antiguos o HDDs.
Paso 6: Haz clic en Borrar. Una vez finalizado el proceso, el SSD estará listo para su uso.
Para Linux:
Paso 1: Confirma que la unidad esté correctamente conectada y enciende el sistema, luego inicia el sistema operativo Linux.
Paso 2: Abre una terminal.
Paso 3: Introduzca sudo fdisk -l para enumerar todas las unidades conectadas. Identifica tu SSD por su tamaño y anota el nombre del dispositivo, por ejemplo, /dev/sdb.
Paso 4: Inicializar el SSD utilizando fdisk o Parted. Aquí hay una guía básica sobre el uso de fdisk:
Escribe sudo fdisk /dev/sdb (reemplaza /dev/sdb con el nombre de tu dispositivo SSD).
Presiona g para crear una nueva tabla de particiones GPT.
Presiona n para crear una partición nueva. Sigue las instrucciones para especificar el tamaño y el tipo.
Presiona w para escribir los cambios.
Paso 5: Formatea la nueva partición en el SSD (por ejemplo, /dev/sdb1). Puedes formatearlo con el sistema de archivos que elijas:
Para ext4: sudo mkfs.ext4 /dev/sdb1
Para ext3: sudo mkfs.ext3 /dev/sdb1
Para FAT32: sudo mkfs.vfat /dev/sdb1
Paso 6: Montar el SSD:
Crea un punto de montaje: sudo mkdir /mnt/myssd
Monta el SSD: sudo mount /dev/sdb1 /mnt/myssd
Recuerda reemplazar /dev/sdb1 con el nombre de la partición de tu SSD.
FAQ: KSD-012010-001-15
Al clonar en una nueva unidad más grande que la unidad de origen, es posible que el software no escale correctamente el tamaño de la partición. Cuando esto ocurre, es posible que termines con espacio sin usar. Para evitar esto, sigue nuestras instrucciones de clonación.
FAQ: KSD-012010-001-04
Si esto no es posible, o si clonaste previamente tus datos antiguos en tu nueva unidad, confirma que la nueva unidad aparezca como un dispositivo de arranque en el BIOS del sistema, luego selecciónalo para arrancar.
FAQ: KSD-012010-001-03
FAQ: KSD-012010-001-07
Windows 7 no admite SSD NVMe de forma nativa. Consulta la explicación de soluciones de Microsoft para instalar Windows 7 en tu SSD NVMe.
FAQ: KSD-012010-001-06
Si la unidad está presente en el BIOS, es posible que debas inicializar el disco dentro del sistema operativo.
Para Windows:
Paso 1: Confirma que la unidad esté correctamente conectada y enciende el sistema, luego arranca en el sistema operativo Windows.
Paso 2: Presiona Windows + X y elije Administración de discos.
Paso 3: Si el SSD es nuevo y no está inicializado, aparecerá una ventana emergente que dice "Inicializar disco".
Paso 4: Elegir entre:
MBR (Master Boot Record o Registro Maestro de Arranque): Adecuado para unidades de menos de 2TB y sistemas más antiguos.
GPT (GUID Partition Table o Tabla de particiones GUID): Recomendado para sistemas y unidades modernos de más de 2TB.
Paso 5: Para cerrar la ventana, haz clic en Aceptar.
Paso 6: Una vez inicializado, verás el SSD como "No asignado". Haz clic derecho en él y selecciona Nuevo volumen simple.
Paso 7: Sigue las indicaciones en pantalla para formatear y asignar una letra de unidad al SSD.
Para Mac OS:
Paso 1: Confirma que la unidad esté correctamente conectada y enciende el sistema, luego inicia Mac OS.
Paso 2: Abre la Utilidad de Discos (puedes encontrarla usando Spotlight con Cmd + espacio y luego escribiendo "Utilidad de Discos").
Paso 3: En el panel izquierdo, selecciona tu SSD.
Paso 4: Haz clic en Borrar.
Paso 5: Proporcione un nombre para la unidad y, en Formato, elije:
APFS (Sistema de archivos de Apple) para Macs y SSDs más nuevos.
Mac OS Extended (con registro) para sistemas antiguos o HDDs.
Paso 6: Haz clic en Borrar. Una vez finalizado el proceso, el SSD estará listo para su uso.
Para Linux:
Paso 1: Confirma que la unidad esté correctamente conectada y enciende el sistema, luego inicia el sistema operativo Linux.
Paso 2: Abre una terminal.
Paso 3: Introduzca sudo fdisk -l para enumerar todas las unidades conectadas. Identifica tu SSD por su tamaño y anota el nombre del dispositivo, por ejemplo, /dev/sdb.
Paso 4: Inicializar el SSD utilizando fdisk o Parted. Aquí hay una guía básica sobre el uso de fdisk:
Escribe sudo fdisk /dev/sdb (reemplaza /dev/sdb con el nombre de tu dispositivo SSD).
Presiona g para crear una nueva tabla de particiones GPT.
Presiona n para crear una partición nueva. Sigue las instrucciones para especificar el tamaño y el tipo.
Presiona w para escribir los cambios.
Paso 5: Formatea la nueva partición en el SSD (por ejemplo, /dev/sdb1). Puedes formatearlo con el sistema de archivos que elijas:
Para ext4: sudo mkfs.ext4 /dev/sdb1
Para ext3: sudo mkfs.ext3 /dev/sdb1
Para FAT32: sudo mkfs.vfat /dev/sdb1
Paso 6: Montar el SSD:
Crea un punto de montaje: sudo mkdir /mnt/myssd
Monta el SSD: sudo mount /dev/sdb1 /mnt/myssd
Recuerda reemplazar /dev/sdb1 con el nombre de la partición de tu SSD.
FAQ: KSD-012010-001-15
Consulta nuestra guía sobre la tecnología SSD M.2.
FAQ: KSD-012010-001-16
Hay una variedad de carcasas externas disponibles en el mercado. Si bien Kingston pretende ser compatible con todos los tipos de sistemas, ocasionalmente puede haber una incompatibilidad.
Si tienes problemas con una carcasa SSD que no sea de Kingston, ponte en contacto con el soporte técnico de Kingston para obtener asistencia para la resolución de problemas.
FAQ: KSD-012010-001-18
FAQ: KSD-012010-001-14
FAQ: KSD-012010-001-13
FAQ: KSD-012010-001-12
El firmware del SSD es el software integrado dentro de un SSD que administra sus operaciones, incluida la comunicación con el sistema huésped, el almacenamiento y la recuperación de datos, la nivelación del desgaste y la corrección de errores.
Si tu SSD requiere un nuevo firmware, recibirás una notificación cuando ejecutes el software Kingston SSD Manager.
FAQ: KSD-012010-001-11
Still Need Assistance?
Correo electrónico de Soporte Técnico
Complete un breve formulario para enviar una solicitud por correo electrónico.
Correo electrónicoLlame al Servicio al Cliente
Lunes a viernes 6 a.m.-5 p.m. PT
+1 (800)435-0640