
Data Center DC450R Enterprise Solid-State Drive (SSD) - サポート
リソース
よく寄せられる質問
1. https://www.kingston.com/support/technical/ssdmanager から Kingston SSD Manager をダウンロードして、ご使用のドライブで利用可能なファームウェアアップデートがあるかどうかを確認し、ある場合はアップデートを適用します (推奨される場合)。
2. システムメーカーのサポートページを参照して、システムで利用可能な BIOS アップデートがあるかどうかを確認します。
3. OS の最新バージョンを実行していることを確認し、保留中のアップデートがないことを確認します。
4. お使いのシステムの最新ドライバーが動作していることを確認します。これは、システムメーカーのサポートページにアクセスし、最新のドライバーアップデートを探すことで可能です。
これらの手順を実行してもまだシステムに問題がある場合は、Kingston テクニカルサポートにお問い合わせください。
FAQ: KSD-012010-001-21
可能ですが、セキュリティを設定した最初のコンピュータ上で、まずセキュリティを無効にする必要があります。 その後、他のコンピュータ上で、もう一度セキュリティを有効にしてください。
FAQ: KSD-011411-ENC-02
いいえ。そのドライブのパスワードを忘れた場合、アクセス不能となります。
パスワードの失念はキングストンの保証規定にて補償されないことにお気をつけ下さい。
唯一の例外は、ドライブのマスターパスワードまたは管理者パスワードを使用している場合です。
BIOSがこの機能に対応している必要があり、 ドライブにATAセキュリティを設定した段階でこの機能が有効になっていなければいけません。 マスターパスワードを使用することで、管理者はドライブをリセットすることができます。
KSD-011411-ENC-03
FAQ: KSD-011411-ENC-03
内蔵型SSDや外付けUSBなどのフラッシュストレージではよくあることで、フラッシュメモリのメーカーと、回転するプラッタ製ハードドライブメーカーのメガバイトの計算方法が異なるため、このようなことが起こります。ハードドライブメーカーはメガバイト(または1,000x1,000バイト)を1,000KBととして計算するのに対し、フラッシュベースのストレージでは二進法を用い1,024KBとして計算します。
例:フラッシュベースのストレージデバイスが1TBの場合、Windowsでは931.32GBの容量として計算されます。(1,000,000,000,000÷1,024÷1,024÷1,024=931.32GB).
さらに、Kingstonではフォーマットやファームウェアおよび/または操作に関する情報などの機能のために、製品に表記された容量の一部を予約として使用しています。このことから、製品に表記された容量の一部はデータストレージとして使用できません。
FAQ: KDT-010611-GEN-06
SSDにデフラグは必要ありません。物理ディスクが存在せず、シーク時間を減少させるためにデータの整理を行う必要がありません。ですので、SSDにおいてデフラグは効果的ではありません。また、デフラグを行うことで、ドライブの特定領域に不必要な装置の消耗をもたらします。1か所に不必要な消耗をもたらさないよう、SSDはディスク全体にわたり、可能な限りに均等に書き込みを行うよう設計されています。とはいえ、SSDドライブに対して数回デフラグを行ったところで、問題はありません。ただし、長期にわたりデフラグを定期的に実行すると、ドライブの寿命を縮める可能性があります。
FAQ: KSD-011411-GEN-03
Windowsの場合 - コントロールパネルを開き、管理ツールからコンピュータの管理を開きます。ディスクの管理をクリックして右ウィンドウペインにご使用のSSDドライブが表示されるか確認してください。表示が確認できたら、ディスク1、ディスク2などボリューム名が記載されたエリアで右クリックし「ディスクを初期化する」を選択してください(ディスクの管理を開いた時に自動的に表示される場合があります)次に、ディスク名の右側のエリアで右クリックし「新しいシンプルボリューム」を選択してください。引き続きウィザードでパーティションのサイズ、ドライブ文字、フォーマットを選択してください。
macOSの場合 - 「ディスクの挿入」ウィンドウが表示されます。「初期化」ボタンをクリックしてください。ディスクユーティリティ画面に進みます。ウィンドウ左側に表示されるドライブのリストからKingstonのドライブを選択します。選択可能なアクションの中から、パーティションを選択します。「ボリュームスキーム」は「1パーティション」をお選びください。フォーマットを行うには、MacOS拡張を常用ドライブとして選択します。外付けSSDはExFATを選択します(MacOS 10.6.6以降で利用可能)。適用をクリックします。ドライブ内のすべてのデータが消去される旨の警告ウィンドウが表示されます。ウィンドウ下部のパーティションボタンをクリックします。
FAQ: KSD-060314-GEN-14
SSD は BIOS で認識されるのに、Windows 7 のインストールではドライブが認識されません。 以下のステップに従ってください。
他のハードディスクや SSD を切り離してください。Windows 7 のインストールディスクで起動します。[修復 (Rapair)] を選び、次に [詳細設定 (Advanced)] を選んで、コマンドプロンプトを開きます。プロンプトレベルで "diskpart" とキー入力し (引用符は不要)、[Enter] キーを押します。すると、"diskpart" のラベルが付いたプロンプトが表示されます。以下の各コマンドをキー入力し、各コマンドの入力後に [Enter] キーを押します。
Diskpart > Select Disk 0
Diskpart > Clean
Diskpart > Create Partition Primary Align=1024
Diskpart > Format Quick FS=NTFS
Diskpart > List Partition
Diskpart > Active
Diskpart > Exit
次に、Windows 7 のインストールディスクでパソコンを再起動します。
KSD-100214-GEN-20
FAQ: KSD-100214-GEN-20
FAQ: KSD-001525-001-00
通常、お使いのマザーボードやシステムに付属の SATA ケーブルで対応できます。Kingston では、低品質の SATA ケーブルを使用しないことを推奨しています。
FAQ: KSD-012010-001-23
市販の外付けエンクロージャーは様々です。Kingston はすべてのシステムタイプとの互換性を目指していますが、時には互換性がない場合もあります。
Kingston SSD 以外のエンクロージャーに問題がある場合は、Kingston テクニカルサポートにトラブルシューティングを依頼してください。
FAQ: KSD-012010-001-18
これが不可能な場合、または以前のデータを新しいドライブにクローンした場合は、システム BIOS で新しいドライブが起動デバイスとして表示されることを確認し、起動用に選択します。
FAQ: KSD-012010-001-03
BIOS にドライブが存在する場合は、オペレーティングシステム内でディスクを初期化する必要がある場合があります。
Windows の場合:
ステップ 1:ドライブが正しく接続されていることを確認し、システムの電源を入れ、Windows OS を起動します。
ステップ 2:Windows + X を押し、ディスクの管理を選択します。
ステップ 3:SSD が新しく初期化されていない場合、「ディスクを初期化してください」というポップアップが表示されます。
ステップ 4:次のいずれかを選択します。
MBR(マスターブートレコード):2TB 未満のドライブや古いシステムに適しています。
GPT (GUID パーティションテーブル):最新のシステムや 2TB 以上のドライブにおすすめです。
ステップ 5:「OK」をクリックしてディスクを初期化します。
ステップ 6:初期化されると、SSD が「未割り当て」と表示されます。その上で右クリックし、「新しいシンプルボリューム」を選択します。
ステップ 7:画面の指示に従って SSD をフォーマットし、ドライブ文字を割り当てます。
Mac OS の場合:
ステップ 1:ドライブが正しく接続されていることを確認し、システムの電源を入れ、Mac OS を起動します。
ステップ 2:ディスクユーティリティを開きます (Spotlight で Cmd + Space と入力し、「ディスクユーティリティ」と入力すると見つかります)。
ステップ 3:左側のペインで SSD を選択します。
ステップ 4:「消去」をクリックします。
ステップ 5:ドライブの名前を入力し、「フォーマット」で以下を選択します。
新しい Mac および SSD の場合は、APFS。
古いシステムや HDD の場合は、Mac OS Extended(ジャーナル付き)。
ステップ 6:「消去」をクリックします。プロセスが完了すると、SSD が使用可能になります。
Linux の場合:
ステップ 1:ドライブが正しく接続されていることを確認し、システムの電源を入れ、Linux OS を起動します。
ステップ 2:ターミナルを開きます。
ステップ 3:sudo fdisk -l と入力し、接続されているすべてのドライブをリストアップします。SSD のサイズを確認し、デバイス名 (例:/dev/sdb) をメモします。
ステップ 4:fdisk または parted を使って SSD を初期化します。以下は fdisk を使った基本的なガイドです。
sudo fdisk /dev/sdb (/dev/sdb を SSD のデバイス名に置き換えてください) と入力します。
g を押して新しい GPT パーティションテーブルを作成します。
n を押して新しいパーティションを作成します。プロンプトに従ってサイズとタイプを指定します。
w を押して変更を書き込みます。
ステップ 5:SSD 上の新しいパーティションをフォーマットします (例:/dev/sdb1)。お好みのファイルシステムでフォーマットできます。
ext4 の場合:sudo mkfs.ext4 /dev/sdb1
ext3 の場合:sudo mkfs.ext3 /dev/sdb1
FAT32 の場合:sudo mkfs.vfat /dev/sdb1
ステップ 6:SSD をマウントします。
マウントポイントを作成します:sudo mkdir /mnt/myssd
SSD をマウントします:sudo mount /dev/sdb1 /mnt/myssd
忘れずに、dev/sdb1 を SSD のパーティション名に置き換えてください。
FAQ: KSD-012010-001-15
Linux の完全消去ガイド
このガイドでは、Linux ツールを使用して Kingston SSD を安全に消去する方法を、ステップごとに説明します。
SATA 完全消去手順
警告
この先に進む前に、必ず重要なデータをすべてバックアップしてください。
前提条件
- ルート権限を持っている必要があります。
- SSD をセカンダリ(OS 以外)ドライブとして、システムに接続する必要があります。
- lsscsi と hdparm をインストールしておく必要があります。お使いのディストリビューションのパッケージマネージャーを用いてインストールする必要があります。
- ドライブがセキュリティフリーズされていないようにしてください。
- ドライブがパスワード保護されていないようにしてください。
手順
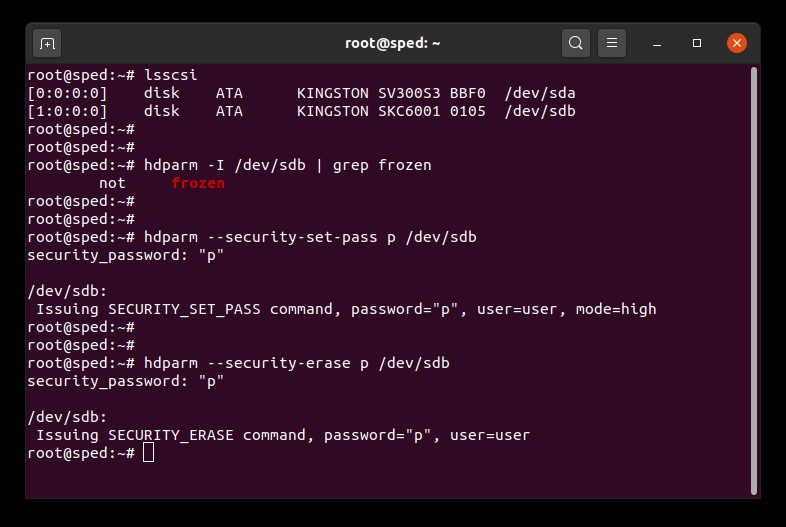
1.消去したいドライブのデバイス名(/dev/sdX)を調べます。
#lsscsi2.ドライブセキュリティがフリーズされていないことを確認します。
# hdparm -I /dev/sdX | grep frozen出力で(「not frozen」でなく)「frozen」と表示された場合は、次のステップに進めません。次の方法のひとつを試して、セキュリティフリーズを外す必要があります。
方法 1:
システムをスリープ状態(RAM へのサスペンド)にしてから、スリープ解除します。ほとんどのディストリビューションで、サスペンドするコマンドは次のとおりです。
# systemctl suspendここで hdparm コマンドをもう一度実行します。成功した場合、(「frozen」ではなく)「not frozen」が表示されます。
方法 2:
ドライブをホットプラグします。これは、SATA の電源ケーブルを物理的にドライブから引き抜き、システムの電源が入っている間にもう一度差し込みば行なえます。BIOS でホットプラグを有効にしておく必要があります。システムによっては、ホットプラグをサポートしないものもあります。 ここで hdparm コマンドをもう一度実行します。成功した場合、(「frozen」ではなく)「not frozen」が表示されます。
3.ドライブにユーザーパスワードを設定します。パスワードは何でもかまいません。この例ではパスワードを「p」に設定します。
# hdparm --security-set-pass p /dev/sdX4.同じパスワードを使用して、ドライブに完全消去コマンドを実行します。1234567890 - 1234567890 -
# hdparm --security-erase p /dev/sdXこのコマンドは完了するまでに数分かかります。正常に完了するとドライブパスワードが除去されます。
完全消去が中断された場合や、その他の失敗が起こった場合は、ドライブにセキュリティロックがかかります。この場合、下のコマンドを使用してセキュリティロックを外し、完全消去手順を再び試すことができます。
# hdparm --security-disable p /dev/sdXSATA 完全消去の例
NVMe 完全消去手順
警告
この先に進む前に、必ず重要なデータをすべてバックアップしてください。
前提条件
- ルート権限を持っている必要があります。
- SSD をセカンダリ(OS 以外)ドライブとして、システムに接続する必要があります。
- nvme-cli をインストールしておく必要があります。お使いのディストリビューションのパッケージマネージャーを用いてインストールしておく必要があります。
- ドライブがパスワード保護されていないようにしてください。
手順
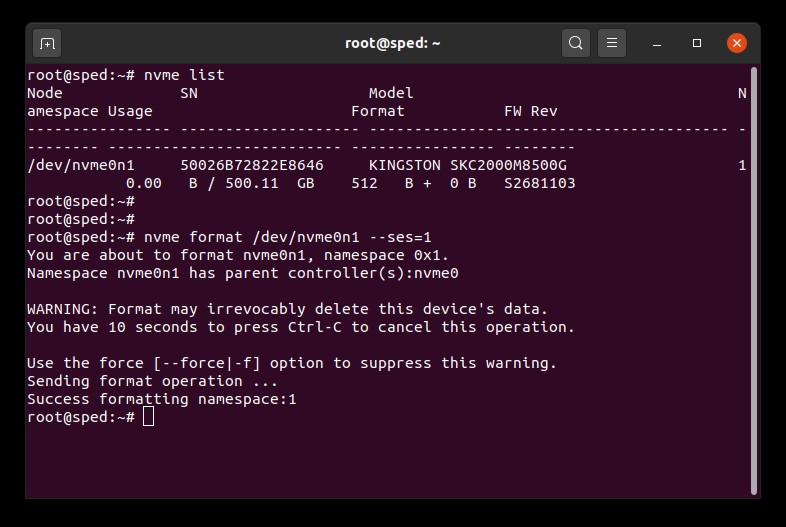
1.消去したいドライブのデバイス名(/dev/nvmeXn1)を調べます。
# nvme list2.ドライブのフォーマットコマンドを実行します。ここで、完全消去設定を 1 に設定します。これは、ユーザーデータ消去を示します。
# nvme format /dev/nvmeXn1 --ses=1このコマンドは完了するまでに数分かかります。
NVMe 完全消去の例
FAQ: KSM-SE-LIX
いいえ。そのドライブのパスワードを忘れた場合、アクセス不能となります。
パスワードの失念はキングストンの保証規定にて補償されないことにお気をつけ下さい。
唯一の例外は、ドライブのマスターパスワードまたは管理者パスワードを使用している場合です。
BIOSがこの機能に対応している必要があり、 ドライブにATAセキュリティを設定した段階でこの機能が有効になっていなければいけません。 マスターパスワードを使用することで、管理者はドライブをリセットすることができます。
KSD-011411-ENC-03
FAQ: KSD-011411-ENC-03
可能ですが、セキュリティを設定した最初のコンピュータ上で、まずセキュリティを無効にする必要があります。 その後、他のコンピュータ上で、もう一度セキュリティを有効にしてください。
FAQ: KSD-011411-ENC-02
最初に、コマンドプロンプトの展開ウィンドウを開きます。
コマンドプロンプトの展開ウィンドウを開く手順: Start Orbをクリックし、検索ボックスに "CMD.exe" をキー入力し、"CMD" を右クリックし、"Run as Administrator(管理者として実行する)"を選択する。(確認を求められた場合は、「はい」をクリックする。)
TRIMコマンドが有効化どうか確認するには、以下をキー入力し、展開コマンドのEnterを押します:
fsutil behavior query disabledeletenotify
結果は以下のようになります:DisableDeleteNotify = 1 (WindowsのTRIMコマンドは無効です)DisableDeleteNotify = 0 (WindowsのTRIMコマンドは有効です)
TRIMコマンドを有効にするには、以下をキー入力し、展開コマンドでEnterを押してください:
fsutil behavior set disabledeletenotify 0
TRIMコマンドを無効にするには、以下をキー入力し、展開コマンドでEnterを押してください:
fsutil behavior set disabledeletenotify 1
FAQ: KSD-072211-GEN-18
Kingstonはお客様の個人情報を機密かつ安全に保管することの重要性を熟知しており、保証契約の下に修理や交換を要するSSD (ソリッドステートドライブ) が当社のRMA施設に返送された場合、適正な措置をとってお客様の個人情報を守ります。修理センターに到着したSSDは綿密なテスト工程を経ていきます。テストの第一工程では、ATA Secure Erase (ATA安全消去) を行ってSSDからすべてのデータと情報を消去します。ATA Secure Eraseは、ユーザーの機密データを安全に消去する技術であり、National Institute of Standards and Technology (NIST 800-88) が連邦法の下に認定したものです。SSDが機能不能のため、ATA Secure Erase処理が不可能な場合、解体後、NANDフラッシュメモリが破壊されます。
FAQ: KSD-022411-GEN-15
すべてのSSDはRAID構成にてお使いいただけます。しかしながら、耐久性に関する仕様の関係上、RAID構成には特定の製品番号を使用するようにしてください。サーバー用途に関しては、キングストンまでお問い合わせいただき、お客様の負荷状況に応じて最良のキングストン製SSDを決定いたします。
FAQ: KSD-052511-GEN-17
Self-Monitoring, Analysis, and Reporting Technology (自己監視分析報告機能、S.M.A.R.T.)はハードドライブおよびSSDに内蔵された自己監視機能です。ユーザーがデバイスの状態を監視することができます。S.M.A.R.T.機能用に特別に設計された監視ソフトウェアを通じて行われます。弊社SSDNowドライブはすべてS.M.A.R.T.に対応しております。
FAQ: KSD-011411-GEN-10
SSD ファームウェアは、ホストシステムとの通信、データの保存と取り出し、ウェアレベリング、エラー訂正などの動作を管理する SSD 内の統合ソフトウェアです。
SSD に新バージョンのファームウェアが必要な場合は、Kingston の SSD Manager ソフトウェアを実行すると通知が表示されます。
FAQ: KSD-012010-001-11
Self-Monitoring, Analysis, and Reporting Technology (自己監視分析報告機能、S.M.A.R.T.)はハードドライブおよびSSDに内蔵された自己監視機能です。ユーザーがデバイスの状態を監視することができます。S.M.A.R.T.機能用に特別に設計された監視ソフトウェアを通じて行われます。弊社SSDNowドライブはすべてS.M.A.R.T.に対応しております。
FAQ: KSD-011411-GEN-10
TRIMとガベージコレクションは、最新のSSDに組み込まれたパフォーマンスと耐久性を向上するテクノロジーです。SSDをパッケージから取り出したときはNANDブロックがすべて空になっており、SSDは単一処理でこれらの空ブロックに新しいデータを書き込むことができます。いずれ、これら空ブロックのほとんどはユーザーデータを含む使用済みブロックとなっていきます。使用済みブロックには、SSDが新しいデータを書き込むため、読み取り、修正、書き込みのサイクルを強制実行します。こうした読み取り、修正、書き込みのサイクルは3つの処理を実行しなければならないのでSSDの全体的なパフォーマンスに負担がかかります。読み取り、修正、書き込みのサイクルは書き込み増幅の原因にもなり、SSDの全体的な耐久性にも重負荷を課します。
TRIMとガベージコレクションは、相互に連動して使用済みブロックにスペースを確保するのでSSDのパフォーマンスと耐久性を向上させます。ガベージコレクションはSSDコントローラに組み込まれている機能であり、使用済みブロックに保存されたデータを統合して、書き込み可能なスペースを設けます。こうした処理はSSDが完全にバックグラウンドで実行します。ただし、SSDはどのブロックにユーザーデータが含まれ、どのブロックのデータをユーザーが削除したのか見分けることができません。その処理をするのがTRIMです。TRIMは、データが削除されたときにオペレーティングシステムに認識させ、使用済みブロックを再利用できるようにします。これを可能にするには、オペレーティングシステムとSSDの両方がTRIMをサポートする必要があります。最新のオペレーティングシステムとSSDはTRIMをサポートしますが、RAID構成のほとんどはサポートしていません。
Kingston SSDはTRIMとガベージコレクションの両方を取り入れており、SSDのライフサイクルにわたって最大限可能なパフォーマンスを耐久性を維持します。
FAQ: KSD-011411-GEN-13
静電放電 (ESD) とは帯電した静電気の放電のことです。ESD は、電気部品が損傷したり破損したりする可能性のある減少の 1 つであるため、決して軽視すべきではありません。
静電気は、摩擦によって自然に発生します。例えば、乾燥した風の強い日にカーペットの上を裸足で歩くと発生します。ある物体に静電気が帯電すると、金属などの導電性表面と接触すると放電します。これには、メモリモジュールなどの導電性の電気部品が含まれます。PC への取り付け時に、メモリモジュールに静電気が放電しても気づかない場合がありますが、この放電された電荷により回路が深刻な損傷を受ける可能性があります。損傷は、すぐに発生するか、あとから発生する場合があります。
静電放電 (ESD) を防ぐ方法
静電放電 (ESD) を防ぐ最適な方法は、電子機器を取り扱う前に自分自身を接地することです。ESD の発生リスクを低減するために、ESD リストストラップや接地マットなどの ESD 保護具を使用することもできます。次の手順も ESD の低減に役立ちます。
立ち作業 – コンピュータ内部のコンポーネントを扱う際は、立って作業することをお勧めします。椅子に座ると、足を床から離れる場合があります。それにより、ESDの接地経路が遮断されてしまいます
各種コード - パソコンの背面の接続ケーブル (電源ケーブル、マウスケーブル、キーボードのケーブルなど) をすべてのコードを取り外してください。
衣服 – ウールのセーターなど、静電気放電しやすい素材の服は着用しないでください。
アクセサリ - ESD の低減や、その他の問題を防止するには、身に付けているすべての宝飾品を外すことです。
天候 - 落雷は ESD のリスクを高めます。落雷が起こっている時は、必要な場合を除き、パソコンでの作業を行わないようにしてください。 非常に乾燥した場所や風が強い環境でも、静電気が帯電しやすくなります。
ESD の詳細や、お手元の電子部品を保護する方法については、以下のサイトをご覧ください。ESD 協会
FAQ: KTC-Gen-ESD
NVMe と SATA SSD の違いについては、当社のガイドを参照してください。
FAQ: KSD-012010-001-19
こちらで SSD ハードウェアベースの暗号化の詳細をご覧ください。
FAQ: KSD-012010-001-28
1.最初に、データをバックアップすることをおすすめします。
2.次にセカンダリシステムを使用して、ドライブラベル上の PSID を使用して REVERT (取り消し)を完了します。注:REVERT を実行すると、ドライブ上のすべてのデータを安全に消去できます。
3.IEEE 1667 サポートを無効にします。
4.KSM をリフレッシュまたはリスタートすると、ファームウェアアップデートを使用できるようになります。
FAQ: KSM-001125-001-01
Kingston は、可能であれば、SSD を最新のファームウェアに更新することを推奨しています。Kingston の SSD Manager ソフトウェアを使用すると、更新があるかどうかを確認できます。
FAQ: KSD-012010-001-25
ソースドライブより大きい新しいドライブにクローンを作成する場合、ソフトウェアがパーティションサイズを適切に調整しないことがあります。この場合、未使用領域が残ってしまう可能性があります。これを回避するには、クローン作製手順を参照してください。
FAQ: KSD-012010-001-04
次の代替方法を使うと RST RAID が壊れますので、データ損失のおそれがあります。システムに RST RAID アレイがある場合、別の方法を試してください。
代替方法 1:BIOS で RST Control (RST 制御)を無効にします
このワークアラウンドには、RST Control を有効または無効にする BIOS オプションが必要ですが、使用できないシステムもあります。
注:この先に進む前にすべての重要データをバックアップしてください。
- 再起動してシステム BIOS に進みます。
- BIOS の RST Configuration (RST 構成)設定を探します。
- 「RST Controlled」を「Not RST Controlled」に変更します。
- 保存して BIOS を終了します。
- KSM を開き、ドライブファームウェアをアップデートします。
このステップが完了したら、BIOS で「RST Controlled」に戻してもかまいません。
代替方法 2:BIOS で RAID から AHCI に切り替えます。
このワークアラウンドはシステムストレージモードを RAID から AHCI に変更します。
すべてのシステムで実行可能です。
注:この先に進む前にすべての重要データをバックアップしてください。
- msconfig をオープンします
- 「Boot」(ブート)タブを選択します
- 「Safe boot - Minimal」(セーフ ブート - 最小)をチェックします
- OK をクリックして再起動します
- システムが再起動したら、システム BIOS に進みます
- ストレージモードを RAID から AHCI に変更します
- 保存して BIOS を終了します。
- Windows がセーフモードで起動するまで待ちます
- msconfig をオープンします
- 「Boot」(ブート)タブを選択します
- 「Safe boot」(セーフ ブート)のチェックを外します
- OK をクリックして再起動します
- Windows が通常の起動をするまで待ちます
- KSM を開き、ドライブファームウェアをアップデートします
このステップが完了したら、BIOS でストレージモードを RAID に戻してもかまいません。
FAQ: KSD-001525-001-01
FAQ: KSM-001125-001-00
FAQ: KSM-001125-002-01
SSD ファームウェアは、ホストシステムとの通信、データの保存と取り出し、ウェアレベリング、エラー訂正などの動作を管理する SSD 内の統合ソフトウェアです。
SSD に新バージョンのファームウェアが必要な場合は、Kingston の SSD Manager ソフトウェアを実行すると通知が表示されます。
FAQ: KSD-012010-001-11
FAQ: KSD-012010-001-14
FAQ: KSD-012010-001-12
FAQ: KSD-012010-001-13
ソースドライブより大きい新しいドライブにクローンを作成する場合、ソフトウェアがパーティションサイズを適切に調整しないことがあります。この場合、未使用領域が残ってしまう可能性があります。これを回避するには、クローン作製手順を参照してください。
FAQ: KSD-012010-001-04
BIOS にドライブが存在する場合は、オペレーティングシステム内でディスクを初期化する必要がある場合があります。
Windows の場合:
ステップ 1:ドライブが正しく接続されていることを確認し、システムの電源を入れ、Windows OS を起動します。
ステップ 2:Windows + X を押し、ディスクの管理を選択します。
ステップ 3:SSD が新しく初期化されていない場合、「ディスクを初期化してください」というポップアップが表示されます。
ステップ 4:次のいずれかを選択します。
MBR(マスターブートレコード):2TB 未満のドライブや古いシステムに適しています。
GPT (GUID パーティションテーブル):最新のシステムや 2TB 以上のドライブにおすすめです。
ステップ 5:「OK」をクリックしてディスクを初期化します。
ステップ 6:初期化されると、SSD が「未割り当て」と表示されます。その上で右クリックし、「新しいシンプルボリューム」を選択します。
ステップ 7:画面の指示に従って SSD をフォーマットし、ドライブ文字を割り当てます。
Mac OS の場合:
ステップ 1:ドライブが正しく接続されていることを確認し、システムの電源を入れ、Mac OS を起動します。
ステップ 2:ディスクユーティリティを開きます (Spotlight で Cmd + Space と入力し、「ディスクユーティリティ」と入力すると見つかります)。
ステップ 3:左側のペインで SSD を選択します。
ステップ 4:「消去」をクリックします。
ステップ 5:ドライブの名前を入力し、「フォーマット」で以下を選択します。
新しい Mac および SSD の場合は、APFS。
古いシステムや HDD の場合は、Mac OS Extended(ジャーナル付き)。
ステップ 6:「消去」をクリックします。プロセスが完了すると、SSD が使用可能になります。
Linux の場合:
ステップ 1:ドライブが正しく接続されていることを確認し、システムの電源を入れ、Linux OS を起動します。
ステップ 2:ターミナルを開きます。
ステップ 3:sudo fdisk -l と入力し、接続されているすべてのドライブをリストアップします。SSD のサイズを確認し、デバイス名 (例:/dev/sdb) をメモします。
ステップ 4:fdisk または parted を使って SSD を初期化します。以下は fdisk を使った基本的なガイドです。
sudo fdisk /dev/sdb (/dev/sdb を SSD のデバイス名に置き換えてください) と入力します。
g を押して新しい GPT パーティションテーブルを作成します。
n を押して新しいパーティションを作成します。プロンプトに従ってサイズとタイプを指定します。
w を押して変更を書き込みます。
ステップ 5:SSD 上の新しいパーティションをフォーマットします (例:/dev/sdb1)。お好みのファイルシステムでフォーマットできます。
ext4 の場合:sudo mkfs.ext4 /dev/sdb1
ext3 の場合:sudo mkfs.ext3 /dev/sdb1
FAT32 の場合:sudo mkfs.vfat /dev/sdb1
ステップ 6:SSD をマウントします。
マウントポイントを作成します:sudo mkdir /mnt/myssd
SSD をマウントします:sudo mount /dev/sdb1 /mnt/myssd
忘れずに、dev/sdb1 を SSD のパーティション名に置き換えてください。
FAQ: KSD-012010-001-15
市販の外付けエンクロージャーは様々です。Kingston はすべてのシステムタイプとの互換性を目指していますが、時には互換性がない場合もあります。
Kingston SSD 以外のエンクロージャーに問題がある場合は、Kingston テクニカルサポートにトラブルシューティングを依頼してください。
FAQ: KSD-012010-001-18
ソースドライブより大きい新しいドライブにクローンを作成する場合、ソフトウェアがパーティションサイズを適切に調整しないことがあります。この場合、未使用領域が残ってしまう可能性があります。これを回避するには、クローン作製手順を参照してください。
FAQ: KSD-012010-001-04
SSD ファームウェアは、ホストシステムとの通信、データの保存と取り出し、ウェアレベリング、エラー訂正などの動作を管理する SSD 内の統合ソフトウェアです。
SSD に新バージョンのファームウェアが必要な場合は、Kingston の SSD Manager ソフトウェアを実行すると通知が表示されます。
FAQ: KSD-012010-001-11
これが不可能な場合、または以前のデータを新しいドライブにクローンした場合は、システム BIOS で新しいドライブが起動デバイスとして表示されることを確認し、起動用に選択します。
FAQ: KSD-012010-001-03
BIOS にドライブが存在する場合は、オペレーティングシステム内でディスクを初期化する必要がある場合があります。
Windows の場合:
ステップ 1:ドライブが正しく接続されていることを確認し、システムの電源を入れ、Windows OS を起動します。
ステップ 2:Windows + X を押し、ディスクの管理を選択します。
ステップ 3:SSD が新しく初期化されていない場合、「ディスクを初期化してください」というポップアップが表示されます。
ステップ 4:次のいずれかを選択します。
MBR(マスターブートレコード):2TB 未満のドライブや古いシステムに適しています。
GPT (GUID パーティションテーブル):最新のシステムや 2TB 以上のドライブにおすすめです。
ステップ 5:「OK」をクリックしてディスクを初期化します。
ステップ 6:初期化されると、SSD が「未割り当て」と表示されます。その上で右クリックし、「新しいシンプルボリューム」を選択します。
ステップ 7:画面の指示に従って SSD をフォーマットし、ドライブ文字を割り当てます。
Mac OS の場合:
ステップ 1:ドライブが正しく接続されていることを確認し、システムの電源を入れ、Mac OS を起動します。
ステップ 2:ディスクユーティリティを開きます (Spotlight で Cmd + Space と入力し、「ディスクユーティリティ」と入力すると見つかります)。
ステップ 3:左側のペインで SSD を選択します。
ステップ 4:「消去」をクリックします。
ステップ 5:ドライブの名前を入力し、「フォーマット」で以下を選択します。
新しい Mac および SSD の場合は、APFS。
古いシステムや HDD の場合は、Mac OS Extended(ジャーナル付き)。
ステップ 6:「消去」をクリックします。プロセスが完了すると、SSD が使用可能になります。
Linux の場合:
ステップ 1:ドライブが正しく接続されていることを確認し、システムの電源を入れ、Linux OS を起動します。
ステップ 2:ターミナルを開きます。
ステップ 3:sudo fdisk -l と入力し、接続されているすべてのドライブをリストアップします。SSD のサイズを確認し、デバイス名 (例:/dev/sdb) をメモします。
ステップ 4:fdisk または parted を使って SSD を初期化します。以下は fdisk を使った基本的なガイドです。
sudo fdisk /dev/sdb (/dev/sdb を SSD のデバイス名に置き換えてください) と入力します。
g を押して新しい GPT パーティションテーブルを作成します。
n を押して新しいパーティションを作成します。プロンプトに従ってサイズとタイプを指定します。
w を押して変更を書き込みます。
ステップ 5:SSD 上の新しいパーティションをフォーマットします (例:/dev/sdb1)。お好みのファイルシステムでフォーマットできます。
ext4 の場合:sudo mkfs.ext4 /dev/sdb1
ext3 の場合:sudo mkfs.ext3 /dev/sdb1
FAT32 の場合:sudo mkfs.vfat /dev/sdb1
ステップ 6:SSD をマウントします。
マウントポイントを作成します:sudo mkdir /mnt/myssd
SSD をマウントします:sudo mount /dev/sdb1 /mnt/myssd
忘れずに、dev/sdb1 を SSD のパーティション名に置き換えてください。
FAQ: KSD-012010-001-15
FAQ: KSD-012010-001-14
FAQ: KSD-012010-001-13
FAQ: KSD-012010-001-12
市販の外付けエンクロージャーは様々です。Kingston はすべてのシステムタイプとの互換性を目指していますが、時には互換性がない場合もあります。
Kingston SSD 以外のエンクロージャーに問題がある場合は、Kingston テクニカルサポートにトラブルシューティングを依頼してください。
FAQ: KSD-012010-001-18