
A1000 Solid State Drive - Asistencia técnica
Recursos
Vídeos


Preguntas frecuentes
1. Descarga SSD Manager de Kingston desde https://www.kingston.com/support/technical/ssdmanager para comprobar si hay una actualización de firmware disponible para tu unidad y, de ser así, aplícala (si se recomienda).
2. Consulta la página de asistencia del fabricante de tu sistema para comprobar si hay una actualización de la BIOS disponible para tu sistema.
3. Confirma que estás ejecutando la versión más reciente de tu sistema operativo y asegúrate de que no tienes actualizaciones pendientes.
4. Comprueba que estás ejecutando los controladores más recientes de tu sistema. Para ello, visita la página de asistencia del fabricante de tu sistema y busca las últimas actualizaciones de los controladores.
Si sigues teniendo problemas con tu sistema después de realizar estos pasos, ponte en contacto con el Servicio técnico de Kingston.
FAQ: KSD-012010-001-21
Esto suele suceder en el almacenamiento flash, ya sea un disco SSD interno o un almacenamiento USB externo, y se debe en parte a una variación en la forma de calcular el megabyte entre los fabricantes de memorias flash y los de discos duros de disco giratorio. Los fabricantes de discos duros calculan un megabyte (o 1000 × 1000bytes) como 1000KB, mientras que el cálculo binario para el almacenamiento flash es de 1024KB.
Por ejemplo: En el caso de un dispositivo de almacenamiento flash de 1TB, Windows calculará que tiene una capacidad de 931,32GB. (1 000 000 000 000÷ 1024÷ 1024÷ 1024=931,32GB).
Además, Kingston reserva parte de la capacidad indicada para el formateo y otras funciones como el firmware o la información específica del controlador y, por tanto, esa capacidad no está disponible para el almacenamiento de datos.
FAQ: KDT-010611-GEN-06
Nota: la ralentización térmica se activará cuando la temperatura de SMART alcance los 80 °C
FAQ: KSD-060117-NVME-02
Pasos para desactivar el vaciado de los búferes del caché de escritura.
1. Abra el Administrador de dispositivos
2. Seleccione Unidades de disco y expanda, luego seleccione el disco destino.
3. Haga clic con el botón y seleccione Propiedades
4. Marque “Desactivar el vaciado de caché de escritura en el dispositivo”
a. Nota: al desactivar el vaciado de caché de escritura en el dispositivo, se corre el riesgo de perder datos en tránsito y/o que los datos se dañen en caso de un corte del fluido eléctrico. Desactive esta función solamente si es consciente de los riesgos que corre.
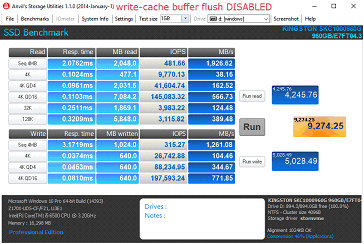
Comparativa de rendimiento

FAQ: KSD-060117-KC1000-04
FAQ: KSD-060117-NVME-01
FAQ: KSD-001525-001-00
Si esto no es posible, o si ya clonaste previamente tus datos antiguos en la nueva unidad, asegúrate de que la nueva unidad aparece como un dispositivo de arranque en la BIOS del sistema y, a continuación, selecciónala para el arranque.
FAQ: KSD-012010-001-03
Si la unidad aparece en la BIOS, es posible que tengas que inicializa el disco dentro del sistema operativo.
En Windows:
Paso 1: Asegúrate de que la unidad está conectada correctamente y encienda y enciende en sistema. A continuación, arranca el sistema operativo Windows.
Paso 2: Pulsa Windows + X y selecciona Administración de discos.
Paso 3: Si el SSD es nuevo y no está inicializado, aparecerá una ventana emergente en la que se indica «Inicializar disco».
Paso 4: Elige entre:
Registro de arranque maestro (MBR): ideal para unidades de menos de 2 TB y sistemas antiguos.
Tabla de partición GUID (GPT): recomendado para sistemas y unidades modernos de más de 2 TB.
Paso 5: Haz clic en Aceptar para inicializar el disco.
Paso 6: Cuando lo hayas inicializado, el SSD aparecerá como «Sin asignar». Haz clic con el botón derecho y selecciona Nuevo volumen simple.
Paso 7: Sigue las indicaciones que aparecen en pantalla para formatear y asignar una letra de unidad al SSD.
En MacOS:
Paso 1: Asegúrate de que la unidad está conectada correctamente y encienda y enciende en sistema. A continuación, arranca el sistema operativo Mac.
Paso 2: Abre Utilidad de disco (puedes encontrarlo usando Spotlight con Cmd + Espacio y escribiendo «Utilidad de disco»).
Paso 3: En el panel de la izquierda, selecciona tu SSD.
Paso 4: Haz clic en Borrar.
Paso 5: Ponle un nombre a la unidad y, en Formato, selecciona:
APFS para Mac y SSD más recientes.
Mac OS Plus (con registro) para sistemas o discos duros más antiguos.
Paso 6: Haz clic en Borrar. Cuando se haya completado el proceso, el SSD estará listo para su uso.
En Linux:
Paso 1: Asegúrate de que la unidad está conectada correctamente y encienda y enciende en sistema. A continuación, arranca el sistema operativo Linux.
Paso 2: Abre un terminal.
Paso 3: Escribe sudo fdisk -l para enumerar todas las unidades conectadas. Identifica el SSD por su tamaño y anota el nombre del dispositivo; por ejemplo, /dev/sdb.
Paso 4: Inicializa el SSD con fdisk o parted. Esta es una guía básica para usar fdisk:
Escribe sudo fdisk /dev/sdb (sustituye /dev/sdb con el nombre de dispositivo de tu SSD).
Pulsa G para crear una nueva tabla de particiones GPT.
Pulsa N para crear una nueva partición. Sigue las indicaciones para especificar el tamaño y el tipo.
Pulsa W para escribir los cambios.
Paso 5: Formatea la nueva partición del SSD (por ejemplo, /dev/sdb1). Puedes formatearla con el sistema de archivos que prefieras:
Para ext4: sudo mkfs.ext4 /dev/sdb1
Para ext3: sudo mkfs.ext3 /dev/sdb1
Para FAT32: sudo mkfs.vfat /dev/sdb1
Paso 6: Monta el SSD:
Crea un punto de montaje: sudo mkdir /mnt/myssd
Monta el SSD: sudo mount /dev/sdb1 /mnt/myssd
Recuerda que debes sustituir /dev/sdb1 con el nombre de partición de tu SSD.
FAQ: KSD-012010-001-15
Existe una gran variedad de dispositivos externos en el mercado. Aunque Kingston intenta ser compatible con todos los tipos de sistemas, en algunas ocasiones puede haber incompatibilidades.
Si tienes problemas con tu dispositivo SSD de otra marca que no es Kingston, ponte en contacto con la Asistencia técnica de Kingston para recibir ayuda en la solución de problemas.
FAQ: KSD-012010-001-18
No, Kingston no ofrece un kit de actualización de NVMe.
FAQ: KSD-012010-001-30
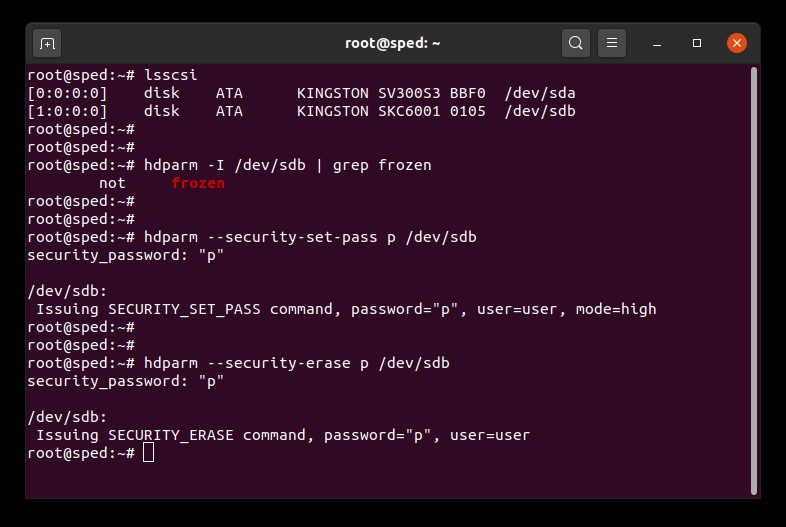
Guía del usuario para el borrado seguro con Linux
Esta guía explica el procedimiento de borrado seguro de sus discos SSD Kingston utilizando las herramientas de Linux
Procedimiento para el borrado seguro de SATA
Advertencia
Antes de continuar, asegúrese de haber realizado una copia de seguridad completa de todos sus datos importantes.
Prerrequisitos
- Debe tener privilegios de raíz.
- Debe tener el disco SSD conectado al sistema como unidad secundaria (no de sistema operativo).
- Debe tener instalados Isscsi y hdparm. Es posible que tenga que instalarlas con su administrador de paquete de distribución.
- La unidad no debe encontrarse en estado de congelamiento de seguridad.
- La unidad no debe estar protegida por contraseña.
Instrucciones
1. Busque el nombre de dispositivo (/dev/sdX) de la unidad que desee borrar:
# lsscsi2. Asegúrese de que la protección de la unidad no esté congelada:
# hdparm -I /dev/sdX | grep frozenSi el resultado indica "frozen" (en lugar de "not frozen"), no podrá continuar con el siguiente paso. Debe intentar eliminar el congelamiento de seguridad con alguno de los siguientes métodos:
Método 1:
Ponga el sistema en reposo (suspenda la RAM) y despiértelo. En la mayoría de las distribuciones, el comando de suspensión es:
# systemctl suspendSeguidamente, vuelva a enviar el comando hdparm. Si ha tenido éxito, el resultado indicará "not frozen" (en lugar de "frozen").
Método 2:
Conecte la unidad en caliente. Esto se realiza desenchufando físicamente el cable de alimentación de SATA de la unidad, y volviéndolo a enchufar mientras el sistema está en funcionamiento. Es posible que tenga que activar la conexión en caliente en el BIOS. No todos los sistemas son compatibles con la conexión en caliente.
Seguidamente, vuelva a enviar el comando hdparm. Si ha tenido éxito, el resultado indicará "not frozen" (en lugar de "frozen").
3. Configure una contraseña de usuario para la unidad. La contraseña puede ser cualquiera. En este caso hemos configurado como contraseña la "p":
# hdparm --security-set-pass p /dev/sdX4. Envíe el comando de borrado seguro a la unidad utilizando la misma contraseña: 1234567890 - 1234567890 -
# hdparm --security-erase p /dev/sdXEste comando puede tardar unos minutos en ejecutarse. Una vez concluida correctamente la ejecución, la contraseña de la unidad quedará borrada.
Si el borrado seguro se interrumpe o no termina de ejecutarse, la unidad puede quedar bloqueada. En este caso, podrá eliminar el bloqueo de seguridad con el siguiente comando para, a continuación, volver a intentar el procedimiento de borrado seguro:
# hdparm --security-disable p /dev/sdXEjemplo de borrado seguro de SATA
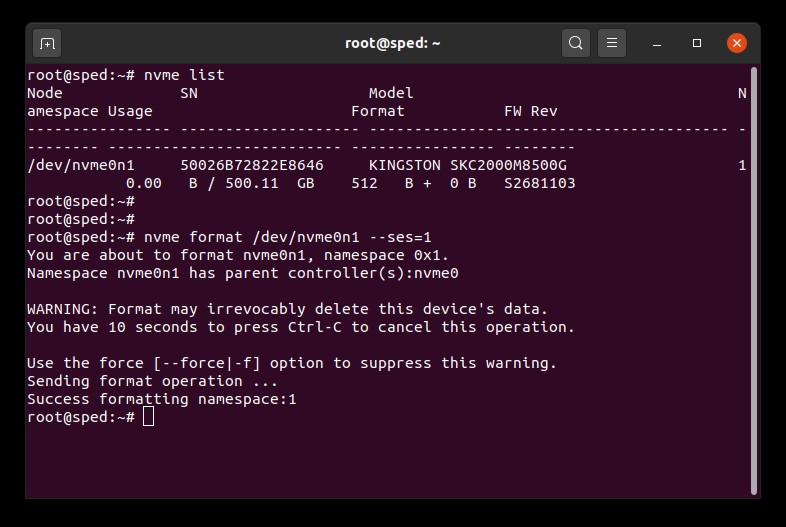
Procedimiento para el borrado seguro de NVMe
Advertencia
Antes de continuar, asegúrese de haber realizado una copia de seguridad completa de todos sus datos importantes.
Prerrequisitos
- Debe tener privilegios de raíz.
- Debe tener el disco SSD conectado al sistema como unidad secundaria (no de sistema operativo).
- Debe tener instalado nvme-cli. Es posible que tenga que instalarlo con su administrador de paquete de distribución.
- La unidad no debe estar protegida por contraseña.
Instrucciones
1. Busque el nombre de dispositivo (/dev/nvmeXn1) de la unidad que desee borrar:
# nvme list2. Envíe el comando de formateo a la unidad. En este caso hemos configurado el borrado seguro como 1, que indica un borrado de datos del usuario:
# nvme format /dev/nvmeXn1 --ses=1Este comando puede tardar unos minutos en ejecutarse.
Ejemplo de borrado seguro de NVMe
FAQ: KSM-SE-LIX
El firmware de la SSD es el software integrado dentro de un SSD que gestiona sus operaciones, incluidas las comunicaciones con el sistema anfitrión, el almacenamiento y la recuperación de datos, la nivelación de desgaste y la corrección de errores.
Si tu SSD necesita un nuevo firmware, recibirás una notificación al ejecutar el software SSD Manager de Kingston.
FAQ: KSD-012010-001-11
Recortar y Recolección de elementos no utilizados son tecnologías que los modernos discos SSD incorporan para mejorar tanto su rendimiento como su duración. Cuando acaba de instalar el disco SSD, todos sus bloques NAND están vacíos, de modo que el SSD puede escribir datos nuevos en los bloques vacíos en una sola operación. Con el correr del tiempo, los bloques vacíos se irán convirtiendo en bloques usados que contienen datos del usuario. Para escribir nuevos datos en los bloques usados, el SSD se ve obligado a ejecutar un ciclo de lectura-modificación-escritura. Este ciclo ralentiza el rendimiento de los SSD, ya que debe ejecutar tres operaciones en lugar de una sola. Además, el ciclo de lectura-modificación-escritura provoca amplificación de lectura, lo cual afecta a la duración del SSD.
Recortar y Recolección de elementos no utilizado pueden combinarse para mejorar el rendimiento y la duración del SSD liberando bloques usados. Recoger elementos no utilizados es una función incorporada en el controlador del SSD, que consolida los datos guardados en los bloques usados para liberar más bloques vacíos. Este proceso se ejecuta en segundo plano y está totalmente controlado por el propio SSD. No obstante, el SSD puede no saber qué bloques contienen datos del usuario y qué bloques contienen datos antiguos que el usuario ya haya eliminado. Allí es donde entra en juego la función de recorte. Recortar permite al sistema operativo informar al SSD que los datos han sido eliminados para que el SSD pueda liberar aquellos bloques previamente utilizados. Para que Recortar funcione, tanto el sistema operativo como el SSD deben ser compatibles con la misma. Actualmente, la mayoría de los sistemas operativos modernos y los SSD son compatibles con la función de recorte, aunque no es así con la mayoría de las configuraciones RAID.
Los SSD de Kingston aprovechan ambas tecnologías para mantener el mejor rendimiento posible y la vida útil más prolongada.
FAQ: KSD-011411-GEN-13
Consulta nuestra guía sobre las diferencias entre las unidades de estado sólido y los discos duros.
FAQ: KSD-012010-001-29
Consulta nuestra guía sobre las diferencias entre estos NVMe y SSD SATA.
FAQ: KSD-012010-001-19
1. En primer lugar, recomendamos hacer una copia de seguridad de los datos.
2. Seguidamente, utilice un sistema secundario para ejecutar una REVERSIÓN utilizando el PSID de la etiqueta de la unidad. Nota: la ejecución de una REVERSIÓN borrará definitivamente todos los datos de la unidad.
3. Desactive la compatibilidad con IEEE 1667
4. La actualización del firmware estará disponible al actualizar o reiniciar el KSM
FAQ: KSM-001125-001-01
Kingston recomienda actualizar el firmware de tu SSD a la última versión disponible, siempre que sea posible. Puedes consultar si tu unidad tiene alguna actualización disponible con el software SSD Manager de Kingston.
FAQ: KSD-012010-001-25
FAQ: KSM-001125-001-00
Al clonar en una nueva unidad mayor que la unidad de origen, es posible que el software no escale correctamente el tamaño de la partición. Cuando esto ocurre, es posible que acabes teniendo espacio sin usar. Para evitarlo, sigue nuestras instrucciones de clonación.
FAQ: KSD-012010-001-04
¡Precaución! Los siguientes atajos interferirán con las matrices RAID de RST y pueden conllevar la pérdida de datos. Si su sistema tiene matrices RAID de RST, quizá convenga considerar una solución alternativa.
Atajo 1: Desactive el control de RST en el BIOS
Este atajo requiere opciones de BIOS para activar o desactivar el Control de RST, que no están disponibles en todos los sistemas.
Nota: ¡Antes de continuar, realice una copia de seguridad de todos sus datos importantes!
- Reinicie y, a continuación, entre en el BIOS del sistema
- Busque los ajustes de configuración de RST en el BIOS
- Cambie "Controlado por RST" por "No controlado por RST"
- Guarde y salga del BIOS
- Abra KSM y actualice el firmware de la unidad
Una vez concluido este procedimiento tendrá la opción de volver a seleccionar "Controlador por RST" en el BIOS.
Atajo 2: En el BIOS, cambie de RAID a AHCI
Este atajo sirve para cambiar el modo de almacenamiento del sistema de RAID a AHCI, y debería funcionar con todos los sistemas.
Nota: ¡Antes de continuar, realice una copia de seguridad de todos sus datos importantes!
- Abra msconfig
- Seleccione la ficha Arranque
- Marque Arranque a prueba de errores (mínimo)
- Haga clic en Aceptar y, a continuación, en Reiniciar
- Cuando el sistema se reinicie, entre al BIOS del sistema
- Cambie el modo de almacenamiento de RAID a AHCI
- Guarde y salga del BIOS
- Espere a que Windows arranque en modo a prueba de errores
- Abra msconfig
- Seleccione la ficha Arranque
- Desmarque la ficha Arranque
- Haga clic en Aceptar y, a continuación, en Reiniciar
- Espere a que Windows arranque de manera normal
- Abra KSM y actualice el firmware de la unidad
Una vez concluido este procedimiento tendrá la opción de volver a seleccionar RAID como modo de almacenamiento en el BIOS.
FAQ: KSD-001525-001-01
FAQ: KSM-001125-002-01
El firmware de la SSD es el software integrado dentro de un SSD que gestiona sus operaciones, incluidas las comunicaciones con el sistema anfitrión, el almacenamiento y la recuperación de datos, la nivelación de desgaste y la corrección de errores.
Si tu SSD necesita un nuevo firmware, recibirás una notificación al ejecutar el software SSD Manager de Kingston.
FAQ: KSD-012010-001-11
FAQ: KSD-012010-001-12
FAQ: KSD-012010-001-13
FAQ: KSD-012010-001-14
Al clonar en una nueva unidad mayor que la unidad de origen, es posible que el software no escale correctamente el tamaño de la partición. Cuando esto ocurre, es posible que acabes teniendo espacio sin usar. Para evitarlo, sigue nuestras instrucciones de clonación.
FAQ: KSD-012010-001-04
Si la unidad aparece en la BIOS, es posible que tengas que inicializa el disco dentro del sistema operativo.
En Windows:
Paso 1: Asegúrate de que la unidad está conectada correctamente y encienda y enciende en sistema. A continuación, arranca el sistema operativo Windows.
Paso 2: Pulsa Windows + X y selecciona Administración de discos.
Paso 3: Si el SSD es nuevo y no está inicializado, aparecerá una ventana emergente en la que se indica «Inicializar disco».
Paso 4: Elige entre:
Registro de arranque maestro (MBR): ideal para unidades de menos de 2 TB y sistemas antiguos.
Tabla de partición GUID (GPT): recomendado para sistemas y unidades modernos de más de 2 TB.
Paso 5: Haz clic en Aceptar para inicializar el disco.
Paso 6: Cuando lo hayas inicializado, el SSD aparecerá como «Sin asignar». Haz clic con el botón derecho y selecciona Nuevo volumen simple.
Paso 7: Sigue las indicaciones que aparecen en pantalla para formatear y asignar una letra de unidad al SSD.
En MacOS:
Paso 1: Asegúrate de que la unidad está conectada correctamente y encienda y enciende en sistema. A continuación, arranca el sistema operativo Mac.
Paso 2: Abre Utilidad de disco (puedes encontrarlo usando Spotlight con Cmd + Espacio y escribiendo «Utilidad de disco»).
Paso 3: En el panel de la izquierda, selecciona tu SSD.
Paso 4: Haz clic en Borrar.
Paso 5: Ponle un nombre a la unidad y, en Formato, selecciona:
APFS para Mac y SSD más recientes.
Mac OS Plus (con registro) para sistemas o discos duros más antiguos.
Paso 6: Haz clic en Borrar. Cuando se haya completado el proceso, el SSD estará listo para su uso.
En Linux:
Paso 1: Asegúrate de que la unidad está conectada correctamente y encienda y enciende en sistema. A continuación, arranca el sistema operativo Linux.
Paso 2: Abre un terminal.
Paso 3: Escribe sudo fdisk -l para enumerar todas las unidades conectadas. Identifica el SSD por su tamaño y anota el nombre del dispositivo; por ejemplo, /dev/sdb.
Paso 4: Inicializa el SSD con fdisk o parted. Esta es una guía básica para usar fdisk:
Escribe sudo fdisk /dev/sdb (sustituye /dev/sdb con el nombre de dispositivo de tu SSD).
Pulsa G para crear una nueva tabla de particiones GPT.
Pulsa N para crear una nueva partición. Sigue las indicaciones para especificar el tamaño y el tipo.
Pulsa W para escribir los cambios.
Paso 5: Formatea la nueva partición del SSD (por ejemplo, /dev/sdb1). Puedes formatearla con el sistema de archivos que prefieras:
Para ext4: sudo mkfs.ext4 /dev/sdb1
Para ext3: sudo mkfs.ext3 /dev/sdb1
Para FAT32: sudo mkfs.vfat /dev/sdb1
Paso 6: Monta el SSD:
Crea un punto de montaje: sudo mkdir /mnt/myssd
Monta el SSD: sudo mount /dev/sdb1 /mnt/myssd
Recuerda que debes sustituir /dev/sdb1 con el nombre de partición de tu SSD.
FAQ: KSD-012010-001-15
Existe una gran variedad de dispositivos externos en el mercado. Aunque Kingston intenta ser compatible con todos los tipos de sistemas, en algunas ocasiones puede haber incompatibilidades.
Si tienes problemas con tu dispositivo SSD de otra marca que no es Kingston, ponte en contacto con la Asistencia técnica de Kingston para recibir ayuda en la solución de problemas.
FAQ: KSD-012010-001-18
Al clonar en una nueva unidad mayor que la unidad de origen, es posible que el software no escale correctamente el tamaño de la partición. Cuando esto ocurre, es posible que acabes teniendo espacio sin usar. Para evitarlo, sigue nuestras instrucciones de clonación.
FAQ: KSD-012010-001-04
El firmware de la SSD es el software integrado dentro de un SSD que gestiona sus operaciones, incluidas las comunicaciones con el sistema anfitrión, el almacenamiento y la recuperación de datos, la nivelación de desgaste y la corrección de errores.
Si tu SSD necesita un nuevo firmware, recibirás una notificación al ejecutar el software SSD Manager de Kingston.
FAQ: KSD-012010-001-11
FAQ: KSD-012010-001-13
FAQ: KSD-012010-001-12
Si esto no es posible, o si ya clonaste previamente tus datos antiguos en la nueva unidad, asegúrate de que la nueva unidad aparece como un dispositivo de arranque en la BIOS del sistema y, a continuación, selecciónala para el arranque.
FAQ: KSD-012010-001-03
Existe una gran variedad de dispositivos externos en el mercado. Aunque Kingston intenta ser compatible con todos los tipos de sistemas, en algunas ocasiones puede haber incompatibilidades.
Si tienes problemas con tu dispositivo SSD de otra marca que no es Kingston, ponte en contacto con la Asistencia técnica de Kingston para recibir ayuda en la solución de problemas.
FAQ: KSD-012010-001-18
Si la unidad aparece en la BIOS, es posible que tengas que inicializa el disco dentro del sistema operativo.
En Windows:
Paso 1: Asegúrate de que la unidad está conectada correctamente y encienda y enciende en sistema. A continuación, arranca el sistema operativo Windows.
Paso 2: Pulsa Windows + X y selecciona Administración de discos.
Paso 3: Si el SSD es nuevo y no está inicializado, aparecerá una ventana emergente en la que se indica «Inicializar disco».
Paso 4: Elige entre:
Registro de arranque maestro (MBR): ideal para unidades de menos de 2 TB y sistemas antiguos.
Tabla de partición GUID (GPT): recomendado para sistemas y unidades modernos de más de 2 TB.
Paso 5: Haz clic en Aceptar para inicializar el disco.
Paso 6: Cuando lo hayas inicializado, el SSD aparecerá como «Sin asignar». Haz clic con el botón derecho y selecciona Nuevo volumen simple.
Paso 7: Sigue las indicaciones que aparecen en pantalla para formatear y asignar una letra de unidad al SSD.
En MacOS:
Paso 1: Asegúrate de que la unidad está conectada correctamente y encienda y enciende en sistema. A continuación, arranca el sistema operativo Mac.
Paso 2: Abre Utilidad de disco (puedes encontrarlo usando Spotlight con Cmd + Espacio y escribiendo «Utilidad de disco»).
Paso 3: En el panel de la izquierda, selecciona tu SSD.
Paso 4: Haz clic en Borrar.
Paso 5: Ponle un nombre a la unidad y, en Formato, selecciona:
APFS para Mac y SSD más recientes.
Mac OS Plus (con registro) para sistemas o discos duros más antiguos.
Paso 6: Haz clic en Borrar. Cuando se haya completado el proceso, el SSD estará listo para su uso.
En Linux:
Paso 1: Asegúrate de que la unidad está conectada correctamente y encienda y enciende en sistema. A continuación, arranca el sistema operativo Linux.
Paso 2: Abre un terminal.
Paso 3: Escribe sudo fdisk -l para enumerar todas las unidades conectadas. Identifica el SSD por su tamaño y anota el nombre del dispositivo; por ejemplo, /dev/sdb.
Paso 4: Inicializa el SSD con fdisk o parted. Esta es una guía básica para usar fdisk:
Escribe sudo fdisk /dev/sdb (sustituye /dev/sdb con el nombre de dispositivo de tu SSD).
Pulsa G para crear una nueva tabla de particiones GPT.
Pulsa N para crear una nueva partición. Sigue las indicaciones para especificar el tamaño y el tipo.
Pulsa W para escribir los cambios.
Paso 5: Formatea la nueva partición del SSD (por ejemplo, /dev/sdb1). Puedes formatearla con el sistema de archivos que prefieras:
Para ext4: sudo mkfs.ext4 /dev/sdb1
Para ext3: sudo mkfs.ext3 /dev/sdb1
Para FAT32: sudo mkfs.vfat /dev/sdb1
Paso 6: Monta el SSD:
Crea un punto de montaje: sudo mkdir /mnt/myssd
Monta el SSD: sudo mount /dev/sdb1 /mnt/myssd
Recuerda que debes sustituir /dev/sdb1 con el nombre de partición de tu SSD.
FAQ: KSD-012010-001-15
FAQ: KSD-012010-001-14
Still Need Assistance?
Correo electrónico del servicio de atención al cliente
Cumplimente un breve formulario para enviar su petición por correo electrónico.
Correo electrónico