
DC1000M U.2 NVMe SSD - Support
Resources
Frequently asked questions
1. Download Kingston SSD Manager from www.kingston.com/ssdmanager to confirm if there is a firmware update available for your drive, and if so, apply the update (if recommended).
2. Consult your system manufacturer’s support page to confirm if there is a BIOS update available for your system.
3. Confirm you’re running the latest version of your operating system and ensure that you don’t have any pending updates.
4. Confirm you are running the latest drivers for your system. You can do this by visiting your system manufacturer’s support page and looking for the latest driver updates.
If you’re still encountering issues with your system after these steps, please contact Kingston Technical Support.
FAQ: KSD-012010-001-21
Encrypted solid state drives utilize the hard drive security command available on most business class computers and motherboards. It is accessed through the BIOS. This will allow you to create a password for many HDD’s and SSD’s and to securely erase the drives if needed. Some computers will not have this feature. If this is the case, the drive can still be used, just without these security features. Be sure not to confuse BIOS password with the hard drive security password.
FAQ: KSD-011411-ENC-01
You can but you first must disable the security for the drive in the original computer. Then you can enable it again in the new computer.
FAQ: KSD-011411-ENC-02
No. If you forget the password for this drive, it cannot be accessed.
Be aware that forgetting your password is not covered under Kingston's warranty.
The only exception to this is using a master or administrative password for the drive.
The BIOS would have to support this and it would have to be enabled at the time you initiated the ATA security for this drive.
Using a master password would allow an administrator to reset the drive.
KSD-011411-ENC-03
FAQ: KSD-011411-ENC-03
This is common for flash storage, whether internal SSD, Flash Card, or external USB storage, and is due in part to a variance in how flash memory vs spinning platter hard drive manufacturers calculate megabyte. Hard drive manufacturers calculate a megabyte (or 1,000x1,000 bytes) as 1,000KBs, whereas the binary calculation for flash-based storage is 1,024KBs.
Example: For a 1TB flash-based storage device, Windows will calculate it as having a capacity of 931.32GB. (1,000,000,000,000÷1,024÷1,024÷1,024=931.32GB).
Furthermore, Kingston reserves some of the listed capacity for formatting (e.g., File Allocation Table) and other functions such as firmware and/or controller-specific information, and thus some of the listed capacity is not available for data storage.
FAQ: KDT-010611-GEN-06
SSDs do not require defragmentation. Since there are no physical disks, there is no need to organize the data in order to reduce seek time. Therefore defragmenting an SSD is not effective. Also, defragmenting an SSD can put undue wear on specific areas of the drive. SSDs are designed to write data as evenly as possible over the entire drive to reduce undue wear to any one location. Nonetheless defragmenting your SSD drive a couple of times will not harm it. However if it is done continuously over a long period, it may reduce the life of the drive.
FAQ: KSD-011411-GEN-03
In Windows - Open the control panel, open administrative tools and then open computer management. Click on Disk Management and see if the SSD drive is seen in the right window pane. If it is, right click on where it is labeled as disk 1, disk 2, etc and select "Initialize disk" (this may come up automatically when you go to Disk Management). Next, right-click on the area to the right of the disk label and choose "New Simple Volume". Continue with the wizard by choosing the size, drive letter and formatting of the partition.
In macOS - A "disk insertion" window will appear. Click on the "initialize" button. This will take you to the disk utility. Select the Kingston drive from the list of drives on the left side of the Window. From the actions available, choose partition. For the "Volume Scheme", choose "1 partition". For the format, choose MacOS extended for a permanent drive. Choose ExFAT for an external drive (available on MacOS 10.6.6 and above). Click Apply. A warning windows will appear stating you will erase all data from the drive. Click on the partition button at the bottom.
FAQ: KSD-060314-GEN-14
When the SSD is recognized in the BIOS, but Windows 7 installation does not detect the drive, follow these steps:
Disconnect any other hard drives or SSDs. Boot the Windows 7 installation disk. Choose repair, then advanced, then command prompt. Type: "diskpart" without quotes and press Enter. You will see a prompt labeled "diskpart". Type the following commands and press enter after each one.
Diskpart > Select Disk 0
Diskpart > Clean
Diskpart > Create Partition Primary Align=1024
Diskpart > Format Quick FS=NTFS
Diskpart > List Partition
Diskpart > Active
Diskpart > Exit
Then reboot the computer to the Windows 7 installation disk.
FAQ: KSD-100214-GEN-20
FAQ: KSD-001525-001-00
If this is not possible, or if you previously cloned your old data to your new drive, confirm that the new drive appears as a boot device in the system BIOS, then select it for booting.
FAQ: KSD-012010-001-03
There are a variety of external enclosures available on the market. While Kingston aims to be compatible with all system types, occasionally, there may be an incompatibility.
If you’re having trouble with your non-Kingston SSD enclosure, please contact Kingston Technical Support for troubleshooting assistance.
FAQ: KSD-012010-001-18
If the drive is present in the BIOS, you may need to initialize the disk within the operating system. Follow the steps below to initialize.
For Windows:
Step 1: Confirm the drive is properly attached, and power on the system, then boot into Windows OS.
Step 2: Press Windows + X and choose Disk Management.
Step 3: If the SSD is new and not initialized, a popup will appear saying "Initialize Disk."
Step 4: Choose between: MBR (Master Boot Record): Suitable for drives under 2TB and older systems. GPT (GUID Partition Table): Recommended for modern systems and drives larger than 2TB.
Step 5: Click OK to initialize the disk.
Step 6: Once initialized, you'll see the SSD as "Unallocated." Right-click on it and select New Simple Volume.
Step 7: Follow the on-screen prompts (keeping all defaults is Okay) to format and assign a drive letter to the SSD.
For macOS:
Step 1: Confirm the drive is properly attached, and power on the system, then boot into Mac OS.
Step 2: Open Disk Utility (you can find it using Spotlight with Cmd + Space and then typing "Disk Utility").
Step 3: In the left pane, select your SSD.
Step 4: Click on Erase.
Step 5: Provide a name for the drive, and under Format, choose: APFS for newer Macs and SSDs. Mac OS Extended (Journaled) for older systems or HDDs.
Step 6: Click Erase. Once the process completes, the SSD will be ready for use.
For Linux:
Step 1: Confirm the drive is properly attached, and power on the system, then boot into Linux OS.
Step 2: Open a terminal.
Step 3: Enter sudo fdisk -l to list all connected drives. Identify your SSD by its size and note the device name, e.g., /dev/sdb.
Step 4: Initialize the SSD using fdisk or parted. Here's a basic guide using fdisk: Enter sudo fdisk /dev/sdb (replace /dev/sdb with your SSD's device name). Press g to create a new GPT partition table. Press n to create a new partition. Follow the prompts to specify the size and type. Press w to write the changes.
Step 5: Format the new partition on the SSD (e.g., /dev/sdb1). You can format it with the filesystem of your choice: For ext4: sudo mkfs.ext4, For ext3: sudo mkfs.ext3 /dev/sdb1 /dev/sdb1, For FAT32: sudo mkfs.vfat /dev/sdb1
Step 6: Mount the SSD: Create a mount point: sudo mkdir /mnt/myssd, Mount the SSD: sudo mount /dev/sdb1 /mnt/myssd, Remember to replace /dev/sdb1 with your SSD's partition name.
FAQ: KSD-012010-001-15
Secure Erase User Guide for Linux
This guide will walk you through securely erasing your Kingston SSD using Linux tools.
SATA Secure Erase Procedure
Warning
Please make sure to have a full backup of any important data before you proceed!
Prerequisites
- You must have root privileges.
- You must have your SSD connected to the system as a secondary (non-OS) drive.
- You must have lsscsi and hdparm installed. You may need to install them with your distribution’s package manager.
- Your drive must not be in a security freeze.
- Your drive must not be password protected.
Instructions
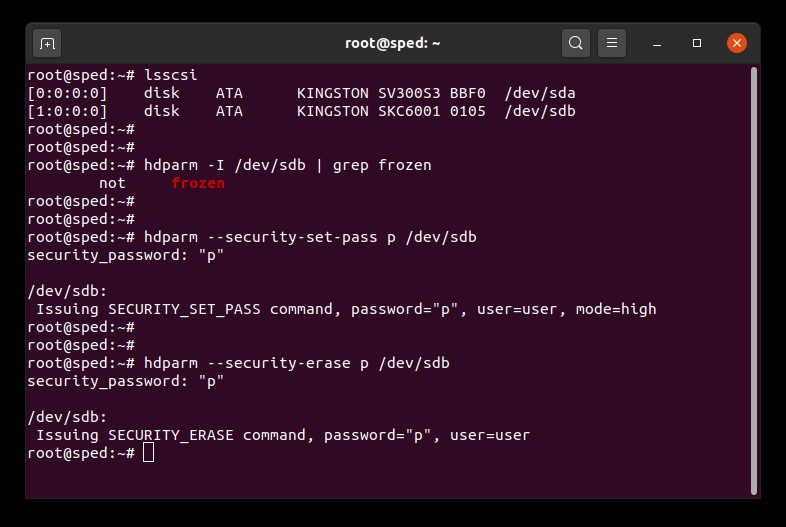
1. Find the device name (/dev/sdX) of the drive you wish to erase:
# lsscsi2. Make sure drive security is not frozen:
# hdparm -I /dev/sdX | grep frozenIf the output shows "frozen" (instead of "not frozen") then you cannot continue to the next step. You must try to remove the security freeze by trying one of the following methods:
Method 1:
Put the system to sleep (suspend to RAM) and wake it up. On most distributions the command to suspend is:
# systemctl suspendNow issue the hdparm command again. If it worked the output will show "not frozen" (instead of "frozen").
Method 2:
Hot plug the drive. This is done by physically unplugging the SATA power cable from the drive and plugging it back in while the system is powered on. You may need to enable hot plug in BIOS. Not all systems support hot plug.
Now issue the hdparm command again. If it worked the output will show "not frozen" (instead of "frozen").
3. Set a user password on the drive. The password can be anything. Here we are setting the password to "p":
# hdparm --security-set-pass p /dev/sdX4. Issue the secure erase command to the drive using the same password: 1234567890 - 1234567890 -
# hdparm --security-erase p /dev/sdXThis command may take a few minutes to complete. The drive password is removed upon successful completion.
If the secure erase is interrupted or otherwise fails your drive may become security locked. In this case you can remove the security lock using the command below and then try the secure erase procedure again:
# hdparm --security-disable p /dev/sdXSATA Secure Erase Example
NVMe Secure Erase Procedure
Warning
Please make sure to have a full backup of any important data before you proceed!
Prerequisites
- You must have root privileges.
- You must have your SSD connected to the system as a secondary (non-OS) drive.
- You must have nvme-cli installed. You may need to install it with your distribution’s package manager.
- Your drive must not be password protected.
Instructions
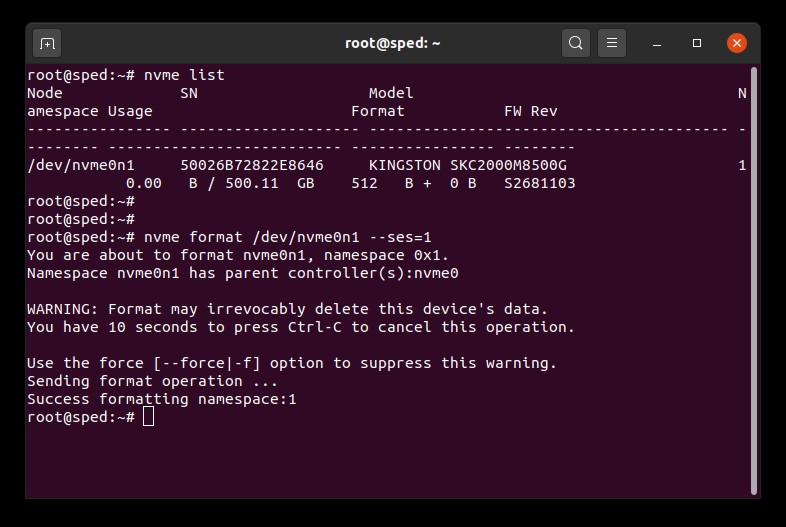
1. Find the device name (/dev/nvmeXn1) of the drive you wish to erase:
# nvme list2. Issue the format command to the drive. Here we set the secure erase setting to 1 which indicates a user data erase:
# nvme format /dev/nvmeXn1 --ses=1This command may take a few minutes to complete.
NVMe Secure Erase Example
FAQ: KSM-SE-LIX
No. If you forget the password for this drive, it cannot be accessed.
Be aware that forgetting your password is not covered under Kingston's warranty.
The only exception to this is using a master or administrative password for the drive.
The BIOS would have to support this and it would have to be enabled at the time you initiated the ATA security for this drive.
Using a master password would allow an administrator to reset the drive.
KSD-011411-ENC-03
FAQ: KSD-011411-ENC-03
You can but you first must disable the security for the drive in the original computer. Then you can enable it again in the new computer.
FAQ: KSD-011411-ENC-02
Encrypted solid state drives utilize the hard drive security command available on most business class computers and motherboards. It is accessed through the BIOS. This will allow you to create a password for many HDD’s and SSD’s and to securely erase the drives if needed. Some computers will not have this feature. If this is the case, the drive can still be used, just without these security features. Be sure not to confuse BIOS password with the hard drive security password.
FAQ: KSD-011411-ENC-01
First, open an Elevated Command Prompt window.
To open an Elevated Command Prompt window: Click on Start Orb > Type "CMD.exe" in Search box > Right click on "CMD" and select "Run as Administrator" (If you receive a prompt confirmation, click YES)
To verify the TRIM command is enabled, type the following and press enter in the Elevated command:
fsutil behavior query disabledeletenotify
The results will be as follows: DisableDeleteNotify = 1 (Windows TRIM commands are disabled) DisableDeleteNotify = 0 (Windows TRIM commands are enabled)
To enable the TRIM command,type the following and press enter in the Elevated command:
fsutil behavior set disabledeletenotify 0
To disable the TRIM command,type the following and press enter in the Elevated command:
fsutil behavior set disabledeletenotify 1
FAQ: KSD-072211-GEN-18
Kingston realizes the importance of keeping our customers’ personal data and information confidential and secure. Kingston takes measures to ensure the security of all of our customers’ personal information when a Solid State Drive (SSD) is returned to our RMA facility for warranty replacement or repair. When an SSD reaches our repair center, it will undergo a thorough testing process. During the first phase of testing, an ATA Secure Erase is performed on the SSD which erases all data and information.ATA Secure Erase is federally-approved by the National Institute of Standards and Technology (NIST 800-88) for legal sanitization of confidential user data. If the SSD is not in a functional state and not capable of undergoing an ATA Secure Erase, the SSD is dismantled and the NAND Flash Memory is destroyed.
FAQ: KSD-022411-GEN-15
Any of our SSDs can be used in RAID. But due to endurance specifications, only certain part numbers should be used in RAID. For servers, please contact Kingston to determine the best Kingston SSD to use for your workload.
FAQ: KSD-052511-GEN-17
Self-Monitoring, Analysis, and Reporting Technology (S.M.A.R.T.) is a built-in monitoring capability in hard drives and SSDs. It can allow users to monitor the health of a device. It does this through monitoring software designed specifically for the S.M.A.R.T. feature. All of our SSDNow drives support S.M.A.R.T.
FAQ: KSD-011411-GEN-10
SSD firmware is the integrated software within an SSD that manages its operations, including communication with the host system, data storage and retrieval, wear leveling, and error correction.
If your SSD requires new firmware, you will receive a notification when running Kingston’s SSD Manager software.
FAQ: KSD-012010-001-11
Self-Monitoring, Analysis, and Reporting Technology (S.M.A.R.T.) is a built-in monitoring capability in hard drives and SSDs. It can allow users to monitor the health of a device. It does this through monitoring software designed specifically for the S.M.A.R.T. feature. All of our SSDNow drives support S.M.A.R.T.
FAQ: KSD-011411-GEN-10
Trim and garbage collection are technologies that modern SSDs incorporate to improve both their performance and endurance. When your SSD is in its fresh out of box condition all of the NAND blocks are empty so the SSD can write new data to the empty blocks in a single operation. Over time most of the empty blocks will become used blocks that contain user data. In order to write new data to used blocks the SSD is forced to perform a read-modify-write cycle. The read-modify-write cycle hurts the SSDs overall performance because it now must do three operations instead of a single operation. The read-modify-write cycle also causes write amplification which hurts the SSDs overall endurance.
Trim and garbage collection can work together to improve SSD performance and endurance by freeing up used blocks. Garbage collection is a function built into the SSD controller that consolidates data stored in used blocks in order to free up more empty blocks. This process happens in the background and is completely handled by the SSD itself. However the SSD may not know which blocks contain user data and which blocks contain stale data that the user has already deleted. This is where the trim function comes in. Trim allows the operating system to inform the SSD that data has been deleted so that the SSD can free up those previously used blocks. For trim to work both the operating system and the SSD must support it. Currently most modern operating systems and SSDs support trim however most RAID configurations do not support it.
Kingston SSDs take advantage of both garbage collection and trim technologies in order to maintain the highest possible performance and endurance over their lifetime.
FAQ: KSD-011411-GEN-13
Electrostatic Discharge (ESD) is the discharge of built-up static electricity. ESD should not be taken lightly as this is one of the few things an individual can do to damage or destroy their electronic components.
Static electricity occurs naturally because of friction, such as when walking barefoot on carpet on a dry, windy day. When static build up occurs on a body it will discharge when in contact with a conductive surface, like metal. This includes conductive electrical components like memory modules. A discharge of ESD onto a memory module may go unnoticed when installing into a PC, but the charge introduced may cause serious damage to the circuits. The damage may be immediate, or manifest overtime.
How to prevent ESD
The best method of preventing ESD is to ground yourself before handling electronics. You can also use ESD protective equipment, such as an ESD wrist strap or a grounding mat to reduce the chances of ESD. The following steps below will also help reduce the chance of ESD:
Standing – It’s recommended to stand when working with components inside a computer. When sitting in a chair, it’s common for people to lift their feet off the floor, which removes the path to grounding for ESD.
Cords - Ensure all cords are removed from the back of the computer (power cord, mouse, keyboard, etc.).
Clothing – Do not wear fabrics that are more likely to build up ESD, such as a wool sweater.
Accessories - To help reduce ESD and help prevent other problems, it is also good practice to remove all jewelry.
Weather - Electrical storms can increase the ESD risk; unless necessary, try not to work on a computer during an electrical storm. Very dry areas and wind also contribute to electrostatic build-up
To learn more about ESD and how to protect your electronics, please visit the ESD Association website
FAQ: KTC-Gen-ESD
Please see our guide regarding differences between these NVMe and SATA SSDs.
FAQ: KSD-012010-001-19
When cloning to a new drive larger than the source drive, the software may not properly scale partition size. When this occurs, you might end up with unused space. To avoid this please follow our cloning instructions.
FAQ: KSD-012010-001-04
Caution! The workarounds below will break RST RAID arrays and could lead to data loss. If your system has RST RAID arrays you should consider an alternate solution.
Workaround 1: Disable RST Control in BIO
This workaround requires BIOS options to enable or disable RST Control and is not available on all systems
Note: Please backup all important data before you proceed!
- Restart and enter the system BIOS
- Locate the RST Configuration settings in BIOS
- Change "RST Controlled" to "Not RST Controlled"
- Save and exit BIOS
- Open KSM and update the drive firmware
Once these steps are completed you may optionally switch back to "RST Controlled" in BIOS.
Workaround 2: Switch from RAID to AHCI in BIOS
This workaround is to change your system storage mode from RAID to AHCI and should work on all systems.
Note: Please backup all important data before you proceed!
- Open msconfig
- Select the Boot tab
- Check Safe boot (minimal)
- Click OK and Restart
- When the system restarts go into the system BIOS
- Change the storage mode from RAID to AHCI
- Save and exit BIOS
- Wait for Windows to boot into safe mode
- Open msconfig
- Select the Boot tab
- Uncheck Safe boot
- Click OK and Restart
- Wait for Windows to boot normally
- Open KSM and update the drive firmware
Once these steps are completed you may optionally switch the storage mode back to RAID in BIOS.
FAQ: KSD-001525-001-01
FAQ: KSM-001125-001-00
FAQ: KSM-001125-002-01
1. First, we recommend you backup your data.
2. Then use a secondary system to complete a REVERT using the PSID on the drive label. Note: Performing a REVERT will securely erase all data on the drive.
3. Disable IEEE 1667 support
4. The firmware update will become available upon refresh or restart of KSM
FAQ: KSM-001125-001-01
SSD firmware is the integrated software within an SSD that manages its operations, including communication with the host system, data storage and retrieval, wear leveling, and error correction.
If your SSD requires new firmware, you will receive a notification when running Kingston’s SSD Manager software.
FAQ: KSD-012010-001-11
FAQ: KSD-012010-001-12
FAQ: KSD-012010-001-13
While it may be possible to update your target drive’s firmware via USB storage enclosure, Kingston recommends against this. Proper update procedure involves having your target SSD directly connected to the system ports (SATA or NVMe, where applicable).
FAQ: KSD-012010-001-14
When cloning to a new drive larger than the source drive, the software may not properly scale partition size. When this occurs, you might end up with unused space. To avoid this please follow our cloning instructions.
FAQ: KSD-012010-001-04
If the drive is present in the BIOS, you may need to initialize the disk within the operating system. Follow the steps below to initialize.
For Windows:
Step 1: Confirm the drive is properly attached, and power on the system, then boot into Windows OS.
Step 2: Press Windows + X and choose Disk Management.
Step 3: If the SSD is new and not initialized, a popup will appear saying "Initialize Disk."
Step 4: Choose between: MBR (Master Boot Record): Suitable for drives under 2TB and older systems. GPT (GUID Partition Table): Recommended for modern systems and drives larger than 2TB.
Step 5: Click OK to initialize the disk.
Step 6: Once initialized, you'll see the SSD as "Unallocated." Right-click on it and select New Simple Volume.
Step 7: Follow the on-screen prompts (keeping all defaults is Okay) to format and assign a drive letter to the SSD.
For macOS:
Step 1: Confirm the drive is properly attached, and power on the system, then boot into Mac OS.
Step 2: Open Disk Utility (you can find it using Spotlight with Cmd + Space and then typing "Disk Utility").
Step 3: In the left pane, select your SSD.
Step 4: Click on Erase.
Step 5: Provide a name for the drive, and under Format, choose: APFS for newer Macs and SSDs. Mac OS Extended (Journaled) for older systems or HDDs.
Step 6: Click Erase. Once the process completes, the SSD will be ready for use.
For Linux:
Step 1: Confirm the drive is properly attached, and power on the system, then boot into Linux OS.
Step 2: Open a terminal.
Step 3: Enter sudo fdisk -l to list all connected drives. Identify your SSD by its size and note the device name, e.g., /dev/sdb.
Step 4: Initialize the SSD using fdisk or parted. Here's a basic guide using fdisk: Enter sudo fdisk /dev/sdb (replace /dev/sdb with your SSD's device name). Press g to create a new GPT partition table. Press n to create a new partition. Follow the prompts to specify the size and type. Press w to write the changes.
Step 5: Format the new partition on the SSD (e.g., /dev/sdb1). You can format it with the filesystem of your choice: For ext4: sudo mkfs.ext4, For ext3: sudo mkfs.ext3 /dev/sdb1 /dev/sdb1, For FAT32: sudo mkfs.vfat /dev/sdb1
Step 6: Mount the SSD: Create a mount point: sudo mkdir /mnt/myssd, Mount the SSD: sudo mount /dev/sdb1 /mnt/myssd, Remember to replace /dev/sdb1 with your SSD's partition name.
FAQ: KSD-012010-001-15
There are a variety of external enclosures available on the market. While Kingston aims to be compatible with all system types, occasionally, there may be an incompatibility.
If you’re having trouble with your non-Kingston SSD enclosure, please contact Kingston Technical Support for troubleshooting assistance.
FAQ: KSD-012010-001-18
When cloning to a new drive larger than the source drive, the software may not properly scale partition size. When this occurs, you might end up with unused space. To avoid this please follow our cloning instructions.
FAQ: KSD-012010-001-04
If this is not possible, or if you previously cloned your old data to your new drive, confirm that the new drive appears as a boot device in the system BIOS, then select it for booting.
FAQ: KSD-012010-001-03
While it may be possible to update your target drive’s firmware via USB storage enclosure, Kingston recommends against this. Proper update procedure involves having your target SSD directly connected to the system ports (SATA or NVMe, where applicable).
FAQ: KSD-012010-001-14
FAQ: KSD-012010-001-13
FAQ: KSD-012010-001-12
SSD firmware is the integrated software within an SSD that manages its operations, including communication with the host system, data storage and retrieval, wear leveling, and error correction.
If your SSD requires new firmware, you will receive a notification when running Kingston’s SSD Manager software.
FAQ: KSD-012010-001-11
There are a variety of external enclosures available on the market. While Kingston aims to be compatible with all system types, occasionally, there may be an incompatibility.
If you’re having trouble with your non-Kingston SSD enclosure, please contact Kingston Technical Support for troubleshooting assistance.
FAQ: KSD-012010-001-18
If the drive is present in the BIOS, you may need to initialize the disk within the operating system. Follow the steps below to initialize.
For Windows:
Step 1: Confirm the drive is properly attached, and power on the system, then boot into Windows OS.
Step 2: Press Windows + X and choose Disk Management.
Step 3: If the SSD is new and not initialized, a popup will appear saying "Initialize Disk."
Step 4: Choose between: MBR (Master Boot Record): Suitable for drives under 2TB and older systems. GPT (GUID Partition Table): Recommended for modern systems and drives larger than 2TB.
Step 5: Click OK to initialize the disk.
Step 6: Once initialized, you'll see the SSD as "Unallocated." Right-click on it and select New Simple Volume.
Step 7: Follow the on-screen prompts (keeping all defaults is Okay) to format and assign a drive letter to the SSD.
For macOS:
Step 1: Confirm the drive is properly attached, and power on the system, then boot into Mac OS.
Step 2: Open Disk Utility (you can find it using Spotlight with Cmd + Space and then typing "Disk Utility").
Step 3: In the left pane, select your SSD.
Step 4: Click on Erase.
Step 5: Provide a name for the drive, and under Format, choose: APFS for newer Macs and SSDs. Mac OS Extended (Journaled) for older systems or HDDs.
Step 6: Click Erase. Once the process completes, the SSD will be ready for use.
For Linux:
Step 1: Confirm the drive is properly attached, and power on the system, then boot into Linux OS.
Step 2: Open a terminal.
Step 3: Enter sudo fdisk -l to list all connected drives. Identify your SSD by its size and note the device name, e.g., /dev/sdb.
Step 4: Initialize the SSD using fdisk or parted. Here's a basic guide using fdisk: Enter sudo fdisk /dev/sdb (replace /dev/sdb with your SSD's device name). Press g to create a new GPT partition table. Press n to create a new partition. Follow the prompts to specify the size and type. Press w to write the changes.
Step 5: Format the new partition on the SSD (e.g., /dev/sdb1). You can format it with the filesystem of your choice: For ext4: sudo mkfs.ext4, For ext3: sudo mkfs.ext3 /dev/sdb1 /dev/sdb1, For FAT32: sudo mkfs.vfat /dev/sdb1
Step 6: Mount the SSD: Create a mount point: sudo mkdir /mnt/myssd, Mount the SSD: sudo mount /dev/sdb1 /mnt/myssd, Remember to replace /dev/sdb1 with your SSD's partition name.
FAQ: KSD-012010-001-15