
DC500M Data Center Solid State Drive - Mixed-Use - การสนับสนุน
ข้อมูลอ้างอิง
คำถามที่พบบ่อย
1. ดาวน์โหลด Kingston SSD Manager จากเว็บไซต์ https://www.kingston.com/support/technical/ssdmanager เพื่อดูว่าไดรฟ์ต้องอัปเดตเฟิร์มแวร์หรือไม่ ถ้าใช่ อัปเดตให้เสร็จเรียบร้อย (ถ้าระบบแนะนำ)
2. อ่านหน้าการสนับสนุนของผู้ผลิตอุปกรณ์ของคุณ แล้วตรวจสอบว่าอุปกรณ์ต้องอัปเดต BIOS หรือไม่
3. ตรวจสอบยืนยันว่าคุณกำลังใช้ระบบปฏิบัติการเวอร์ชันล่าสุดอยู่หรือไม่ และตรวจสอบให้แน่ใจว่าไม่มีการอัปเดตที่อยู่ระหว่างดำเนินการ
4. ตรวจสอบยืนยันว่าคุณกำลังใช้งานไดรเวอร์เวอร์ชันล่าสุดของอุปกรณ์ โดยการเข้าไปที่หน้าการสนับสนุนของผู้ผลิตอุปกรณ์ จากนั้นมองหาการอัปเดตไดรเวอร์ล่าสุด
หากคุณยังเจอปัญหาหลังจากทำตามขั้นตอนเหล่านี้ โปรดติดต่อฝ่ายสนับสนุนทางเทคนิคของ Kingston
FAQ: KSD-012010-001-21
สามารถทำได้แต่จะต้องปิดระบบความปลอดภัยของไดร์ฟจากคอมพิวเตอร์เครื่องเดิมก่อน จากนั้นสามารถเปิดใช้ได้อีกครั้งในคอมพิวเตอร์เครื่องใหม่
FAQ: KSD-011411-ENC-02
ไม่ได้ หากคุณลืมรหัสผ่านของไดร์ฟ จะไม่สามารถใช้งานไดร์ฟได้อีก การรับประกันของ Kingston ไม่ครอบคลุมกรณีที่ลืมรหัสผ่าน
ยกเว้นในกรณีที่ใช้รหัสผ่านหลักหรือรหัสผ่านของผู้ดูแลระบบสำหรับไดร์ฟ BIOS จะต้องรองรับฟังก์ชั่นนี้ และจะต้องเปิดใช้งานขณะเปิดระบบความปลอดภัย ATA สำหรับไดร์ฟ การใช้รหัสผ่านหลักจะทำให้ผู้ดูแลระบบสามารถรีเซ็ตไดร์ฟได้
FAQ: KSD-011411-ENC-03
นี่เป็นเรื่องปกติสำหรับอุปกรณ์จัดเก็บข้อมูลแบบแฟลช ทั้งในกรณีของ SSD แบบภายในและไดรฟ์ USB แบบต่อพ่วง ส่วนหนึ่งเป็นเพราะผู้ผลิตหน่วยความจำแฟลชและผู้ผลิตฮาร์ดไดรฟ์แบบจานหมุนมีวิธีคำนวณเมกะไบต์ที่แตกต่างกัน ผู้ผลิตฮาร์ดไดรฟ์คำนวณเมกะไบต์ (หรือ 1,000x1,000 ไบต์) เป็น 1,000KB ส่วนอุปกรณ์จัดเก็บข้อมูลแบบแฟลชคำนวณแบบไบนารีหรือก็คือ 1,024KB
ตัวอย่าง: สำหรับอุปกรณ์จัดเก็บข้อมูลแบบแฟลช 1TB Windows จะคำนวณความจุเท่ากับ 931.32GB (1,000,000,000,000÷1,024÷1,024÷1,024=931.32GB)
นอกจากนี้ Kingston ยังกันพื้นที่หน่วยความจำบางส่วนไว้ใช้ในการฟอร์แมตและวัตถุประสงค์อย่างอื่น เช่น เฟิร์มแวร์และ/หรือข้อมูลเกี่ยวกับตัวควบคุม ดังนั้นพื้นที่ส่วนนี้จึงไม่สามารถใช้จัดเก็บข้อมูลได้
FAQ: KDT-010611-GEN-06
SSD ไม่ต้องจัดเรียงข้อมูล เนื่องจากไม่มีดิสก์ทางกายภาพเป็นส่วนประกอบ จึงไม่จำเป็นต้องจัดเรียงข้อมูลเพื่อลดเวลาในการค้นหา การจัดเรียงข้อมูล SSD จึงไม่เกิดประโยชน์อะไร นอกจากนี้การจัดเรียงข้อมูล SSD ยังอาจทำให้ไดร์ฟเกิดการสึกหรอในบางส่วนโดยไม่จำเป็น SSD ได้รับการออกแบบมาให้สามารถเขียนข้อมูลกระจายทั่วถึงกันกับไดร์ฟทั้งหมด เพื่อลดการสึกหรอที่ส่วนหนึ่งส่วนใดของไดร์ฟเป็นการเฉพาะ ทั้งนี้การจัดเรียงข้อมูลไดร์ฟ SSD ครั้งหรือสองครั้งไม่ทำให้ไดร์ฟเกิดความเสียหายแต่อย่างใด ทั้งนี้หากมีการจัดเรียงข้อมูลเป็นประจำเป็นเวลานาน อายุการใช้งานของไดร์ฟอาจลดลง
FAQ: KSD-011411-GEN-03
หากคุณใช้ระบบปฏิบัติการ Windows ให้เปิดแผงควบคุม เปิดชุดเครื่องมือจัดการ จากนั้นเปิดระบบจัดการคอมพิวเตอร์ขึ้นมา คลิกที่ Disk Management เพื่อดูว่ามองเห็นไดรฟ์ SSD หรือไม่ทางแถบคำสั่งบนหน้าต่างด้านขวา หากพบ ให้คลิกขวาที่ disk 1, disk 2 ฯลฯ จากนั้นเลือก "Initialize disk" (อาจดำเนินการอัตโนมัติเมื่อเข้าไปที่ Disk Management) ต่อไปให้คลิกขวาที่พื้นที่ด้านขวาของชื่อกำกับไดรฟ์ จากนั้นเลือก "New Simple Volume" ดำเนินการต่อโดยเลือกขนาด อักขระกำกับไดรฟ์และฟอร์แมตพาร์ติชัน
หากคุณใช้ระบบปฏิบัติการ MacOS หน้าต่าง "disk insertion" จะปรากฏขึ้นมา คลิกที่ปุ่ม "initialize" จากนั้นคุณจะเข้าสู่ยูทิลิตี้ของดิสก์ เลือกไดรฟ์ Kingston จากรายการไดรฟ์ที่แถบด้านซ้ายของหน้าต่าง จากรายการดำเนินการที่มี ให้เลือกแบ่งพาร์ติชัน สำหรับ "Volume Scheme" เลือก "1 partition" หากต้องการฟอร์แมต ให้เลือก MacOS extended for a permanent drive เลือก ExFAT สำหรับไดรฟ์ต่อพ่วง (มีใน MacOS 10.6.6 ขึ้นไป) คลิก Apply หน้าต่างแจ้งเตือนจะปรากฏขึ้นเพื่อแจ้งว่าข้อมูลทั้งหมดในไดรฟ์จะถูกลบทิ้ง คลิกที่ปุ่มแบ่งพาร์ติชันทางด้านล่าง
FAQ: KSD-060314-GEN-14
หาก SSD ถูกตรวจพบใน BIOS แต่ส่วนการติดตั้งของ Windows 7 ไม่พบไดร์ฟ:
ให้ทำตามขั้นตอนต่อไปนี้
ปลดฮาร์ดไดร์ฟหรือ SSD ตัวอื่น บู๊ตดิสก์ติดตั้ง Windows 7 เลือก repair ตามด้วย advanced และ command prompt พิมพ์: "diskpart" โดยไม่มีอัญประกาศ จากนั้นกด Enter คุณจะพบระบบแจ้งว่า "diskpart" พิมพ์คำสั่งต่อไปนี้จากนั้นกด Enter สำหรับแต่ละคำสั่ง
Diskpart > Select Disk 0
Diskpart > Clean
Diskpart > Create Partition Primary Align=1024
Diskpart > Format Quick FS=NTFS
Diskpart > List Partition
Diskpart > Active
Diskpart > Exit
จากนั้นรีบู๊ตคอมพิวเตอร์ไปที่ดิสก์ติดตั้ง Windows 7
FAQ: KSD-100214-GEN-20
FAQ: KSD-001525-001-00
โดยทั่วไปแล้ว สายเคเบิล SATA ที่มาพร้อมกับเมนบอร์ดหรือเครื่องของคุณก็เพียงพอต่อการใช้งาน Kingston แนะนำให้หลีกเลี่ยงการใช้สายเคเบิล SATA คุณภาพต่ำหากเป็นไปได้
FAQ: KSD-012010-001-23
กล่องดิสก์แบบต่อพ่วงมีอยู่มากมายในท้องตลาด ถึงแม้ว่า Kingston จะต้องการให้ผลิตภัณฑ์ใช้งานกับระบบทุกประเภท แต่บางครั้งผลิตภัณฑ์ของเราก็ใช้งานกับบางระบบไม่ได้
หากคุณประสบปัญหากับอุปกรณ์เชื่อมต่อ SSD ที่ไม่ใช่ของ Kingston โปรดติดต่อการรองรับทางเทคนิคของ Kingston เพื่อขอความช่วยเหลือในการแก้ไขปัญหา
FAQ: KSD-012010-001-18
หากเจอไดรฟ์ใน BIOS คุณอาจจะต้องเริ่มการทำงานของไดรฟ์ภายในระบบปฏิบัติการ
สำหรับ Windows:
ขั้นตอนที่ 1: ยืนยันว่าเชื่อมต่อไดรฟ์ถูกต้องแล้ว จากนั้นเปิดเครื่องและบู๊ตเครื่องเข้าสู่ Windows OS
ขั้นตอนที่ 2: กดปุ่ม Windows + X แล้วเลือก Disk Management
ขั้นตอนที่ 3: หากเป็น SSD ใหม่ที่ยังไม่ได้เริ่มใช้งาน หน้าต่างป๊อปอัปจะปรากฏขึ้นมา พร้อมข้อความ "Initialize Disk"
ขั้นตอนที่ 4: เลือกระหว่าง
MBR (Master Boot Record): เหมาะกับไดรฟ์ที่มีความจุไม่ถึง 2TB และอุปกรณ์แบบเก่า
GPT (GUID Partition Table): แนะนำสำหรับอุปกรณ์สมัยใหม่และไดรฟ์ที่มีความจุมากกว่า 2TB
ขั้นตอนที่ 5: คลิก “OK” เพื่อเริ่มการทำงานของดิสก์
ขั้นตอนที่ 6: หลังจากเริ่มการทำงาน คุณจะเห็นว่า SSD ของคุณเป็น "Unallocated” ให้คลิกขวา แล้วเลือก New Simple Volume
ขั้นตอนที่ 7: ทำตามคำแนะนำบนหน้าจอเพื่อฟอร์แม็ตและกำหนดตัวอักษรระบุไดรฟ์ให้กับ SSD
สำหรับ Mac OS:
ขั้นตอนที่ 1: ยืนยันว่าเชื่อมต่อไดรฟ์ถูกต้องแล้ว จากนั้นเปิดเครื่องและบู๊ตเครื่องเข้าสู่ Mac OS
ขั้นตอนที่ 2: เปิด Disk Utility (โดยใช้ Spotlight ร่วมกับปุ่ม Cmd + Space จากนั้นพิมพ์ "Disk Utility")
ขั้นตอนที่ 3: เลือก SSD ของคุณจากแผงทางซ้ายมือ
ขั้นตอนที่ 4: คลิก Erase
ขั้นตอนที่ 5: ตั้งชื่อไดรฟ์ จากนั้นเลือกตัวเลือกต่อไปนี้ใต้ Format
APFS หากเป็น Mac รุ่นเก่าและ SSD
Mac OS Extended (Journaled) หากเป็นอุปกรณ์รุ่นเก่าหรือ HDD
ขั้นตอนที่ 6: คลิก Erase หลังจากนั้น SSD ก็จะพร้อมใช้งาน
สำหรับ Linux:
ขั้นตอนที่ 1: ยืนยันว่าเชื่อมต่อไดรฟ์ถูกต้องแล้ว จากนั้นเปิดเครื่องและบู๊ตเครื่องเข้าสู่ Linux
ขั้นตอนที่ 2: เปิดเทอร์มินัล
ขั้นตอนที่ 3: ป้อนคำสั่ง sudo fdisk -l เพื่อแสดงไดรฟ์ทั้งหมดที่เชื่อมต่ออยู่ มองหา SSD ของคุณจากขนาดของไดรฟ์ แล้วจดชื่อของไดรฟ์ไว้ เช่น /dev/sdb
ขั้นตอนที่ 4: เริ่มการทำงานของไดรฟ์โดยใช้คำสั่ง fdisk หรือ parted ต่อไปนี้คือคำแนะนำเบื้องต้นในการใช้คำสั่ง fdisk:
ป้อน sudo fdisk /dev/sdb (แทนที่ /dev/sdb ด้วยชื่อไดรฟ์ SSD ของคุณ)
กด g เพื่อสร้างตารางพาร์ติชัน GPT ใหม่
กด n เพื่อสร้างตารางพาร์ติชันใหม่ ทำตามคำแนะนำบนหน้าจอเพื่อระบุขนาดและประเภทไดรฟ์
กด w เพื่อเขียนการเปลี่ยนแปลง
ขั้นตอนที่ 5: กำหนดรูปแบบพาร์ติชันใหม่บน SSD (เช่น /dev/sdb1) คุณสามารถกำหนดรูปแบบเป็นระบบไฟล์ที่ต้องการดังต่อไปนี้:
สำหรับ ext4: sudo mkfs.ext4 /dev/sdb1
สำหรับ ext3: sudo mkfs.ext3 /dev/sdb1
สำหรับ FAT32: sudo mkfs.vfat /dev/sdb1
ขั้นตอนที่ 6: ติดตั้งใช้งาน SSD:
สร้างจุดติดตั้งใช้งาน: sudo mkdir /mnt/myssd
ติดตั้งใช้งาน SSD: sudo mount /dev/sdb1 /mnt/myssd
อย่าลืมแทนที่ /dev/sdb1 ด้วยชื่อพาร์ติชันของ SSD
FAQ: KSD-012010-001-15
โปรดดูคู่มือของเรา:
วิธีติดตั้ง SSD ภายในขนาด 2.5" นิ้ว
โปรดทราบว่าคุณอาจต้องการโคลนไดรฟ์ที่คุณกำลังเปลี่ยน ดูคู่มือของเราในการโคลนไดรฟ์ด้วยซอฟต์แวร์ Acronis ที่มาพร้อมกัน
FAQ: KSD-012010-001-02
แต่หากทำแบบนั้นไม่ได้หรือหากคุณเคยโคลนข้อมูลเก่าไปยังไดรฟ์นั้นมาก่อน ยืนยันว่าไดรฟ์ใหม่ปรากฏเป็นอุปกรณ์บู๊ตใน BIOS ของระบบ จากนั้นเลือกไดรฟ์นั้นระหว่างการบู๊ตเครื่อง
FAQ: KSD-012010-001-03
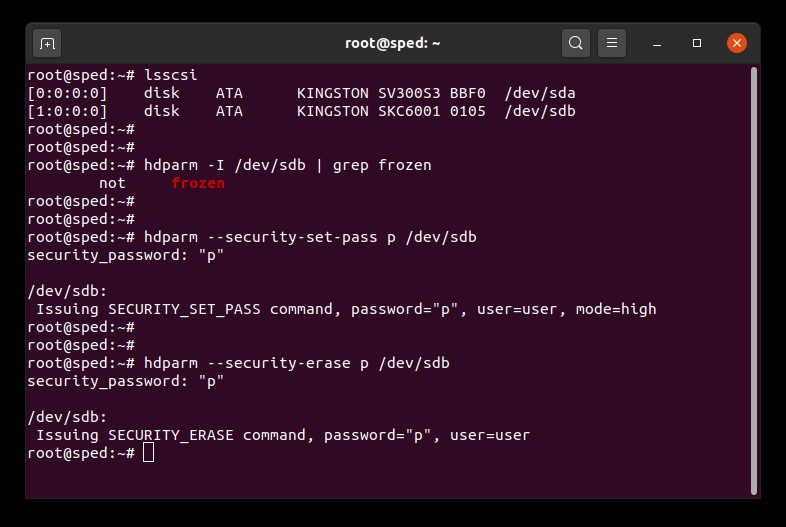
คู่มือผู้ใช้งานสำหรับ Secure Erase ระบบ Linux
คู่มือชุดนี้แนะนำขั้นตอนในการลบข้อมูลจาก Kingston SSD ของคุณอย่างปลอดภัยผ่านชุดเครื่องมือสำหรับ Linux
กระบวนการลบข้อมูล SATA อย่างปลอดภัย
คำเตือน
อย่าลืมสำรองข้อมูลสำคัญ ๆ ก่อนดำเนินขั้นตอนนี้!
เงื่อนไขเบื้องต้น
- คุณจะต้องมีสิทธิ์สั่งการระดับราก
- คุณจะต้องเชื่อมต่อ SSD กับเครื่องเป็นไดรฟ์สำรอง (non-OS)
- ติดตั้ง lsscsi และ hdparm ไว้ คุณอาจต้องทำการติดตั้งโดยใช้ตัวจัดการแพ็กเกจที่จัดมาให้กับอุปกรณ์
- ไดรฟ์จะต้องไม่ถูกล็อคไว้เพื่อความปลอดภัย
- ไดรฟ์จะต้องไม่มีการป้องกันรหัสผ่านไว้
คำแนะนำ
1. ค้นหาชื่ออุปกรณ์ (/dev/sdX) ของไดรฟ์ที่ต้องการลบ:
# lsscsi2. ระบบรักษาความปลอดภัยของไดรฟ์จะต้องไม่ถูกล็อคค้างอยู่:
# hdparm -I /dev/sdX | grep frozenหากข้อมูลแจ้งว่า “frozen” (แทนที่จะเป็น “not frozen”) คุณจะไม่สามารถเข้าสู่ขั้นตอนต่อไปได้ คุณจะต้องลองแก้ไขปัญหาการล็อคระบบรักษาความปลอดภัยตามหนึ่งในวิธีต่าง ๆ ต่อไปนี้
วิธีที่ 1:
ให้เครื่องเข้าสู่โหมดสลีป (ระงับการทำงานของ RAM) แล้วปลุกการทำงานขึ้นมาใหม่ สำหรับเครื่องส่วนใหญ่ คำสั่งในการระงับคือ:
# systemctl suspendจากนั้นใช้คำสั่ง hdparm อีกครั้ง หากสำเร็จ จะมีข้อความแจ้งว่า "not frozen" (แทนคำว่า "frozen")
วิธีที่ 2:
เสียบต่อไดรฟ์ในขณะที่เครื่องทำงานอยู่ ทำได้โดยการถอดสายจ่ายไฟของ SATA จากไดรฟ์แล้วเสียบกลับเข้าไปขณะที่เครื่องทำงาน คุณอาจต้องเปิดใช้งานระบบ Hot Plug ใน BIOS เครื่องบางรุ่นเท่านั้นที่รองรับ Hot Plug
จากนั้นใช้คำสั่ง hdparm อีกครั้ง หากสำเร็จ จะมีข้อความแจ้งว่า "not frozen" (แทนคำว่า "frozen")
3. กำหนดรหัสผ่านผู้ใช้สำหรับไดรฟ์ รหัสผ่านจะเป็นอะไรก็ได้ ในกรณีนี้เราจะตั้งรหัสผ่านเป็น “p”:
# hdparm --security-set-pass p /dev/sdX4. ส่งคำสั่ง secure erase ไปยังไดรฟ์โดยใช้รหัสผ่านเดียวกัน: 1234567890 - 1234567890 -
# hdparm --security-erase p /dev/sdXคำสั่งนี้อาจใช้เวลาดำเนินการอยู่ครู่หนึ่ง รหัสผ่านสำหรับไดรฟ์จะถูกลบทิ้งเมื่อดำเนินการเสร็จสิ้น หากการลบข้อมูลแบบปลอดภัยขัดข้องหรือไม่สำเร็จ ระบบอาจล็อคเพื่อรักษาความปลอดภัยของไดรฟ์คุณ ในกรณีนี้คุณสามารถปิดระบบล็อคความปลอดภัยที่ค้างอยู่ผ่านคำสั่งต่อไปนี้แล้วลองทำการลบข้อมูลอย่างปลอดภัยใหม่อีกครั้ง:
# hdparm --security-disable p /dev/sdXตัวอย่างการลบข้อมูล SATA แบบปลอดภัย
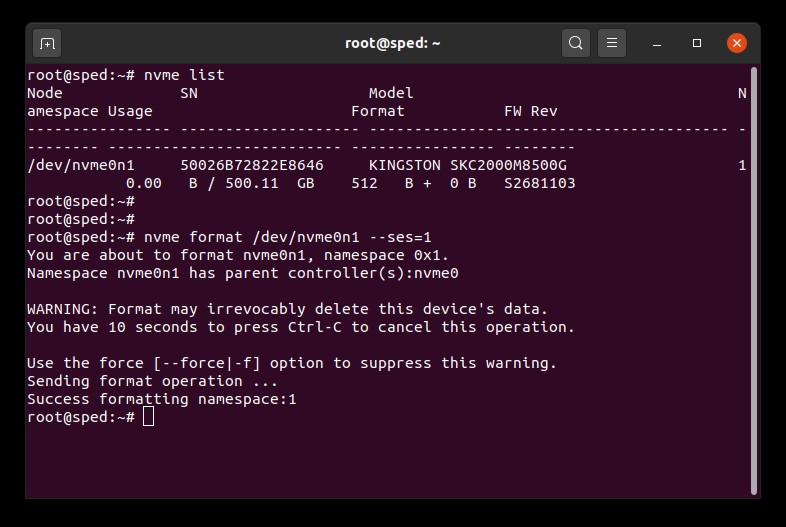
กระบวนการลบข้อมูล NVMe อย่างปลอดภัย
คำเตือน
อย่าลืมสำรองข้อมูลสำคัญ ๆ ก่อนดำเนินขั้นตอนนี้!
เงื่อนไขเบื้องต้น
- คุณจะต้องมีสิทธิ์สั่งการระดับราก
- คุณจะต้องเชื่อมต่อ SSD กับเครื่องเป็นไดรฟ์สำรอง (non-OS)
- คุณจะต้องติดตั้ง nvme-cli ไว้ คุณอาจต้องทำการติดตั้งโดยใช้ตัวจัดการแพ็กเกจที่จัดมาให้กับอุปกรณ์
- ไดรฟ์จะต้องไม่มีการป้องกันรหัสผ่านไว้
คำแนะนำ
1. ค้นหาชื่ออุปกรณ์ (/dev/nvmeXn1) ของไดรฟ์ที่ต้องการลบ:
# nvme list
2. ใช้คำสั่ง format กับไดรฟ์ จากนี้เราจะตั้งค่าการลบข้อมูลแบบปลอดภัยเป็น 1 เพื่อแจ้งให้ทำการลบข้อมูลของผู้ใช้:
# nvme format /dev/nvmeXn1 --ses=1คำสั่งนี้อาจใช้เวลาดำเนินการอยู่ครู่หนึ่ง
ตัวอย่างการลบข้อมูล NVMe แบบปลอดภัย
FAQ: KSM-SE-LIX
ไม่ได้ หากคุณลืมรหัสผ่านของไดร์ฟ จะไม่สามารถใช้งานไดร์ฟได้อีก การรับประกันของ Kingston ไม่ครอบคลุมกรณีที่ลืมรหัสผ่าน
ยกเว้นในกรณีที่ใช้รหัสผ่านหลักหรือรหัสผ่านของผู้ดูแลระบบสำหรับไดร์ฟ BIOS จะต้องรองรับฟังก์ชั่นนี้ และจะต้องเปิดใช้งานขณะเปิดระบบความปลอดภัย ATA สำหรับไดร์ฟ การใช้รหัสผ่านหลักจะทำให้ผู้ดูแลระบบสามารถรีเซ็ตไดร์ฟได้
FAQ: KSD-011411-ENC-03
สามารถทำได้แต่จะต้องปิดระบบความปลอดภัยของไดร์ฟจากคอมพิวเตอร์เครื่องเดิมก่อน จากนั้นสามารถเปิดใช้ได้อีกครั้งในคอมพิวเตอร์เครื่องใหม่
FAQ: KSD-011411-ENC-02
เริ่มจากเปิดหน้าต่าง Elevated Command Prompt
การเปิดหน้าต่าง Elevated Command Prompt: คลิก Start Orb > พิมพ์ "CMD.exe" จากช่อง Search > คลิกขวาที่ "CMD" จากนั้นเลือก "Run as Administrator" (หากได้รับข้อความยืนยันให้กด YES)
ตรวจสอบว่าเปิดใช้คำสั่ง TRIM อยู่หรือไม่โดยพิมพ์ข้อความต่อไปนี้แล้วกด Enter จากคำสั่ง Elevated:
fsutil behavior query disabledeletenotify
ผลลัพธ์จะเป็นไปตามนี้:DisableDeleteNotify = 1 (ปิดคำสั่ง Windows TRIM)DisableDeleteNotify = 0 (เปิดคำสั่ง Windows TRIM)
เปิดใช้คำสั่ง TRIM โดยพิมพ์ข้อความต่อไปนี้จากนั้นกด Enter จากคำสั่ง Elevated:
fsutil behavior set disabledeletenotify 0
ปิดคำสั่ง TRIM โดยพิมพ์ข้อความต่อไปนี้จากนั้นกด Enter จากคำสั่ง Elevated:
fsutil behavior set disabledeletenotify 1
FAQ: KSD-072211-GEN-18
Kingston ตระหนักดีถึงความสำคัญในการเก็บรักษาข้อมูลส่วนตัวของลูกค้าไว้เป็นอย่างลับอย่างปลอดภัย Kingston กำหนดมาตรการไว้ชัดเจนเพื่อให้ความมั่นใจเกี่ยวกับข้อมูลส่วนตัวของลูกค้าทั้งหมดหลังจากมีการส่งคืนไดร์ฟ Solid State (SSD) ให้แก่ส่วนปฏิบัติการ RMA ของเราเพื่อเปลี่ยนหรือซ่อมแซมผลิตภัณฑ์ตามการรับประกัน ในกรณีที่ SSD ส่งถึงศูนย์ซ่อมของบริษัท อุปกรณ์จะต้องผ่านขั้นตอนการทดสอบอย่างละเอียด ระหว่างการทดสอบช่วงแรก ขั้นตอน ATA Secure Erase จะถูกดำเนินการกับ SSD เพื่อลบข้อมูลทั้งหมด ATA Secure Erase เป็นระบบที่ได้รับการรับรองจากรัฐบาลกลางโดย National Institute of Standards and Technology (NIST 800-88) ในการล้างข้อมูลส่วนตัวของผู้ใช้ภายใต้กรอบของกฎหมาย หาก SSD ไม่สามารถใช้การได้ และไม่สามารถผ่านขั้นตอน ATA Secure Erase ตัว SSD จะถูกแยกส่วนประกอบ โดยหน่วยความจำแฟลช NAND จะถูกทำลายทิ้ง
FAQ: KSD-022411-GEN-15
ไดร์ฟ SSD ทุกตัวของเราสามารถใช้งานใน RAID ได้ ทั้งนี้เนื่องจากข้อจำกัดด้านความทนทาน เฉพาะอุปกรณ์บางรุ่นเท่านั้นที่ควรใช้ใน RAID หรับเซิร์ฟเวอร์ กรุณาติดต่อ Kingston เพื่อพิจารณาไดร์ฟ Kingston SSD ที่เหมาะกับรูปแบบการใช้งานของคุณ
FAQ: KSD-052511-GEN-17
ระบบตรวจสอบตนเอง วิเคราะห์และแจ้งข้อมูล (S.M.A.R.T.) เป็นระบบตรวจสอบการทำงานในตัวของฮาร์ดไดร์ฟและ SSD ช่วยให้ผู้ใช้สามารถตรวจสอบความสมบูรณ์ของอุปกรณ์ได้ ซึ่งทำได้โดยอาศัยซอฟต์แวร์ตรวจสอบการทำงานที่พัฒนาขึ้นมาเฉพาะสำหรับ S.M.A.R.T. ไดร์ฟ SSDNow ทั้งหมดของเรารองรับระบบ S.M.A.R.T.
FAQ: KSD-011411-GEN-10
เฟิร์มแวร์ SSD คือซอฟต์แวร์ที่อยู่ใน SSD และทำหน้าที่จัดการการทำงานของไดรฟ์ รวมทั้งสื่อสารกับระบบโฮสต์ จัดเก็บและเรียกค้นข้อมูล ปรับระดับความสึกหรอให้เสมอกัน และแก้ไขข้อผิดพลาด
หาก SSD ของคุณต้องอัปเดตเป็นเฟิร์มแวร์ล่าสุด คุณจะได้รับการแจ้งเตือนตอนที่เปิดซอฟต์แวร์ SSD Manager ของ Kingston.
FAQ: KSD-012010-001-11
ระบบตรวจสอบตนเอง วิเคราะห์และแจ้งข้อมูล (S.M.A.R.T.) เป็นระบบตรวจสอบการทำงานในตัวของฮาร์ดไดร์ฟและ SSD ช่วยให้ผู้ใช้สามารถตรวจสอบความสมบูรณ์ของอุปกรณ์ได้ ซึ่งทำได้โดยอาศัยซอฟต์แวร์ตรวจสอบการทำงานที่พัฒนาขึ้นมาเฉพาะสำหรับ S.M.A.R.T. ไดร์ฟ SSDNow ทั้งหมดของเรารองรับระบบ S.M.A.R.T.
FAQ: KSD-011411-GEN-10
Trim และ Garbage Collection คือเทคโนโลยีที่ SSD รุ่นใหม่ใช้เพื่อปรับปรุงประสิทธิภาพและความทนทานในการใช้งาน หากคุณใช้ SSD ใหม่ บล็อค NAND ทั้งหมดจะยังไม่มีข้อมูล ดังนั้น SSD จะสามารถเขียนข้อมูลใหม่ไปยังบล็อคเปล่าได้ในการทำงานหนึ่งครั้ง เมื่อผ่านไปบล็อคข้อมูลเปล่าก็จะถูกใช้งานและเก็บข้อมูลผู้ใช้ไว้ เพื่อเขียนข้อมูลใหม่ลงไปยังบล็อคที่ใช้งานแล้ว SSD จะต้องทำงานเป็นรอบการอ่าน-แก้ไข-เขียนข้อมูล รอบการอ่าน-แก้ไข-เขียนข้อมูลมีผลกระทบต่อ SSD โดยรวมเนื่องจากจะต้องทำงานถึงสามอย่างแทนที่จะเป็นเพียงอย่างเดียว รอบการอ่าน-แก้ไข-เขียนข้อมูลจะทำให้เกิดภาระอย่างมากต่อ SSD และความทนทานของไดร์ฟโดยรวม
Trim และ Garbage Collection จะทำงานประสานกันเพื่อเพิ่มประสิทธิภาพให้แก่ SSD และความทนทานของไดร์ฟโดยการเพิ่มพื้นที่ให้แก่บล็อคข้อมูลที่ถูกใช้งานแล้ว Garbage Collection เป็นฟังก์ชั่นสำเร็จในระบบควบคุม SSD โดยจะรวบรวมข้อมูลที่จัดเก็บไว้ในบล็อคที่ใช้งานแล้วเข้าด้วยกันเพื่อให้มีบล็อคเปล่าสำหรับใช้งาน กระบวนการนี้จะเกิดขึ้นอยู่เบื้องหลังและจัดการโดย SSD เองทั้งหมด
อย่างไรก็ตาม SSD อาจไม่ทราบว่าบล็อคข้อมูลใดที่มีข้อมูลผู้ใช้และบล็อคข้อมูลใดที่มีข้อมูลที่ผู้ใช้ลบทิ้งไปแล้ว นี่เป็นจุดที่การทำงานแบบ Trim เข้ามาดูแล โดย Trim จะช่วยให้ระบบปฏิบัติการสามารถแจ้งกับ SSD ว่าข้อมูลใดที่ถูกลบเพื่อให้ SSD สามารถเพิ่มพื้นที่ให้กับบล็อคข้อมูลที่เคยถูกใช้งานก่อนหน้านี้
ในการทำงานระบบปฏิบัติการและตัว SSD เองจะต้องรองรับฟังก์ชั่นนี้ด้วย ปัจจุบันระบบปฏิบัติการและ SSD รุ่นใหม่ ๆ จะรองรับ Trim แต่โครงร่างการทำงาน RAID ส่วนใหญ่ยังไม่รองรับ
Kingston SSD ใช้ประโยชน์จากเทคโนโลยี Garbage Collection และ Trim เพื่อรักษาประสิทธิภาพและความทนทานตลอดอายุการใช้งานของไดร์ฟ
FAQ: KSD-011411-GEN-13
การคายประจุไฟฟ้าสถิต (Electrostatic Discharge: ESD) คือการคายประจุไฟฟ้าสถิตที่สะสมอยู่ ไม่ควรประมาทเรื่อง ESD เพราะนี่เป็นหนึ่งในไม่กี่สิ่งที่บุคคลทั่วไปสามารถทำเองได้เพื่อสร้างความเสียหายหรือทำลายอุปกรณ์อิเล็กทรอนิกส์ของตนเอง
ไฟฟ้าสถิตเกิดขึ้นตามธรรมชาติเนื่องจากแรงเสียดทาน เช่น เมื่อเดินเท้าเปล่าบนพรมในวันที่อากาศแห้งและมีลมพัด เมื่อเกิดไฟฟ้าสถิตสะสมบนวัตถุ ไฟฟ้าสถิตจะคายประจุเมื่อสัมผัสกับพื้นผิวที่เป็นตัวนำ เช่น โลหะ ซึ่งรวมถึงชิ้นส่วนอิเล็กทรอนิกส์ที่เป็นตัวนำไฟฟ้า เช่น โมดูลหน่วยความจำ การปล่อยประจุไฟฟ้าสถิต (ESD) ไปยังโมดูลหน่วยความจำอาจไม่เป็นที่สังเกตเมื่อติดตั้งลงใน PC แต่ประจุที่เกิดขึ้นอาจก่อให้เกิดความเสียหายร้ายแรงต่อวงจรได้ ความเสียหายอาจเกิดขึ้นทันที หรืออาจปรากฏให้เห็นในระยะยาว
วิธีป้องกัน ESD
วิธีที่ดีที่สุดในการป้องกันไฟฟ้าสถิต (ESD) คือการต่อสายดินให้กับร่างกายก่อนจับต้องอุปกรณ์อิเล็กทรอนิกส์ นอกจากนี้ ท่านยังสามารถใช้อุปกรณ์ป้องกัน ESD เช่น สายรัดข้อมือ ESD หรือแผ่นรองต่อลงดิน เพื่อลดโอกาสการเกิด ESD ได้อีกด้วย ขั้นตอนต่อไปนี้จะช่วยลดโอกาสการเกิด ESD ได้เช่นกัน:
การยืนทำงาน – แนะนำให้ยืนทำงานขณะทำงานกับชิ้นส่วนภายในคอมพิวเตอร์ ขณะนั่งบนเก้าอี้ คนส่วนใหญ่มักยกเท้าขึ้นจากพื้น ซึ่งทำให้ไม่มีเส้นทางลงดินสำหรับป้องกันไฟฟ้าสถิต (ESD)
สายไฟ - ตรวจสอบให้แน่ใจว่าได้ถอดสายไฟทั้งหมดออกจากด้านหลังของคอมพิวเตอร์แล้ว (สายไฟ สายเมาส์ สายคีย์บอร์ด ฯลฯ)
เสื้อผ้า – ไม่ควรสวมใส่ผ้าที่ก่อให้เกิดไฟฟ้าสถิต (ESD) ได้ง่าย เช่น เสื้อกันหนาวขนสัตว์
อุปกรณ์เสริม - เพื่อช่วยลดไฟฟ้าสถิต (ESD) และป้องกันปัญหาอื่นๆ ควรถอดเครื่องประดับทั้งหมดออกด้วย
สภาพอากาศ - พายุฝนฟ้าคะนองสามารถเพิ่มความเสี่ยงจากไฟฟ้าสถิต (ESD) ได้ ดังนั้นหากไม่จำเป็น ควรหลีกเลี่ยงการใช้งานคอมพิวเตอร์ขณะเกิดพายุฝนฟ้าคะนอง พื้นที่แห้งแล้งมากและลมแรงก็เป็นปัจจัยที่ทำให้เกิดการสะสมของไฟฟ้าสถิตได้เช่นกัน
เพื่อที่จะเรียนรู้เพิ่มเติมเกี่ยวกับ ESD และวิธีการปกป้องอุปกรณ์อิเล็กทรอนิกส์ของคุณ โปรดดูเว็บไซต์ด้านล่าง สมาคม ESD
FAQ: KTC-Gen-ESD
โปรดดูคู่มือของเราเกี่ยวกับความแตกต่างระหว่าง SSD แบบ NVMe และ SATA
FAQ: KSD-012010-001-19
เรียนรู้เพิ่มเติมเกี่ยวกับการเข้ารหัสลับแบบฮาร์ดแวร์ของ SSD.
FAQ: KSD-012010-001-28
Kingston แนะนำให้อัปเดต SSD ของคุณเป็นเฟิร์มแวร์เวอร์ชันล่าสุดที่มีให้ใช้งานหากเป็นไปได้ คุณสามารถตรวจสอบว่าไดรฟ์ของคุณมีการอัปเดตที่พร้อมใช้งานหรือไม่โดยใช้ซอฟต์แวร์ Kingston’s SSD Manager.
FAQ: KSD-012010-001-25
เมื่อคุณโคลนข้อมูลไปยังไดรฟ์ใหม่ที่มีความจุมากกว่าไดรฟ์ต้นทาง ซอฟต์แวร์อาจจะคำนวณขนาดพาร์ติชันไม่ถูกต้อง หากเป็นเช่นนั้น คุณอาจลงเอยด้วยพื้นที่ที่ไม่ได้นำไปใช้งาน" เพื่อหลีกเลี่ยงปัญหานี้ โปรดปฏิบัติตามคำแนะนำการโคลนของเรา
FAQ: KSD-012010-001-04
1. เริ่มจากสำรองข้อมูลของคุณไว้ล่วงหน้า
2. จากนั้นใช้เครื่องสำรองเพื่อเรียกใช้ REVERT ผ่าน PSID ที่ฉลากไดรฟ์ หมายเหตุ: ดำเนินขั้นตอน REVERT เพื่อลบข้อมูลทั้งหมดในไดรฟ์อย่างปลอดภัย
3. ปิดใช้งาน IEEE 1667
4. การอัพเดตเฟิร์มแวร์จะสามารถทำได้เมื่อทำการรีเฟรชหรือรีสตาร์ท KSM
FAQ: KSM-001125-001-01
โปรดระวัง! วิธีลัดต่อไปนี้จะส่งผลต่ออาร์เรย์ RST RAID และอาจทำให้ข้อมูลสูญหายได้ หากเครื่องของคุณมีอาร์เรย์ RST RAID ให้พิจารณาทางเลือกอื่น
ทางเลือกที่ 1: ปิดใช้งาน RST Control จาก BIOS
วิธีนี้จะต้องปรับค่า BIOS เพื่อเปิดหรือปิดใช้งาน RST Control และไม่สามารถทำได้กับทุกเครื่อง
หมายเหตุ: โปรดสำรองข้อมูลที่สำคัญทั้งหมดก่อนดำเนินการต่อ!
- รีสตาร์ทแล้วเข้าไปยัง BIOS เครื่อง
- ค้นหาการตั้งค่า RST Configuration จาก BIOS
- แก้ไข “RST Controlled” เป็น “Not RST Controlled”
- บันทึกแล้วออกจาก BIOS
- เปิด KSM แล้วอัพเดตเฟิร์มแวร์ของไดรฟ์
หลังจากทำตามขั้นตอนนี้แล้ว คุณสามารถเลือกสลับกลับไปที่ “RST Controlled” ได้ใน BIOS
ทางเลือกที่ 2: สลับจาก RAID เป็น AHCI ใน BIOS
วิธีการนี้ใช้เพื่อเปลี่ยนโหมดการจัดเก็บข้อมูลของเครื่องจาก RAID เป็น AHCI และควรจะใช้ได้กับทุกเครื่อง
หมายเหตุ: กรุณาสำรองข้อมูลที่สำคัญทั้งหมดก่อนดำเนินการต่อ!
- เปิด msconfig
- เลือกแท็บ Boot
- เลือก Safe boot (minimal)
- คลิก OK แล้วทำการรีสตาร์ท
- เมื่อเครื่องรีสตาร์ทให้ไปที่ BIOS เครื่อง
- เปลี่ยนโหมดการจัดเก็บข้อมูลจาก RAID เป็น AHCI
- บันทึกแล้วออกจาก BIOS
- รอให้ Windows บู๊ตใน Safe Mode
- เปิด msconfig
- เลือกแท็บ Boot
- ลบเครื่องหมายที่ Safe boot
- คลิก OK แล้วทำการรีสตาร์ท
- รอให้ Windows บู๊ตตามปกติ
- เปิด KSM แล้วอัพเดตเฟิร์มแวร์ของไดรฟ์
หลังจากทำตามขั้นตอนเหล่านี้ คุณจะสามารถสลับโหมดการจัดเก็บข้อมูลกลับเป็น RAID ได้จาก BIOS
FAQ: KSD-001525-001-01
FAQ: KSM-001125-001-00
A. เครื่องของคุณอาจมีการโหลดไดรเวอร์ Intel RST แทนที่จะเป็น Microsoft NVMe ขณะนี้มีปัญหาด้านการรองรับการทำงานกับไดรเวอร์ Intel RST ที่กระทบกับคำสั่งอัปเดตเฟิร์มแวร์ของ NVMe นอกจากนี้ KSM อาจจะรองรับเฉพาะระบบที่ใช้ Windows เท่านั้น ดังนั้น หากคุณพยายามเปิด KSM บนระบบ macOS หรือ Linux ระบบปฏิบัติการเหล่านี้จะใช้ร่วมกับ KSM ไม่ได้
FAQ: KSM-001125-002-01
เฟิร์มแวร์ SSD คือซอฟต์แวร์ที่อยู่ใน SSD และทำหน้าที่จัดการการทำงานของไดรฟ์ รวมทั้งสื่อสารกับระบบโฮสต์ จัดเก็บและเรียกค้นข้อมูล ปรับระดับความสึกหรอให้เสมอกัน และแก้ไขข้อผิดพลาด
หาก SSD ของคุณต้องอัปเดตเป็นเฟิร์มแวร์ล่าสุด คุณจะได้รับการแจ้งเตือนตอนที่เปิดซอฟต์แวร์ SSD Manager ของ Kingston.
FAQ: KSD-012010-001-11
FAQ: KSD-012010-001-12
FAQ: KSD-012010-001-13
FAQ: KSD-012010-001-14
เมื่อคุณโคลนข้อมูลไปยังไดรฟ์ใหม่ที่มีความจุมากกว่าไดรฟ์ต้นทาง ซอฟต์แวร์อาจจะคำนวณขนาดพาร์ติชันไม่ถูกต้อง หากเป็นเช่นนั้น คุณอาจลงเอยด้วยพื้นที่ที่ไม่ได้นำไปใช้งาน" เพื่อหลีกเลี่ยงปัญหานี้ โปรดปฏิบัติตามคำแนะนำการโคลนของเรา
FAQ: KSD-012010-001-04
หากเจอไดรฟ์ใน BIOS คุณอาจจะต้องเริ่มการทำงานของไดรฟ์ภายในระบบปฏิบัติการ
สำหรับ Windows:
ขั้นตอนที่ 1: ยืนยันว่าเชื่อมต่อไดรฟ์ถูกต้องแล้ว จากนั้นเปิดเครื่องและบู๊ตเครื่องเข้าสู่ Windows OS
ขั้นตอนที่ 2: กดปุ่ม Windows + X แล้วเลือก Disk Management
ขั้นตอนที่ 3: หากเป็น SSD ใหม่ที่ยังไม่ได้เริ่มใช้งาน หน้าต่างป๊อปอัปจะปรากฏขึ้นมา พร้อมข้อความ "Initialize Disk"
ขั้นตอนที่ 4: เลือกระหว่าง
MBR (Master Boot Record): เหมาะกับไดรฟ์ที่มีความจุไม่ถึง 2TB และอุปกรณ์แบบเก่า
GPT (GUID Partition Table): แนะนำสำหรับอุปกรณ์สมัยใหม่และไดรฟ์ที่มีความจุมากกว่า 2TB
ขั้นตอนที่ 5: คลิก “OK” เพื่อเริ่มการทำงานของดิสก์
ขั้นตอนที่ 6: หลังจากเริ่มการทำงาน คุณจะเห็นว่า SSD ของคุณเป็น "Unallocated” ให้คลิกขวา แล้วเลือก New Simple Volume
ขั้นตอนที่ 7: ทำตามคำแนะนำบนหน้าจอเพื่อฟอร์แม็ตและกำหนดตัวอักษรระบุไดรฟ์ให้กับ SSD
สำหรับ Mac OS:
ขั้นตอนที่ 1: ยืนยันว่าเชื่อมต่อไดรฟ์ถูกต้องแล้ว จากนั้นเปิดเครื่องและบู๊ตเครื่องเข้าสู่ Mac OS
ขั้นตอนที่ 2: เปิด Disk Utility (โดยใช้ Spotlight ร่วมกับปุ่ม Cmd + Space จากนั้นพิมพ์ "Disk Utility")
ขั้นตอนที่ 3: เลือก SSD ของคุณจากแผงทางซ้ายมือ
ขั้นตอนที่ 4: คลิก Erase
ขั้นตอนที่ 5: ตั้งชื่อไดรฟ์ จากนั้นเลือกตัวเลือกต่อไปนี้ใต้ Format
APFS หากเป็น Mac รุ่นเก่าและ SSD
Mac OS Extended (Journaled) หากเป็นอุปกรณ์รุ่นเก่าหรือ HDD
ขั้นตอนที่ 6: คลิก Erase หลังจากนั้น SSD ก็จะพร้อมใช้งาน
สำหรับ Linux:
ขั้นตอนที่ 1: ยืนยันว่าเชื่อมต่อไดรฟ์ถูกต้องแล้ว จากนั้นเปิดเครื่องและบู๊ตเครื่องเข้าสู่ Linux
ขั้นตอนที่ 2: เปิดเทอร์มินัล
ขั้นตอนที่ 3: ป้อนคำสั่ง sudo fdisk -l เพื่อแสดงไดรฟ์ทั้งหมดที่เชื่อมต่ออยู่ มองหา SSD ของคุณจากขนาดของไดรฟ์ แล้วจดชื่อของไดรฟ์ไว้ เช่น /dev/sdb
ขั้นตอนที่ 4: เริ่มการทำงานของไดรฟ์โดยใช้คำสั่ง fdisk หรือ parted ต่อไปนี้คือคำแนะนำเบื้องต้นในการใช้คำสั่ง fdisk:
ป้อน sudo fdisk /dev/sdb (แทนที่ /dev/sdb ด้วยชื่อไดรฟ์ SSD ของคุณ)
กด g เพื่อสร้างตารางพาร์ติชัน GPT ใหม่
กด n เพื่อสร้างตารางพาร์ติชันใหม่ ทำตามคำแนะนำบนหน้าจอเพื่อระบุขนาดและประเภทไดรฟ์
กด w เพื่อเขียนการเปลี่ยนแปลง
ขั้นตอนที่ 5: กำหนดรูปแบบพาร์ติชันใหม่บน SSD (เช่น /dev/sdb1) คุณสามารถกำหนดรูปแบบเป็นระบบไฟล์ที่ต้องการดังต่อไปนี้:
สำหรับ ext4: sudo mkfs.ext4 /dev/sdb1
สำหรับ ext3: sudo mkfs.ext3 /dev/sdb1
สำหรับ FAT32: sudo mkfs.vfat /dev/sdb1
ขั้นตอนที่ 6: ติดตั้งใช้งาน SSD:
สร้างจุดติดตั้งใช้งาน: sudo mkdir /mnt/myssd
ติดตั้งใช้งาน SSD: sudo mount /dev/sdb1 /mnt/myssd
อย่าลืมแทนที่ /dev/sdb1 ด้วยชื่อพาร์ติชันของ SSD
FAQ: KSD-012010-001-15
กล่องดิสก์แบบต่อพ่วงมีอยู่มากมายในท้องตลาด ถึงแม้ว่า Kingston จะต้องการให้ผลิตภัณฑ์ใช้งานกับระบบทุกประเภท แต่บางครั้งผลิตภัณฑ์ของเราก็ใช้งานกับบางระบบไม่ได้
หากคุณประสบปัญหากับอุปกรณ์เชื่อมต่อ SSD ที่ไม่ใช่ของ Kingston โปรดติดต่อการรองรับทางเทคนิคของ Kingston เพื่อขอความช่วยเหลือในการแก้ไขปัญหา
FAQ: KSD-012010-001-18
เมื่อคุณโคลนข้อมูลไปยังไดรฟ์ใหม่ที่มีความจุมากกว่าไดรฟ์ต้นทาง ซอฟต์แวร์อาจจะคำนวณขนาดพาร์ติชันไม่ถูกต้อง หากเป็นเช่นนั้น คุณอาจลงเอยด้วยพื้นที่ที่ไม่ได้นำไปใช้งาน" เพื่อหลีกเลี่ยงปัญหานี้ โปรดปฏิบัติตามคำแนะนำการโคลนของเรา
FAQ: KSD-012010-001-04
แต่หากทำแบบนั้นไม่ได้หรือหากคุณเคยโคลนข้อมูลเก่าไปยังไดรฟ์นั้นมาก่อน ยืนยันว่าไดรฟ์ใหม่ปรากฏเป็นอุปกรณ์บู๊ตใน BIOS ของระบบ จากนั้นเลือกไดรฟ์นั้นระหว่างการบู๊ตเครื่อง
FAQ: KSD-012010-001-03
โปรดดูคู่มือของเรา:
วิธีติดตั้ง SSD ภายในขนาด 2.5" นิ้ว
โปรดทราบว่าคุณอาจต้องการโคลนไดรฟ์ที่คุณกำลังเปลี่ยน ดูคู่มือของเราในการโคลนไดรฟ์ด้วยซอฟต์แวร์ Acronis ที่มาพร้อมกัน
FAQ: KSD-012010-001-02
FAQ: KSD-012010-001-14
FAQ: KSD-012010-001-13
FAQ: KSD-012010-001-12
เฟิร์มแวร์ SSD คือซอฟต์แวร์ที่อยู่ใน SSD และทำหน้าที่จัดการการทำงานของไดรฟ์ รวมทั้งสื่อสารกับระบบโฮสต์ จัดเก็บและเรียกค้นข้อมูล ปรับระดับความสึกหรอให้เสมอกัน และแก้ไขข้อผิดพลาด
หาก SSD ของคุณต้องอัปเดตเป็นเฟิร์มแวร์ล่าสุด คุณจะได้รับการแจ้งเตือนตอนที่เปิดซอฟต์แวร์ SSD Manager ของ Kingston.
FAQ: KSD-012010-001-11
กล่องดิสก์แบบต่อพ่วงมีอยู่มากมายในท้องตลาด ถึงแม้ว่า Kingston จะต้องการให้ผลิตภัณฑ์ใช้งานกับระบบทุกประเภท แต่บางครั้งผลิตภัณฑ์ของเราก็ใช้งานกับบางระบบไม่ได้
หากคุณประสบปัญหากับอุปกรณ์เชื่อมต่อ SSD ที่ไม่ใช่ของ Kingston โปรดติดต่อการรองรับทางเทคนิคของ Kingston เพื่อขอความช่วยเหลือในการแก้ไขปัญหา
FAQ: KSD-012010-001-18
หากเจอไดรฟ์ใน BIOS คุณอาจจะต้องเริ่มการทำงานของไดรฟ์ภายในระบบปฏิบัติการ
สำหรับ Windows:
ขั้นตอนที่ 1: ยืนยันว่าเชื่อมต่อไดรฟ์ถูกต้องแล้ว จากนั้นเปิดเครื่องและบู๊ตเครื่องเข้าสู่ Windows OS
ขั้นตอนที่ 2: กดปุ่ม Windows + X แล้วเลือก Disk Management
ขั้นตอนที่ 3: หากเป็น SSD ใหม่ที่ยังไม่ได้เริ่มใช้งาน หน้าต่างป๊อปอัปจะปรากฏขึ้นมา พร้อมข้อความ "Initialize Disk"
ขั้นตอนที่ 4: เลือกระหว่าง
MBR (Master Boot Record): เหมาะกับไดรฟ์ที่มีความจุไม่ถึง 2TB และอุปกรณ์แบบเก่า
GPT (GUID Partition Table): แนะนำสำหรับอุปกรณ์สมัยใหม่และไดรฟ์ที่มีความจุมากกว่า 2TB
ขั้นตอนที่ 5: คลิก “OK” เพื่อเริ่มการทำงานของดิสก์
ขั้นตอนที่ 6: หลังจากเริ่มการทำงาน คุณจะเห็นว่า SSD ของคุณเป็น "Unallocated” ให้คลิกขวา แล้วเลือก New Simple Volume
ขั้นตอนที่ 7: ทำตามคำแนะนำบนหน้าจอเพื่อฟอร์แม็ตและกำหนดตัวอักษรระบุไดรฟ์ให้กับ SSD
สำหรับ Mac OS:
ขั้นตอนที่ 1: ยืนยันว่าเชื่อมต่อไดรฟ์ถูกต้องแล้ว จากนั้นเปิดเครื่องและบู๊ตเครื่องเข้าสู่ Mac OS
ขั้นตอนที่ 2: เปิด Disk Utility (โดยใช้ Spotlight ร่วมกับปุ่ม Cmd + Space จากนั้นพิมพ์ "Disk Utility")
ขั้นตอนที่ 3: เลือก SSD ของคุณจากแผงทางซ้ายมือ
ขั้นตอนที่ 4: คลิก Erase
ขั้นตอนที่ 5: ตั้งชื่อไดรฟ์ จากนั้นเลือกตัวเลือกต่อไปนี้ใต้ Format
APFS หากเป็น Mac รุ่นเก่าและ SSD
Mac OS Extended (Journaled) หากเป็นอุปกรณ์รุ่นเก่าหรือ HDD
ขั้นตอนที่ 6: คลิก Erase หลังจากนั้น SSD ก็จะพร้อมใช้งาน
สำหรับ Linux:
ขั้นตอนที่ 1: ยืนยันว่าเชื่อมต่อไดรฟ์ถูกต้องแล้ว จากนั้นเปิดเครื่องและบู๊ตเครื่องเข้าสู่ Linux
ขั้นตอนที่ 2: เปิดเทอร์มินัล
ขั้นตอนที่ 3: ป้อนคำสั่ง sudo fdisk -l เพื่อแสดงไดรฟ์ทั้งหมดที่เชื่อมต่ออยู่ มองหา SSD ของคุณจากขนาดของไดรฟ์ แล้วจดชื่อของไดรฟ์ไว้ เช่น /dev/sdb
ขั้นตอนที่ 4: เริ่มการทำงานของไดรฟ์โดยใช้คำสั่ง fdisk หรือ parted ต่อไปนี้คือคำแนะนำเบื้องต้นในการใช้คำสั่ง fdisk:
ป้อน sudo fdisk /dev/sdb (แทนที่ /dev/sdb ด้วยชื่อไดรฟ์ SSD ของคุณ)
กด g เพื่อสร้างตารางพาร์ติชัน GPT ใหม่
กด n เพื่อสร้างตารางพาร์ติชันใหม่ ทำตามคำแนะนำบนหน้าจอเพื่อระบุขนาดและประเภทไดรฟ์
กด w เพื่อเขียนการเปลี่ยนแปลง
ขั้นตอนที่ 5: กำหนดรูปแบบพาร์ติชันใหม่บน SSD (เช่น /dev/sdb1) คุณสามารถกำหนดรูปแบบเป็นระบบไฟล์ที่ต้องการดังต่อไปนี้:
สำหรับ ext4: sudo mkfs.ext4 /dev/sdb1
สำหรับ ext3: sudo mkfs.ext3 /dev/sdb1
สำหรับ FAT32: sudo mkfs.vfat /dev/sdb1
ขั้นตอนที่ 6: ติดตั้งใช้งาน SSD:
สร้างจุดติดตั้งใช้งาน: sudo mkdir /mnt/myssd
ติดตั้งใช้งาน SSD: sudo mount /dev/sdb1 /mnt/myssd
อย่าลืมแทนที่ /dev/sdb1 ด้วยชื่อพาร์ติชันของ SSD
FAQ: KSD-012010-001-15